Microsoft Azure- Building and running a MEAN-based application in Azure
Last Updated :
12 Dec, 2023
MEAN stack refers to the technology stack that is often used together to build web applications, and is an abbreviation that stands for:
- M: MongoDB – A NoSQL Database.
- E: ExpressJS – A web server framework for Node.js, based on JavaScript.
- A: Angular – A frontend framework, based on JavaScript.
- N: NodeJS – A server side runtime environment based on JavaScript.
All the technologies used in MEAN Stack are open source.
Significance of Hosting a MEAN Stack App on Azure
Hosting a web application on Azure can have many benefits such as:
- Scalability: By making use of Azure’s various services such as AKS and VMs, you can easily scale your application.
- Reliability: Hosting applications on Azure means that your application will face minimal downtime.
- Integrated Services: Azure’s offerings include services such as CosmosDB, Azure Functions, Azure Web Apps etc. which makes it tremendously easy to deploy applications based on a variety of technologies such as MEAN Stack.
- Monitoring: Azure’s Monitoring Dashboard allows you to keep track of your application’s uptime, health, cost of running etc.
- Cost-effectiveness: Azure offers a variety of payment options such as a pay-as-you-go model which makes it a good choice for hosting MEAN Stack Applications.
Benefits of using MEAN Stack
- JavaScript Based: The whole MEAN Stack is JavaScript based from frontend to the backend. That makes app development efficient.
- Open-source: All the technologies used in this stack are open source and hence it could be used for free without the hassle of any licences.
- Well Documented: Since it is a very popular tech stack for app development, resources(including official documentation and community resources) are easily available.
- Good Community Support: MEAN Stack being open source and a very popular technology stack for development of applications, has a very active community of developers.
- Scalability: A very scalable database is MongoDB. Node.js is designed to facilitate the creation of scalable apps as well.
- Security: All the technologies being open source, contributes to MEAN Stack having improved security.
Steps for Building and Running a MEAN-based application in Azure
Step 1: Creating a Virtual Machine.
To run the application, we create a Virtual Machine in Azure.
Here, we create an Ubuntu Linux VM, which can be deployed on Azure for Free.
- Click on the icon on immediate right of search bar to open the Cloud Shell.
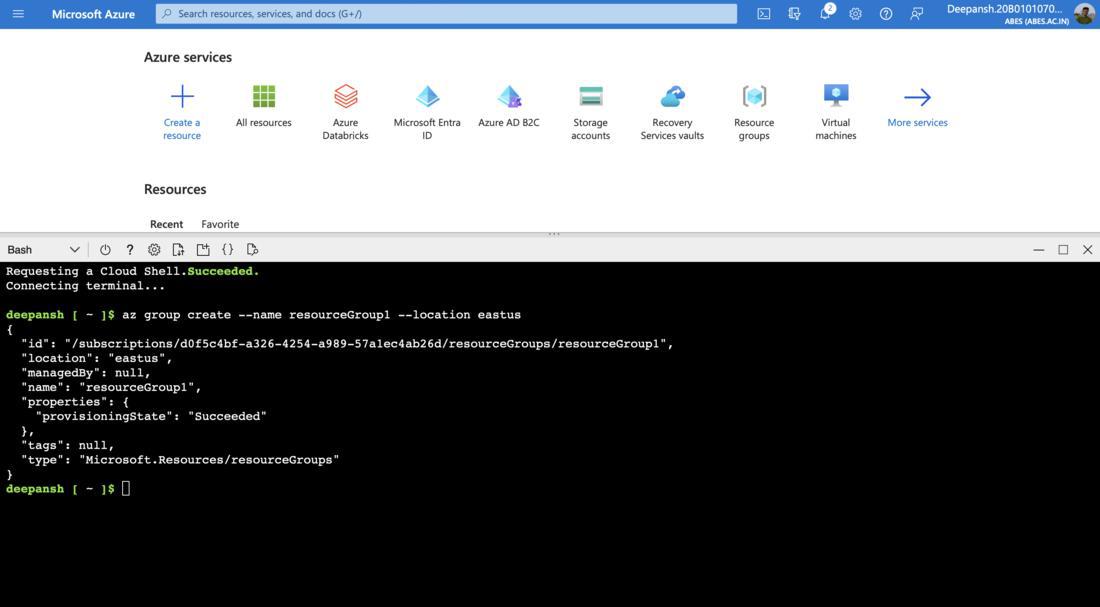
- Create a Resource Group to contain the Virtual Machine.
az group create --name [resource-group-name] --location [resource-group-location]
- Create an Ubuntu Virtual Machine using the following command in Cloud Shell.
az vm create --resource-group [resource-group-name] --name [create-VM-name] --image Canonical:0001-com-ubuntu-server-focal:20_04-lts:latest --admin-username [create-user-name] --generate-ssh-keys
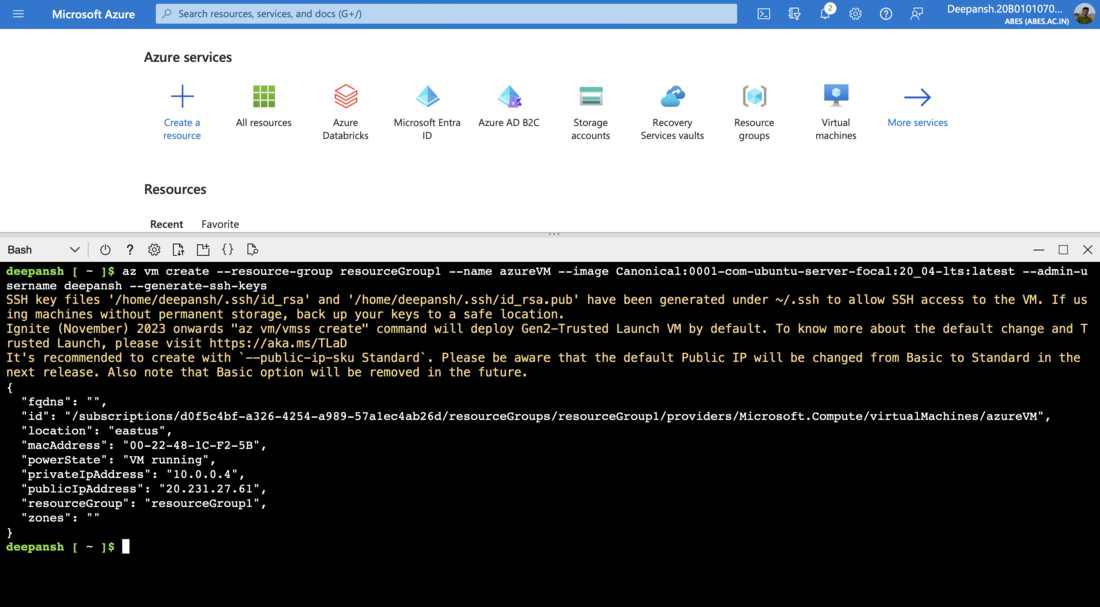
Note: The output will show publicIpAddress of your VM, save this somewhere to be used later.
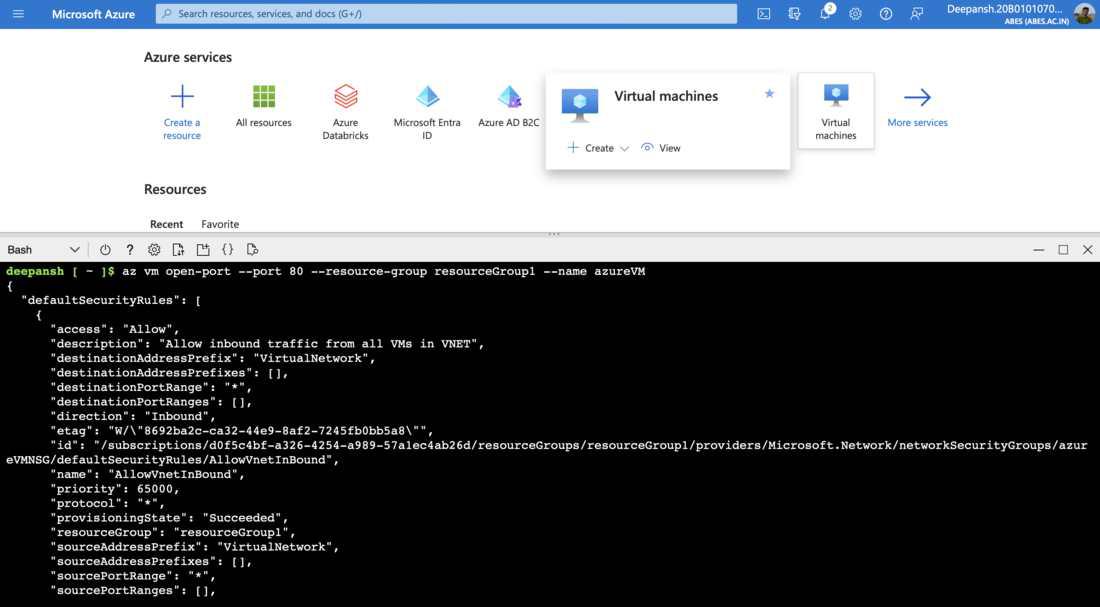
- Open Port 80 on the recently created VM.
The port needs to be open so that we can allow the incoming HTTP traffic to our to be created Web App.
Use the following command in Cloud Shell
az vm open-port --port 80 --resource-group [resource-group-name] --name [your-VM-name]
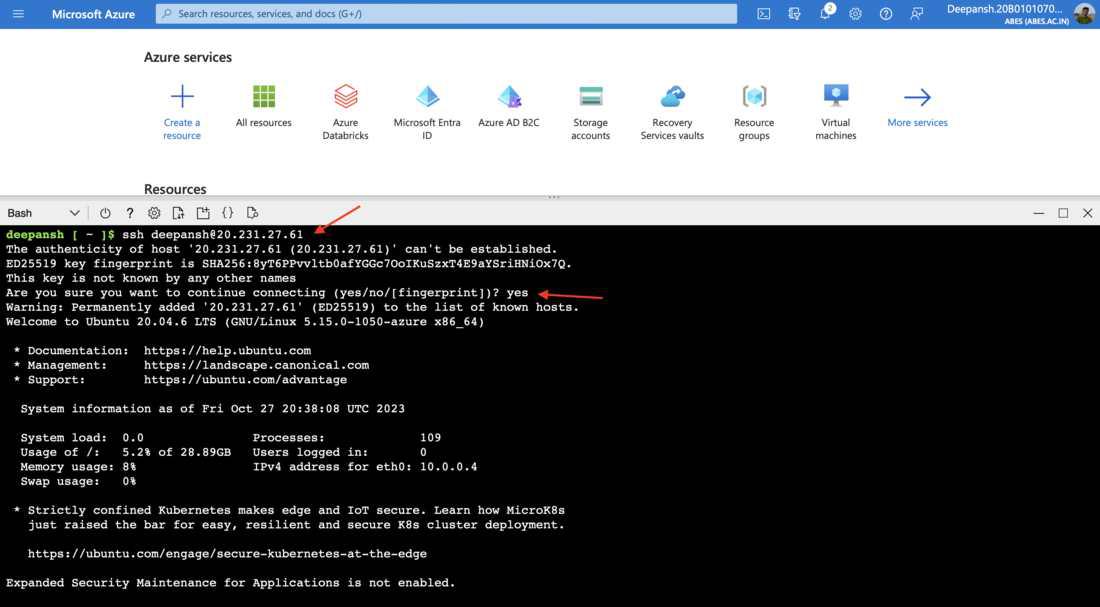
- Create a SSH connection.
We create a SSH connection to the VM so that we can access the command prompt of VM remotely.
ssh [username-you-chose]@[publicIP-of-VM]
When prompted, type Yes.
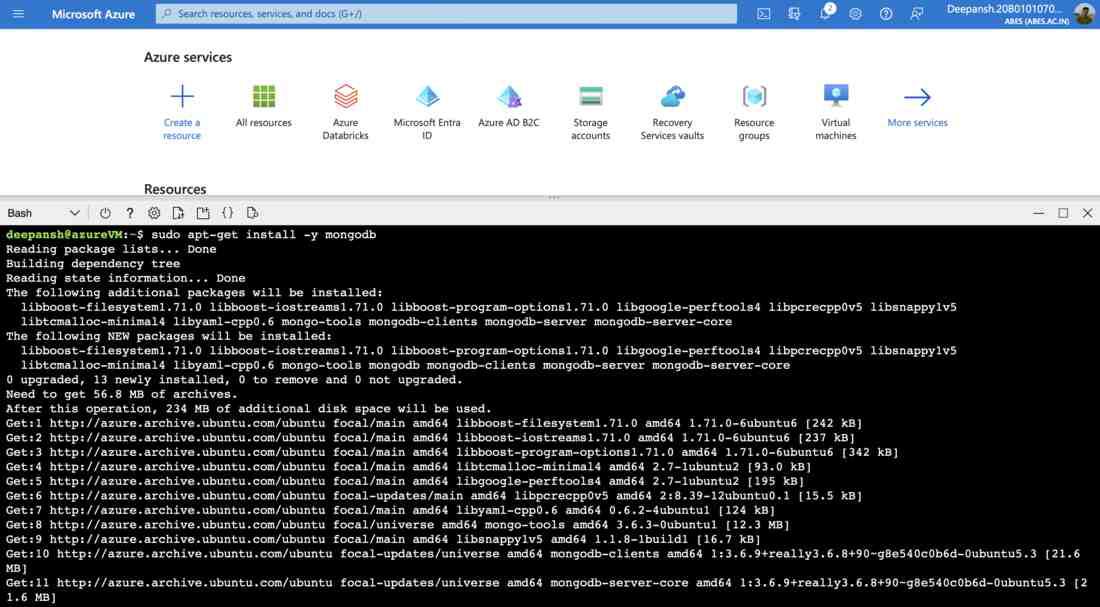
Step 2: MongoDB installation.
- We upgrade all of the current packages first.
sudo apt update && sudo apt upgrade -y
- Install MongoDB using given command
sudo apt install -y mongodb
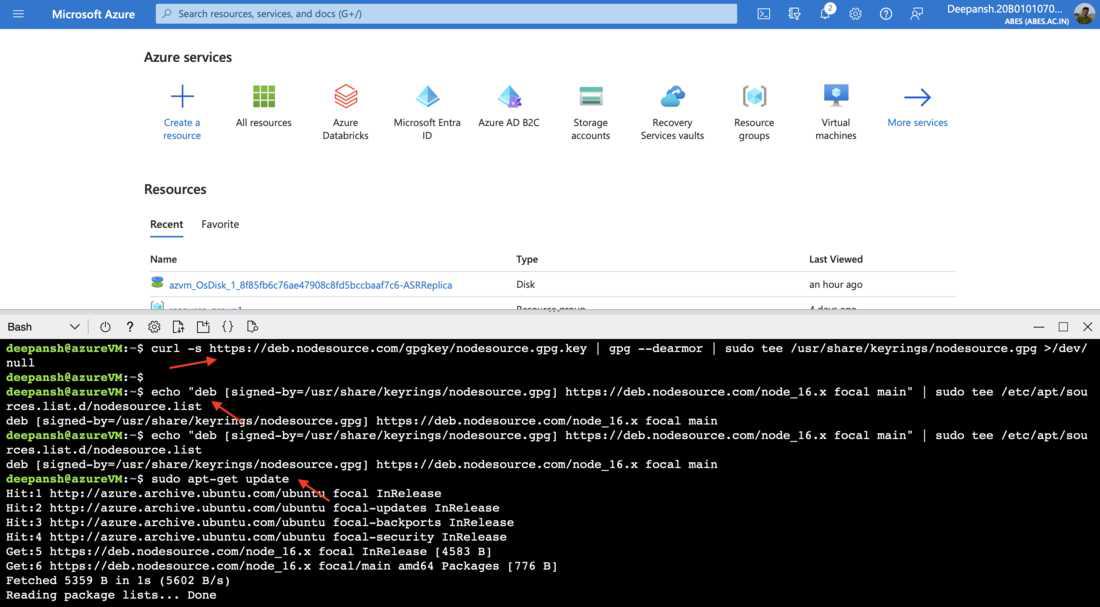
Step 3: Node.js Installation.
- To install Node.js, start by adding the NodeSource GPG key:
curl -s https://deb.nodesource.com/gpgkey/nodesource.gpg.key | gpg --dearmor | sudo tee /usr/share/keyrings/nodesource.gpg >/dev/null
VERSIOn = 20
- Include the Node.js repository and update the system packages:
echo "deb [signed-by=/usr/share/keyrings/nodesource.gpg] https://deb.nodesource.com/node_$VERSION.x focal main" | sudo tee /etc/apt/sources.list.d/nodesource.list
- Refresh System Package List and Update Repository Information:
sudo apt update
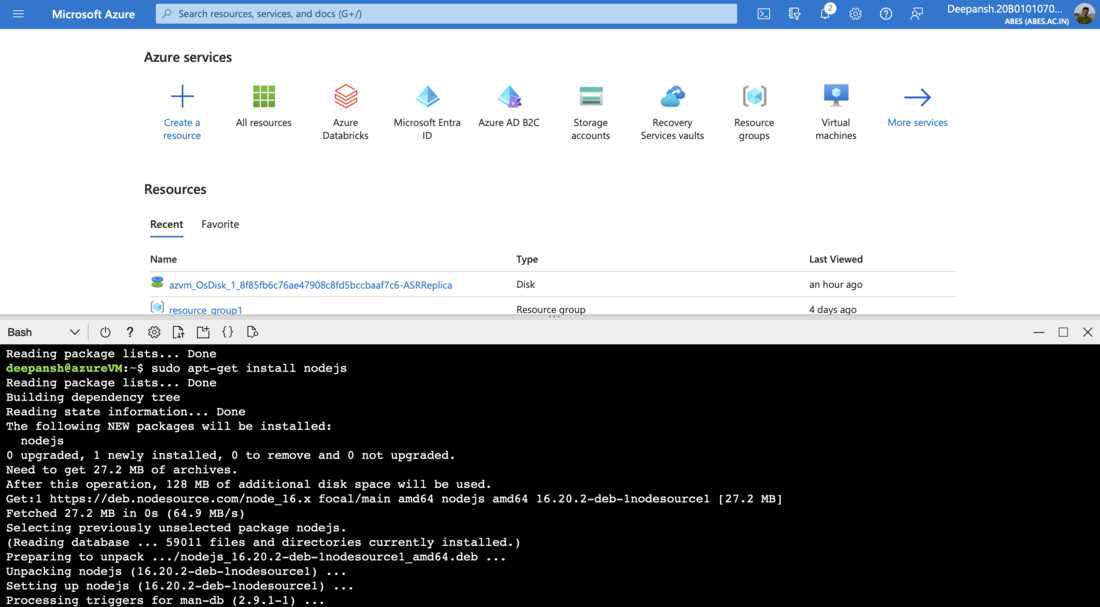
- And now, use the package manager to install Node.js:
sudo apt install nodejs
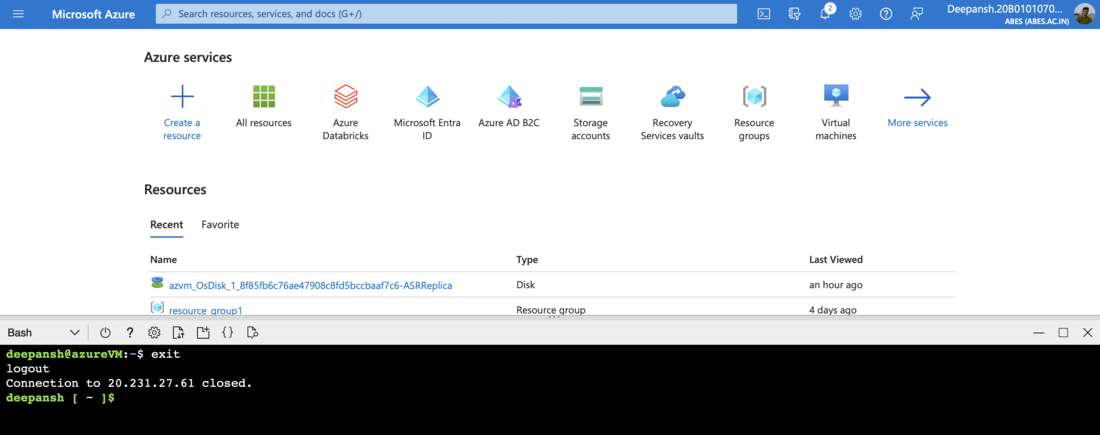
Step 4: Exit your SSH Session.
Now, that we have installed MongoDB and Node.js on our Linux VM, we can terminate the SSH Session using the command:
exit
Step 5: Creating a Web Application.
In this step, we will create a very basic application using Azure Cloud Shell.
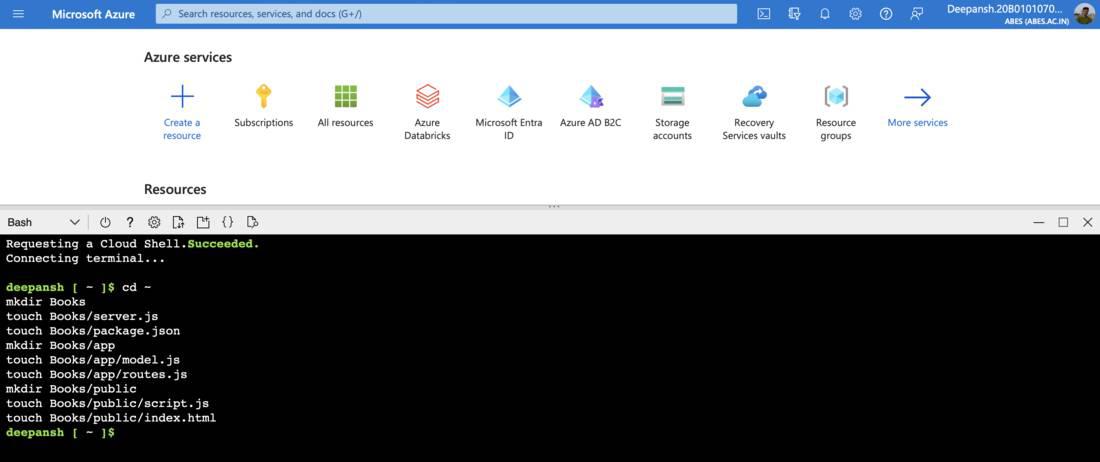
Create the Files
- Creating the files and folders of the Application.
C
cd ~
mkdir Books
touch Books/server.js
touch Books/package.json
mkdir Books/app
touch Books/app/model.js
touch Books/app/routes.js
mkdir Books/public
touch Books/public/script.js
touch Books/public/index.html
|
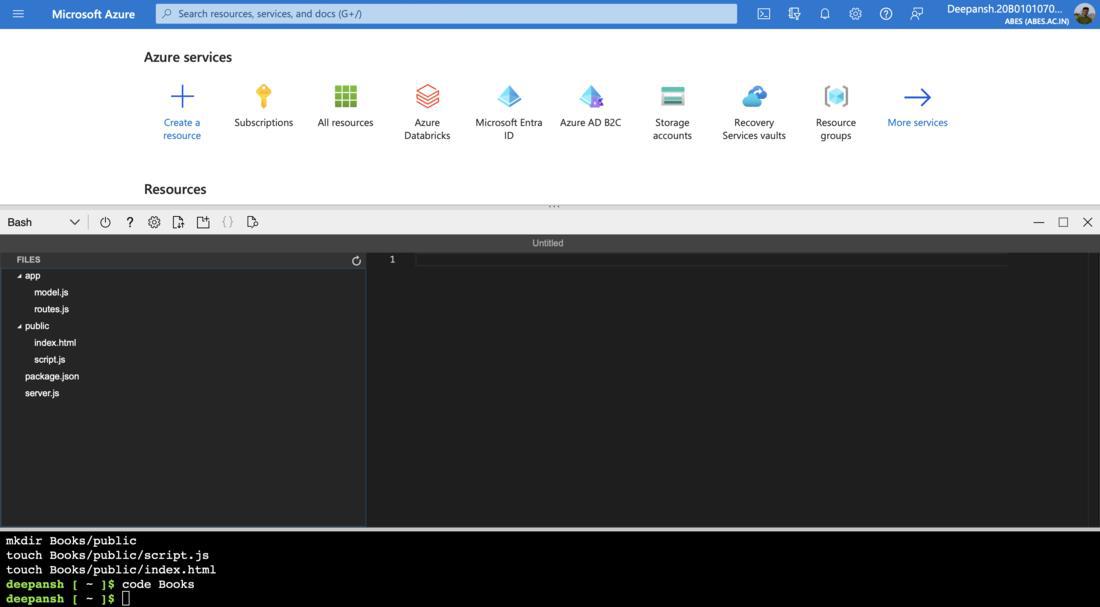
- Open the recently created files in Cloud Shell.
code Books
Create the Data Model
- Open the model.js file inside the app folder.
- Paste the following code inside that file.
Javascript
var mongoose = require('mongoose');
mongoose.connect(dbHost, { useNewUrlParser: true });
mongoose.connection;
mongoose.set('debug', true);
var bookSchema = mongoose.Schema({
name: String,
isbn: { type: String, index: true },
author: String,
pages: Number
});
bookSchema.index({ isbn: 1 }, { background: true });
var Book = mongoose.model('Book', bookSchema);
module.exports = Book;
|

- Note: Save using,
- ctrl+S for Windows/Linux
- cmd+S for MacOS
Creating Express.js routes to handle HTTP requests
- After you have saved the code inside model.js file, open the routes.js file present in the same directory(which is app).
- Paste this code inside the file and save it.
Javascript
var path = require('path');
var Book = require('./model');
var routes = function(app) {
app.get('/book', function(req, res) {
Book.find({}, function(err, result) {
if ( err ) throw err;
res.json(result);
});
});
app.post('/book', function(req, res) {
var book = new Book( {
name:req.body.name,
isbn:req.body.isbn,
author:req.body.author,
pages:req.body.pages
});
book.save(function(err, result) {
if ( err ) throw err;
res.json( {
message:"Successfully added book",
book:result
});
});
});
app.delete("/book/:isbn", function(req, res) {
Book.findOneAndRemove(req.query, function(err, result) {
if ( err ) throw err;
res.json( {
message: "Successfully deleted the book",
book: result
});
});
});
app.get('*', function(req, res) {
res.sendFile(path.join(__dirname + '/public', 'index.html'));
});
};
module.exports = routes;
|
Creating client-side Application in Javascript
- Open the script.js file inside the public directory.
- Paste the following code inside the file and Save it.
Javascript
var app = angular.module('myApp', []);
app.controller('myCtrl', function($scope, $http) {
var getData = function() {
return $http( {
method: 'GET',
url: '/book'
}).then(function successCallback(response) {
$scope.books = response.data;
}, function errorCallback(response) {
console.log('Error: ' + response);
});
};
getData();
$scope.del_book = function(book) {
$http( {
method: 'DELETE',
url: '/book/:isbn',
params: {'isbn': book.isbn}
}).then(function successCallback(response) {
console.log(response);
return getData();
}, function errorCallback(response) {
console.log('Error: ' + response);
});
};
$scope.add_book = function() {
var body = '{ "name": "' + $scope.Name +
'", "isbn": "' + $scope.Isbn +
'", "author": "' + $scope.Author +
'", "pages": "' + $scope.Pages + '" }';
$http({
method: 'POST',
url: '/book',
data: body
}).then(function successCallback(response) {
console.log(response);
return getData();
}, function errorCallback(response) {
console.log('Error: ' + response);
});
};
});
|
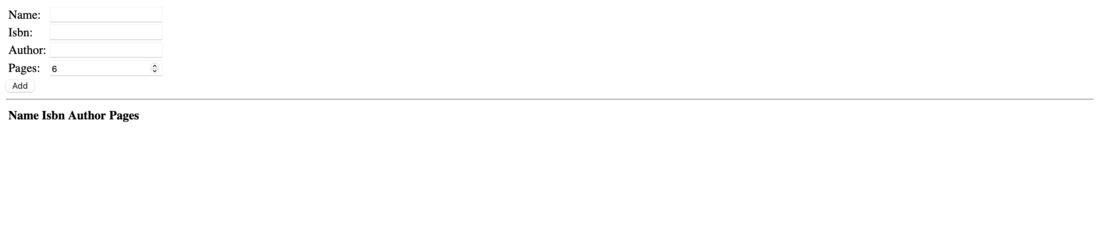
Creating the User Interface
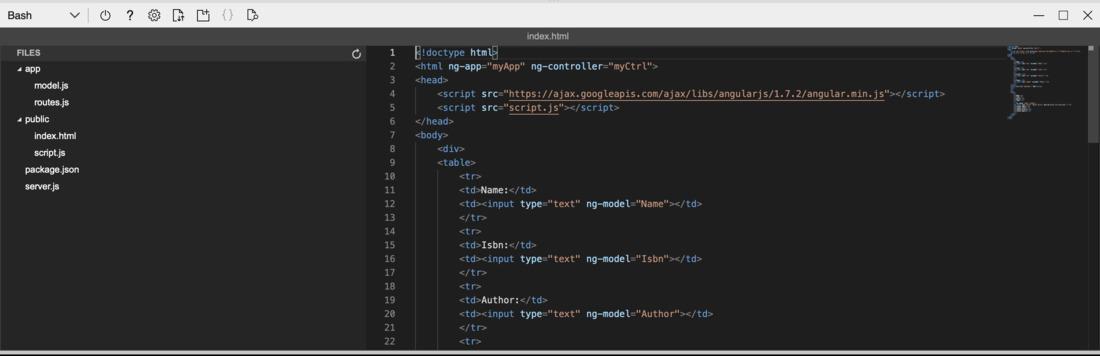
- Paste the following code into the index.html file located inside the public folder.
Javascript
<!doctype html>
<html ng-app="myApp" ng-controller="myCtrl">
<head>
<script src="script.js"></script>
</head>
<body>
<div>
<table>
<tr>
<td>Name:</td>
<td><input type="text" ng-model="Name"></td>
</tr>
<tr>
<td>Isbn:</td>
<td><input type="text" ng-model="Isbn"></td>
</tr>
<tr>
<td>Author:</td>
<td><input type="text" ng-model="Author"></td>
</tr>
<tr>
<td>Pages:</td>
<td><input type="number" ng-model="Pages"></td>
</tr>
</table>
<button ng-click="add_book()">Add</button>
</div>
<hr>
<div>
<table>
<tr>
<th>Name</th>
<th>Isbn</th>
<th>Author</th>
<th>Pages</th>
</tr>
<tr ng-repeat="book in books">
<td><input type="button" value="Delete" data-ng-click="del_book(book)"></td>
<td>{{book.name}}</td>
<td>{{book.isbn}}</td>
<td>{{book.author}}</td>
<td>{{book.pages}}</td>
</tr>
</table>
</div>
</body>
</html>
|
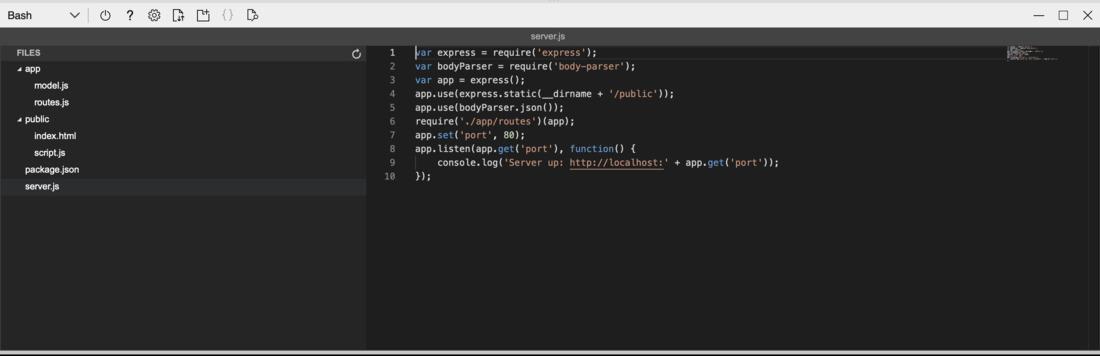
Creating the Express.js Server
- Open the server.js file inside the home directory and paste the given code.
Javascript
var express = require('express');
var bodyParser = require('body-parser');
var app = express();
app.use(express.static(__dirname + '/public'));
app.use(bodyParser.json());
var Book = require('./app/model');
Book.init().then(() => {
console.log("Indexes created");
}).catch(err => {
console.error("Error creating indexes:", err);
});
require('./app/routes')(app);
app.set('port', 80);
app.listen(app.get('port'), function() {
});
|
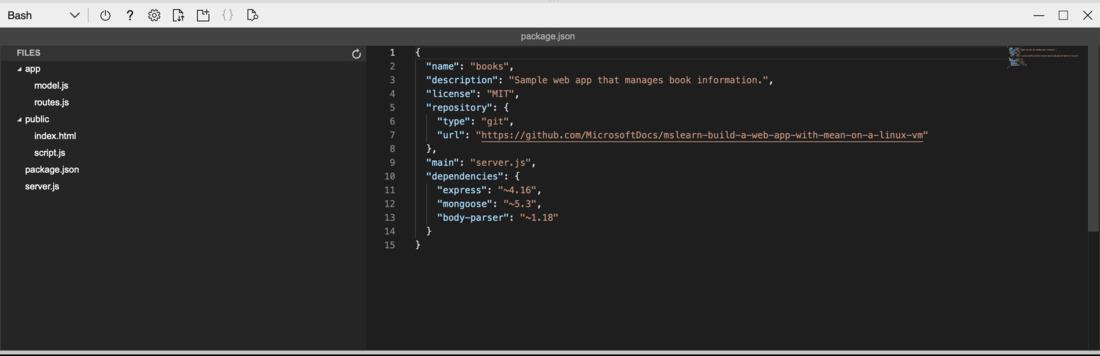
Defining Dependencies
The details about the Application such as its name, description and what all Node.js dependencies are required are provided in package.json file.
- Open the package.json file inside the home directory and paste the code given below inside the file.
Javascript
{
"name": "books",
"description": "Sample web app that manages book information.",
"license": "MIT",
"repository": {
"type": "git",
},
"main": "server.js",
"dependencies": {
"express": "~4.18",
"mongoose": "~7.6",
"body-parser": "~1.20"
}
}
|
- Save the code and then proceed.
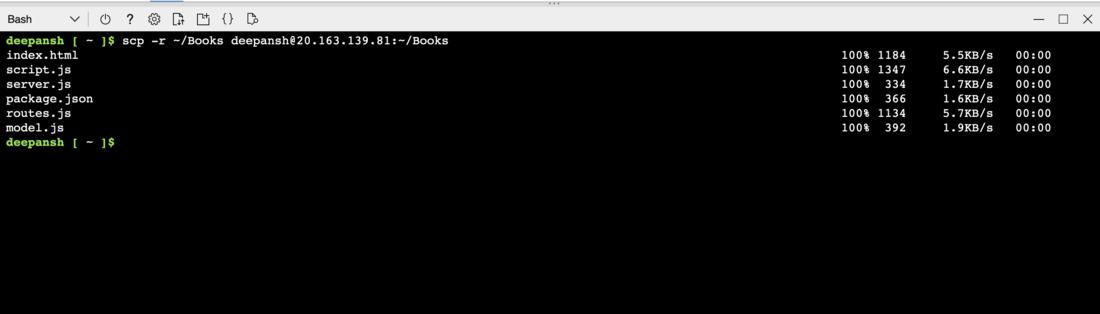
Step 6: Copying files to VM.
Now that we have created the whole application inside the Cloud Shell, we will copy the whole ~/books directory to our Virtual Machine.
- Use this command inside the Cloud Shell
scp -r ~/Books [your-username]@[ipAddress-of-your-VM]:~/Books
ssh [VM_username]@$[Public_IpAddress_of_VM]
- Navigate to ~/Books directory
cd ~/Books
- Run the given command to install the dependencies:
sudo apt install npm -y && npm install
npm install express
Step 7: Running the Application
- Navigate to ~/Books directory and run the command
sudo node server.js
This will start the application
- Open a new tab and paste the Public IpAddress of your VM. Press Enter.
- You will see the application running. Here, we have created a Book Database.
Basic Troubleshooting
- I get the error ‘You have no storage mounted’ while trying to open CLI.’
This means that you don’t have any Storage Account created, which is a necessity for Azure Cloud Shell.
- Click on Create Storage option when you get this error message.
- Create a Storage Account manually by clicking on Add a Resource option on home screen.
- I get the error ‘The following packages have unmet dependencies.’
There can be two reasons for this:
1. You have missing dependencies or,
2. The packages present on your system are outdated.
In either case, your error can most probably be resolved by upgrading the packages.
Javascript
sudo apt update && sudo apt upgrade -y
|
- I get the SCRIPT DEPRECATION WARNING warning while trying to install Node.js
It means that the script you are using to install Node.js is deprecated and will become inactive soon.
Visit https://deb.nodesource.com to get the right script to install Node.js
- I get this pop-up when I use ctrl+S or cmd+S command. Should I save a new file?
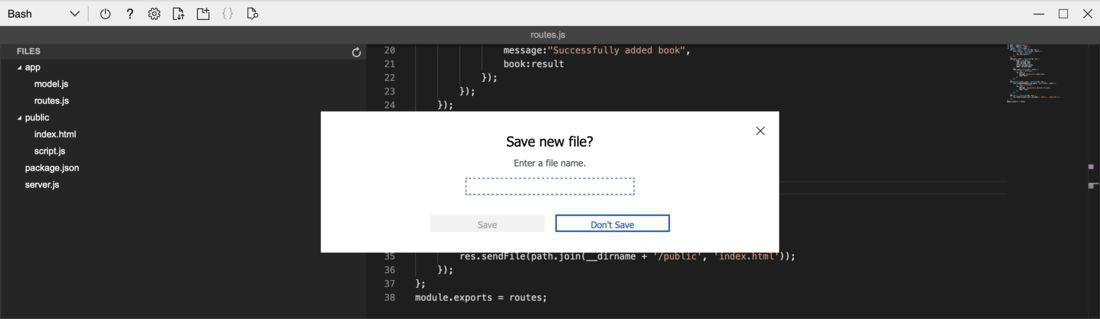
No, you have already created the file where you have pasted the code. After using the ctrl+S/ cmd+S command, click on ‘X’ button is prompted to enter a file name.
FAQs On Building and running a MEAN-based application in Azure
1. When should I not use MEAN stack for building my application?
If the data is structured then use a relational database (eg. MySQL) instead.
If the app built by you uses a language other than JavaScript(such as PHP, Python or Perl.) then you may use any other technology stack.
2 .Why did we use ‘–generate-ssh-keys’?
This command is used to create SSH(Secure Shell) Key Pairs automatically on Azure. This enables the use of SSH based authentications without the manually generating or uploading keys.
3. How to see if MongoDB is running on my VM or not?
You can use the command,
sudo systemctl status mongodb
4. What versions of MongoDB and Node.js got installed on my VM?
Check the versions using the following commands in command line:
mongod –version
node –version
5.What is Mongoose and why do we need to use it?
Mongoose is simply an Object Data Modelling library, based on Javascript. Mongoose is basically used to create a connection between Node.js and MongoDB.
6.Where am I supposed to install MongoDB and Node.js, inside VM or in Azure?
We are building the application to run through our VM and hence we ssh into the VM to install MongoDB and NodeJS inside the Virtual Machine.
Please Login to comment...