Open In App

Face and Hand Landmarks Detection using Python – Mediapipe, OpenCV

Last Updated : 10 Jan, 2023
Improve
Improve
Like Article
Like
Save
Share
Report

In this article, we will use mediapipe python library to detect face and hand landmarks. We will be using a Holistic model from mediapipe solutions to detect all the face and hand landmarks. We will be also seeing how we can access different landmarks of the face and hands which can be used for different computer vision applications such as sign language detection, drowsiness detection, etc.

Required Libraries

  • Mediapipe is a cross-platform library developed by Google that provides amazing ready-to-use ML solutions for computer vision tasks.
  • OpenCV library in python is a computer vision library that is widely used for image analysis, image processing, detection, recognition, etc.

Installing required libraries

pip install opencv-python mediapipe msvc-runtime

Below is the step-wise approach for Face and Hand landmarks detection

STEP-1: Import all the necessary libraries, In our case only two libraries are required.

Python3


# Import Libraries
import cv2
import time
import mediapipe as mp


 STEP-2: Initializing Holistic model and Drawing utils for detecting and drawing landmarks on the image.

Python3


# Grabbing the Holistic Model from Mediapipe and
# Initializing the Model
mp_holistic = mp.solutions.holistic
holistic_model = mp_holistic.Holistic(
    min_detection_confidence=0.5,
    min_tracking_confidence=0.5
)
 
# Initializing the drawing utils for drawing the facial landmarks on image
mp_drawing = mp.solutions.drawing_utils


Let us look into the parameters for the Holistic Model:

Holistic(
  static_image_mode=False, 
  model_complexity=1, 
  smooth_landmarks=True, 
  min_detection_confidence=0.5, 
  min_tracking_confidence=0.5
)
  • static_image_mode: It is used to specify whether the input images must be treated as static images or as a video stream. The default value is False.
  • model_complexity: It is used to specify the complexity of the pose landmark model: 0, 1, or 2. As the model complexity of the model increases the landmark accuracy and latency increase. The default value is 1.
  • smooth_landmarks: This parameter is used to reduce the jitter in the prediction by filtering pose landmarks across different input images. The default value is True.
  • min_detection_confidence: It is used to specify the minimum confidence value with which the detection from the person-detection model needs to be considered as successful. Can specify a value in [0.0,1.0]. The default value is 0.5.
  • min_tracking_confidence: It is used to specify the minimum confidence value with which the detection from the landmark-tracking model must be considered as successful. Can specify a value in [0.0,1.0]. The default value is 0.5.

STEP-3: Detecting Face and Hand landmarks from the image. Holistic model processes the image and produces landmarks for Face, Left Hand, Right Hand and also detects the Pose of the 

  1. Capture the frames continuously from the camera using OpenCV.
  2. Convert the BGR image to an RGB image and make predictions using initialized holistic model.
  3. The predictions made by the holistic model are saved in the results variable from which we can access the landmarks using results.face_landmarks, results.right_hand_landmarks, results.left_hand_landmarks respectively.
  4. Draw the detected landmarks on the image using the draw_landmarks function from drawing utils.
  5. Display the resulting Image.

Python3


# (0) in VideoCapture is used to connect to your computer's default camera
capture = cv2.VideoCapture(0)
 
# Initializing current time and precious time for calculating the FPS
previousTime = 0
currentTime = 0
 
while capture.isOpened():
    # capture frame by frame
    ret, frame = capture.read()
 
    # resizing the frame for better view
    frame = cv2.resize(frame, (800, 600))
 
    # Converting the from BGR to RGB
    image = cv2.cvtColor(frame, cv2.COLOR_BGR2RGB)
 
    # Making predictions using holistic model
    # To improve performance, optionally mark the image as not writeable to
    # pass by reference.
    image.flags.writeable = False
    results = holistic_model.process(image)
    image.flags.writeable = True
 
    # Converting back the RGB image to BGR
    image = cv2.cvtColor(image, cv2.COLOR_RGB2BGR)
 
    # Drawing the Facial Landmarks
    mp_drawing.draw_landmarks(
      image,
      results.face_landmarks,
      mp_holistic.FACEMESH_CONTOURS,
      mp_drawing.DrawingSpec(
        color=(255,0,255),
        thickness=1,
        circle_radius=1
      ),
      mp_drawing.DrawingSpec(
        color=(0,255,255),
        thickness=1,
        circle_radius=1
      )
    )
 
    # Drawing Right hand Land Marks
    mp_drawing.draw_landmarks(
      image,
      results.right_hand_landmarks,
      mp_holistic.HAND_CONNECTIONS
    )
 
    # Drawing Left hand Land Marks
    mp_drawing.draw_landmarks(
      image,
      results.left_hand_landmarks,
      mp_holistic.HAND_CONNECTIONS
    )
     
    # Calculating the FPS
    currentTime = time.time()
    fps = 1 / (currentTime-previousTime)
    previousTime = currentTime
     
    # Displaying FPS on the image
    cv2.putText(image, str(int(fps))+" FPS", (10, 70), cv2.FONT_HERSHEY_COMPLEX, 1, (0,255,0), 2)
 
    # Display the resulting image
    cv2.imshow("Facial and Hand Landmarks", image)
 
    # Enter key 'q' to break the loop
    if cv2.waitKey(5) & 0xFF == ord('q'):
        break
 
# When all the process is done
# Release the capture and destroy all windows
capture.release()
cv2.destroyAllWindows()


The holistic model produces 468 Face landmarks, 21 Left-Hand landmarks, and 21 Right-Hand landmarks. The individual landmarks can be accessed by specifying the index of the required landmark. Example: results.left_hand_landmarks.landmark[0]. You can get the index of all the individual landmarks using the below code:

Python3


# Code to access landmarks
for landmark in mp_holistic.HandLandmark:
    print(landmark, landmark.value)
 
print(mp_holistic.HandLandmark.WRIST.value)


HandLandmark.WRIST 0
HandLandmark.THUMB_CMC 1
HandLandmark.THUMB_MCP 2
HandLandmark.THUMB_IP 3
HandLandmark.THUMB_TIP 4
HandLandmark.INDEX_FINGER_MCP 5
HandLandmark.INDEX_FINGER_PIP 6
HandLandmark.INDEX_FINGER_DIP 7
HandLandmark.INDEX_FINGER_TIP 8
HandLandmark.MIDDLE_FINGER_MCP 9
HandLandmark.MIDDLE_FINGER_PIP 10
HandLandmark.MIDDLE_FINGER_DIP 11
HandLandmark.MIDDLE_FINGER_TIP 12
HandLandmark.RING_FINGER_MCP 13
HandLandmark.RING_FINGER_PIP 14
HandLandmark.RING_FINGER_DIP 15
HandLandmark.RING_FINGER_TIP 16
HandLandmark.PINKY_MCP 17
HandLandmark.PINKY_PIP 18
HandLandmark.PINKY_DIP 19
HandLandmark.PINKY_TIP 20
0

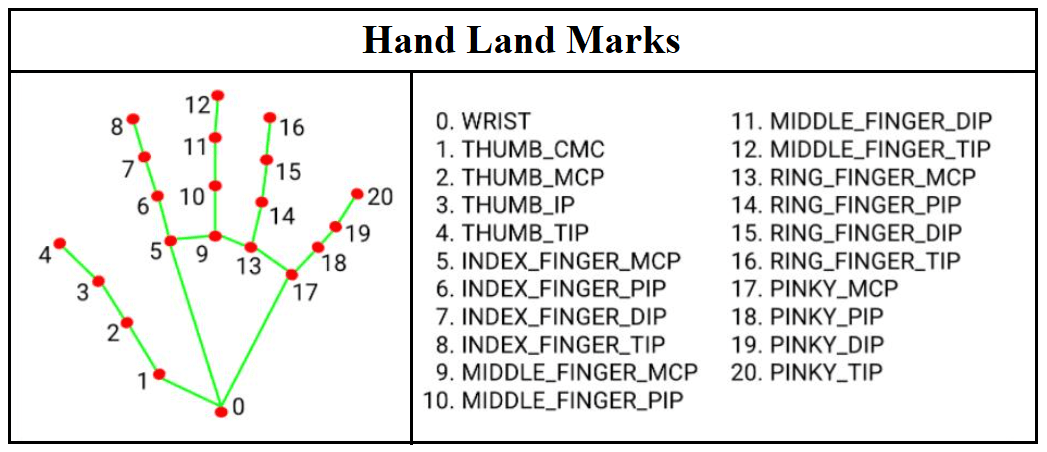
Hand Landmarks and their Indices

OUTPUT: 


Previous Article
Next Article

Similar Reads

Python - Facial and hand recognition using MediaPipe Holistic
What is MediaPipe: Object Detection is one of the leading and most popular use cases in the domain of computer vision. Several object detection models are used worldwide for their particular use case applications. Many of these models have been used as an independent solution to a single computer vision task with its own fixed application. Combinin
4 min read
Face detection using Cascade Classifier using OpenCV-Python
In this article, we are going to see how to detect faces using a cascade classifier in OpenCV Python. Face detection has much significance in different fields of today's world. It is a significant step in several applications, face recognition (also used as biometrics), photography (for auto-focus on the face), face analysis (age, gender, emotion r
4 min read
Opencv Python program for Face Detection
The objective of the program given is to detect object of interest(face) in real time and to keep tracking of the same object.This is a simple example of how to detect face in Python. You can try to use training samples of any other object of your choice to be detected by training the classifier on required objects. Here is the steps to download th
2 min read
Real-Time Edge Detection using OpenCV in Python | Canny edge detection method
Edge detection is one of the fundamental image-processing tasks used in various Computer Vision tasks to identify the boundary or sharp changes in the pixel intensity. It plays a crucial role in object detection, image segmentation and feature extraction from the image. In Real-time edge detection, the image frame coming from a live webcam or video
5 min read
Python | Corner detection with Harris Corner Detection method using OpenCV
Harris Corner detection algorithm was developed to identify the internal corners of an image. The corners of an image are basically identified as the regions in which there are variations in large intensity of the gradient in all possible dimensions and directions. Corners extracted can be a part of the image features, which can be matched with fea
2 min read
Python | Corner Detection with Shi-Tomasi Corner Detection Method using OpenCV
What is a Corner? A corner can be interpreted as the junction of two edges (where an edge is a sudden change in image brightness). Shi-Tomasi Corner Detection - Shi-Tomasi Corner Detection was published by J.Shi and C.Tomasi in their paper 'Good Features to Track'. Here the basic intuition is that corners can be detected by looking for significant
3 min read
Python - Face detection and sending notification
Nowadays python has become one of the most popular languages as well as favorite programming language among developers. The simplified syntax and pattern of this language make the presence of this language in the trending list. The biggest strength of Python is a huge collection of standard library which can be used for the following: Machine Learn
4 min read
Determine The Face Tilt Using OpenCV - Python
In this article, we are going to see how to determine the face tilt using OpenCV in Python. To achieve this we will be using a popular computer vision library opencv-python. In this program with the help of the OpenCV library, we will detect faces in a live stream from a webcam or a video file and subsequently also determine the angle by how much t
4 min read
How to create a Face Detection Android App using Machine Learning KIT on Firebase
Pre-requisites: Firebase Machine Learning kitAdding Firebase to Android App Firebase ML KIT aims to make machine learning more accessible, by providing a range of pre-trained models that can use in the iOS and Android apps. Let's use ML Kit’s Face Detection API which will identify faces in photos. By the end of this article, we’ll have an app that
8 min read
Face Detection in Flutter using Firebase ML Kit
Face detection is a technique by which we can locate the human faces in the image given. Face detection is used in many places nowadays, especially websites hosting images like Picasa, Photobucket, and Facebook. The automatic tagging feature adds a new dimension to sharing pictures among the people who are in the picture and also gives the idea to
5 min read