Age Detection using Deep Learning in OpenCV
Last Updated :
03 Jan, 2023
In this tutorial, we are going to see the entire process of creating an Age predictor and Gender classifier project using OpenCV.
Age Detection
Our goal here is to create a program that will predict the gender and age of the person using an image. But predicting age might not be as simple as you think, why? You might be thinking that age prediction is a regression problem, right? And you would be right in thinking so. However, there are many uncertainties that researchers have faced when they treated this as a regression problem, like camera quality, brightness, climate condition, background, etc.
What’s the solution?
The solution to this problem is quite simple, instead of predicting an exact image, let’s classify the age into a specific range like 0-6,18-25, etc. And that’s what researchers did and found that the results were amazing and the accuracy rose up by a lot in real-world scenarios.
Now that we have clarity of our problem, let’s go ahead and start creating our program.
Workflow:
Downloading the Required Files
We’re going to use pre-trained models for age prediction because our main focus is how to implement the age predictor using OpenCV, using these models.
You can download all the files required here.
Building the Main Program
I have broken down the main program into 5 steps to make it easier to understand then at the end I have written the code for the entire program that you can try and run yourself.
Step 1: Creating the Image Instance
Here we’re going to use the OpenCV package to instantiate an object for the input image, if you don’t understand this, then you should first read about how to read/capture a video in OpenCV here.
And now that we’ve our input image, the next step is to instantiate our models.
Step 2: Create DNNs Using the Models
In OpenCV, we create a DNN – deep neural network to load a pre-trained model and pass it to the model files.
We first create variables to store the file paths of the model files, and then define model variables – these differ from model to model, and I have taken these values for the Caffe model that we’re using.
#———-Model File Paths—————-#
ageProto=”Models/age_deploy.prototxt”
ageModel=”Models/age_net.caffemodel”
#———–Model Variables—————#
mean =(78.4263377603, 87.7689143744, 114.895847746) # these are taken from the official site
ageList=[‘(0-2)’, ‘(4-6)’, ‘(8-12)’, ‘(15-20)’, ‘(25-32)’, ‘(38-43)’, ‘(48-53)’, ‘(60-100)’]
#————-Creating the DNN————#
age_Net= cv2.dnn.readNet(ageModel,ageProto)
NOTE: This is the procedure/steps you need to follow to use a pre-trained model for computer vision using OpenCV.
Now that we have our models, let’s try and detect faces in the image/video.
Step 3: Face Detection
For this program, I have used the dlib.get_frontal_face_detector() method for face detection for simplicity but you can definitely try using custom models or pre-trained models.
There are a lot of comments to make it easier for you to understand each line of the code.
Step 4: Age Detection
Before we pass the image as an input we have to change it to the required dimensions i.e according to our model’s input layer, right? This is done by blobFromImage() function in OpenCV.
Then this blob is passed as an input to the age detector model.
Step 5: Show The Resulting Image with Detection
Now that we have the predictions, we’ll put them as text and show them in the final output image.
Below is the complete Implementation
Here is the final program code combining all the 5 steps that you can directly run on your computers.
Python3
import cv2
import dlib
import numpy as np
img = cv2.imread('assets/kid1.jpg')
img = cv2.resize(img, (720, 640))
frame = img.copy()
age_weights = "Models/age_deploy.prototxt"
age_config = "Models/age_net.caffemodel"
age_Net = cv2.dnn.readNet(age_config, age_weights)
ageList = ['(0-2)', '(4-6)', '(8-12)', '(15-20)',
'(25-32)', '(38-43)', '(48-53)', '(60-100)']
model_mean = (78.4263377603, 87.7689143744, 114.895847746)
fH = img.shape[0]
fW = img.shape[1]
Boxes = []
mssg = 'Face Detected'
face_detector = dlib.get_frontal_face_detector()
img_gray = cv2.cvtColor(frame, cv2.COLOR_BGR2GRAY)
faces = face_detector(img_gray)
if not faces:
mssg = 'No face detected'
cv2.putText(img, f'{mssg}', (40, 40),
cv2.FONT_HERSHEY_SIMPLEX, 2, (200), 2)
cv2.imshow('Age detected', img)
cv2.waitKey(0)
else:
for face in faces:
x = face.left()
y = face.top()
x2 = face.right()
y2 = face.bottom()
box = [x, y, x2, y2]
Boxes.append(box)
cv2.rectangle(frame, (x, y), (x2, y2),
(00, 200, 200), 2)
for box in Boxes:
face = frame[box[1]:box[3], box[0]:box[2]]
blob = cv2.dnn.blobFromImage(
face, 1.0, (227, 227), model_mean, swapRB=False)
age_Net.setInput(blob)
age_preds = age_Net.forward()
age = ageList[age_preds[0].argmax()]
cv2.putText(frame, f'{mssg}:{age}', (box[0],
box[1] - 10),
cv2.FONT_HERSHEY_SIMPLEX, 0.8,
(0, 255, 255), 2, cv2.LINE_AA)
cv2.imshow("Detecting Age", frame)
cv2.waitKey(0)
|
Output:
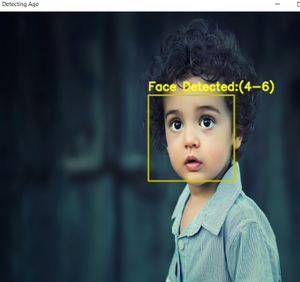
stock image from pexels
Further Improvements/Try it yourself :
- Try editing the code for real-time feed
- Try to use another pre-trained model like YOLO or create your own
- You can also add another model to detect the Liveliness/Emotion of the person
Like Article
Suggest improvement
Share your thoughts in the comments
Please Login to comment...