Connecting Excel to SQLite
Last Updated :
01 Dec, 2022
A tiny, quick, self-contained, highly reliable, fully-featured serverless, zero-configuration, transactional SQL database engine is implemented by SQLite, an in-process C language library. The most popular database engine worldwide is SQLite. The public domain status of SQLite’s source code allows for its use for any purpose, whether they are public or private. All smartphones, the majority of laptops, and many other daily-used programmes include SQLite as standard equipment. The most widely used database in the world, SQLite has more uses than we can count, including some well-known programmes. So let’s first talk about why and How to connect Excel to SQLite.
Why Connect Excel to SQLite?
Numerous accounting software programmes are used by businesses to manage their finances. While some companies utilise commercial accounting or financial software, others develop their own internal systems using programmes like Microsoft Access or Visual Basic. Although the features of accounting applications vary widely, a back-end database is a characteristic that almost all of them employ to index and store data.
The open-source SQLite engine is widely used in custom accounting software to manage data. You might want to export data from your business accounting tool for use in Microsoft Excel analysis if it connects to an SQLite database. You can use Excel’s built-in features to retrieve data if the application lacks built-in control to export it and make spreadsheets.
How to Connect Excel to SQLite?
- On the Ch-Werner.de website, download the SQLite ODBC driver. Get it installed and make sure whether this is done properly or not on your PC.
- Launch Excel from Microsoft. Open the worksheet you wish to add data from the SQLite database to or create a new one if necessary.
- On the Excel ribbon menu, select “Data.” Over the “Get External Data” section label, click the “From Other Sources” button. When the drop-down selection appears, select “From Microsoft Query”.
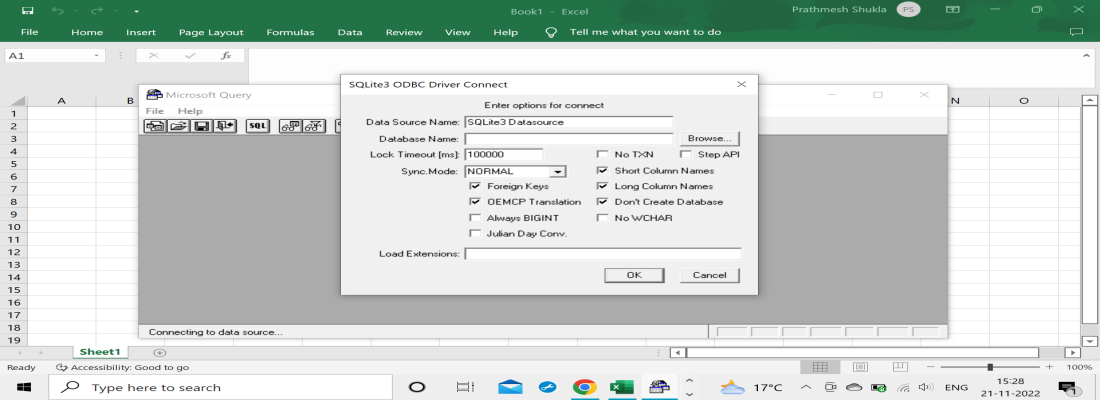
- Now click on Microsoft Query just as illustrated,
- Turn off the option to “Use the Query Wizard to Create/Edit” Queries. After selecting “New Data Source,” click “OK.”
- Turn on “SQLite3 ODBC Driver” by selecting it. Press “OK.” The tables from your SQLite database are displayed in a new query window that appears. Click “Close” after you have highlighted and chosen the table holding the data you wish to import into Excel.

- Click the Fields list’s “*” icon. Then, to import every field from the table into Excel, click the “>” button in the window’s centre. Choose the desired data filtering choices. Excel is instructed through filters to only get information from the SQLite data table that satisfies certain criteria. For instance, your SQLite data table likely has a column with the name “old telephone” or something similar if it contains a list of customers along with their addresses or other contact information. Applying a filter will allow you, for example, to only obtain data for clients with the area code “211”. In the “Column to Filter” window, select the “old telephone” or a field with a similar name. In the filter list, select “Contains”. Click “Next” after entering “211” in the field next to the “Contains” choice.

- Either enable the ascending sort order option and click “Next” to sort the records in that direction, which is the default By clicking, the “Return Data to Microsoft Excel” option can be chosen. To end the fresh query window, click the “Finish” button.
- In the Import Data window, click to make the “Table” and “Existing Worksheet” options active. To make the data table from the SQLite database display in a specific cell on the Excel spreadsheet, click the empty cell. Select “OK” from the menu. Based on any filters you applied to the query, Excel builds and presents a new table with the records it has retrieved from the SQLite data table.
Everything is now set up correctly. As necessary, modify or format the new data table from the SQLite database. Delete your worksheet.
Share your thoughts in the comments
Please Login to comment...