Create a GeeksforGeeks Wrapper Application using Electron
Last Updated :
29 Jan, 2020
Electron is an open-source and platform-independent framework that is used to create native desktop applications using the power of Chromium engine and Node.js.
We are going to create a simple application using Electron that acts as a wrapper around the GeeksforGeeks website. It contains the ability to quickly navigate to important parts of the website, open the ‘Online IDE’ separately whenever required and save articles that could be later read offline.
It makes use of the various features of the Electron framework including browser windows, native menus, file handling and packaging the application for distribution.
Prerequisites:
- The Node.js runtime is required to run an Electron app. This includes the tools like npm to help build and install the needed packages. Installation of Node.js on Windows.
- Knowledge of HTML, CSS and JavaScript
- Introductory Knowledge of Electron and Node.js
Initialize a new Node project:
- Navigate to the place where you want your project to be created. Open a command prompt and use the following command to initialize a new project:
npm init
- Fill in the details of the project as asked in the command prompt window. This will create a package.json file that indicates all the libraries that would be used to run the application.
- Install Electron package using the following npm command:
npm install electron
- Open the package.json file and change the “scripts” portion to the following:
"scripts": {
    "start": "electron ."
  }
This makes it easy run our app through the npm utility.

Creating the Electron basic structure: We start by creating the basic structure of our application. The index.js (or the respective file configured in package.json) is the entry point where the Electron executable will attempt to start the application. We will define application structure in the index.js file with the following code:
- Program:
const { app, BrowserWindow } = require('electron')
let win
function createWindow() {
win = new BrowserWindow({
width: 960,
height: 540,
})
win.loadURL(
win.on('closed', () => {
win = null
})
win.webContents.on('new-window', (event, url) => {
event.preventDefault()
win.loadURL(url)
})
}
app.on('ready', createWindow)
|
- The application could be run using the following command:
npm start
- Output:

Explanation:
- We have defined a BrowserWindow with the dimensions of the window and loaded the login page of the website using the loadURL() method. The BrowserWindow is like a browser that is embedded in our application and can be used to navigate through webpages.
- Whenever this application would be run, it would create an instance of the BrowserWindow and load the specified URL into the window.
Creating the Menu: Electron applications have the feature to create menu items that would be natively displayed in the application’s menubar. These can be linked to actions that would take place when they are clicked.
The menu is initially created from a template that defines how each menu and submenu should appear and what their role would be. Our menu has 6 parts:
- File: It has the option to save the current page and also exit the application.
- Site: It has the option to login and logout of the website.
- Learn: It has the options to various parts of the website that has written articles.
- Practice Questions: It has the option to open the Online IDE in a separate window and also directly go to the questions based on their difficulty.
- Contribute: It has various options that correspond to the contribution of articles to the website.
- Saved Articles: It allows the access of all the articles that have been saved previously.
All the URLs have been directly sourced from the GeekforGeeks website. The “Saved Pages” portion is left empty so that it could be updated later. A separate window is created for the online IDE by creating a new instance of BrowserWindow and loading the URL in that.
The final template menu code is as follows:
Program:
let menu_template = [
{
label: 'File',
submenu: [
{
label: 'Save Page Offline',
click() {
savePageOffline()
}
},
{ type: 'separator' },
{
label: 'Exit',
click() {
app.quit()
}
}
]
},
{
label: 'Site',
submenu: [
{
label: 'Login',
click() {
win.loadURL(
}
},
{
label: 'Logout',
click() {
win.loadURL(
}
},
]
},
{
label: 'Learn',
submenu: [
{
label: 'Quiz Corner',
click() {
win.loadURL(
}
},
{
label: 'Last Minute Notes',
click() {
win.loadURL(
}
},
{
label: 'Interview Experiences',
click() {
win.loadURL(
}
},
{
label: 'Must-Do Questions',
click() {
win.loadURL(
}
}
]
},
{
label: 'Practice Questions',
submenu: [
{
label: 'Online IDE',
click() {
ide_win = new BrowserWindow({
width: 800,
height: 450,
})
ide_win.loadURL(
ide_win.on('closed', () => {
ide_win = null
})
}
},
{ type: 'separator' },
{
label: 'Easy Questions',
click() {
win.loadURL(
}
},
{
label: 'Medium Questions',
click() {
win.loadURL(
}
},
{
label: 'Hard Questions',
click() {
win.loadURL(
}
},
{ type: 'separator' },
{
label: 'Latest Questions',
click() {
win.loadURL(
}
}
]
},
{
label: 'Contribute',
submenu: [
{
label: 'Write New Article',
click() {
win.loadURL(
}
},
{
label: 'Pick Suggested Article',
click() {
win.loadURL(
}
},
{
label: 'Write Interview Experience',
click() {
win.loadURL(
}
}
]
},
{
id: 'saved',
label: 'Saved Articles',
submenu: []
}
]
|
Explanation:

The menubar and the submenus
The Online IDE in a separate window
Adding functionality of Saving Pages: We will now add the functionality of saving a page to the disk so that it could be accessed later even without an internet connection. We will first define the location where our articles would be stored. We can get the current working directory and create a folder for the saved pages.
const savedFolder = __dirname + '\\saved\\'
There are three functions that work together to save and retrieve the articles:
The appendItemToMenu(filename) function:
- This function adds the given page title to the ‘Saved Pages’ submenu and also links it so that the pages would be loaded whenever the user clicks on them.
- The currently active menu is retrieved using the getApplicationMenu() method.
- It then uses the append() method to add a new MenuItem. This MenuItem constructor is given the filename that would be displayed as label and also the functionality that would take place when it is clicked.
- It will automatically update the current menu and the latest page can be used immediately.
- Code:
function appendItemToMenu(filename) {
curr_menu = Menu.getApplicationMenu()
.getMenuItemById("saved").submenu
curr_menu.append(
new MenuItem({
label: path.basename(filename, '.html'),
click() {
console.log('Saved page opened')
win.loadFile(savedFolder + path.basename(filename))
}
}))
}
|
The savePageOffline() function:
- This function saves the whole page along with all images and stylesheets to disk.
- The file name is determined be using the getTitle() method which returns the title of the current page.
- the contents.savePage() method that will take the current webpage and save it to the given location with the above title.
- It also calls the appendItemToMenu() above which updates menu.
- Code:
function savePageOffline() {
pageTitle = win.getTitle()
console.log("Saving:", pageTitle)
win.webContents.savePage(savedFolder + pageTitle +
'.html', 'HTMLComplete').then(() => {
appendItemToMenu(pageTitle + '.html');
console.log('Page was saved successfully.')
}).catch(err => {
console.log(err)
})
}
|
The getSavedArticles() function:
- This function retrieves all the files in the given folder and then adds them to the menu.
- It uses the readdirSync() method to return all the filenames present in the ‘saved’ file directory.
- The filenames are checked so that only the ones with an extension of “.html” are considered.
- These are then passed to the appendItemToMenu() function so that the menu is updated for each saved item.
- Code:
function getSavedArticles() {
fs.readdirSync(savedFolder).forEach(file => {
if (path.extname(file) == '.html') {
appendItemToMenu(file)
}
});
}
|
The savePageOffline() function is invoked from “Save Page Offline” in the “File” menu. The getSavedArticles() function is invoked during the creation of the BrowserWindow so that the previous pages are immediately available. The appendItemToMenu() function is invoked whenever a new page is saved. This allows to seamlessly save and retrieve articles that can be read offline.
Saving a page and retrieving a saved page
Packaging the Application: As Electron is a platform-independent framework, the applications could be run on all the major platforms using a single codebase. The Electron community has created a package that bundles a finished application for the various supported platforms and makes it ready for distribution.
The electron-packager tool can be globally installed for use in the CLI using the following command:
npm install electron-packager -g
The electron-packager has the following syntax:
electron-packager
    <sourcedir>
       <appname> --platform=<platform>
       --arch=<architecture> [optional flags...]
The ‘platform’ and ‘architecture’ could be specified if one is developing for a certain platform. Running the packager specifying only the ‘sourcedir’ and ‘appname’ will produce a bundle that could only be run on the host platform/architecture:
electron-packager . geeksforgeeks-desktop
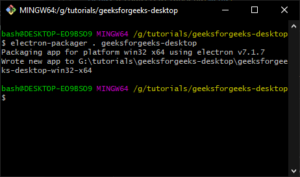
electron-packager
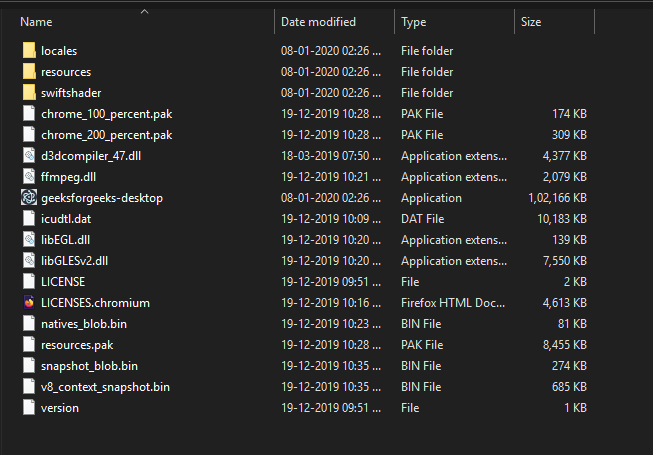
The final packaged application for the windows platform
Further Reading: We have covered a very basic application that shows some of the features of Electron. The framework has many more features that can be integrated together to build more complex applications. It is advised to read further through the following links:
Like Article
Suggest improvement
Share your thoughts in the comments
Please Login to comment...