Django is a high-level Python web framework used to create web applications without any hassle, whereas, PostgreSQL is a powerful, open-source object-relational database. Let us first create a Django application with PostgreSQL in the backend and deploy it in Heroku which is a container-based cloud Platform to deploy, manage, and scale the applications.
Packages Required
File Structure

Project folder
Let us create a simple Django application that takes input from users and stores it in PostgreSQL which then will be deployed using Heroku.
Set-up virtual environment :
In your terminal, use the following commands to set up a virtual environment for this tutorial. This will allow you to have a development environment independent of the host operating system.
pip install virtualenv
virtualenv GFG
GFG\Scripts\activate.bat
Create Django application
Step 1. Django project set-up
django-admin startproject geeks
Step 2: Go to geeks by following the command cd geeks, and create a app.
python manage.py startapp gfg
Step 3: Now, we need to define it in “settings.py” in the project folder by adding the application name.
Add 'gfg,' under INSTALLED_APPS
Step 4: Migrate and deploy
python manage.py migrate
Step 5: Ensure app deployment in the deployment server http://127.0.0.1:8000/.
python manage.py runserver
Step 6: Create a templates folder in the parent folder “geeks“. Add “contact.html” in templates.
HTML
<div>
<form method="POST">
<h2>GeeksforGeeks Tutorial</h2>
{% csrf_token %}
{{ form }}
<button type="submit">Submit</button>
</form>
</div>
|
Step 7: Go to geeks/settings.py to add the following code
Python3
import os
TEMPLATES_DIRS = os.path.join(BASE_DIR,'templates')
DIRS': [TEMPLATES_DIRS]
|
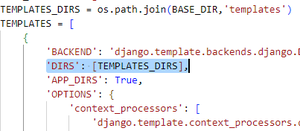
Modifying “TEMPLATES” in settings.py
Step 8: Create “gfg/forms.py” in gfg app to add the following code.
Python3
from django import forms
from .models import GeeksforGeeks
class geeks(forms.ModelForm):
class Meta:
model = GeeksforGeeks
fields = ["fullname", "mobile_number", ]
labels = {'fullname': "Name", "mobile_number": "Mobile Number", }
|
Step 9: Open gfg/models.py and replace the existing code with the below code.
Python3
from django.db import models
class GeeksforGeeks(models.Model):
fullname = models.CharField(max_length=200)
mobile_number = models.IntegerField()
|
Step 10: Replace contents in gfg/views.py with the following code.
Python3
from django.shortcuts import render
from .models import GeeksforGeeks
from .forms import geeks
def gfgForm(request):
if request.method == "POST":
form = geeks(request.POST)
if form.is_valid():
form.save()
else:
form = geeks()
return render(request, 'contact.html', {'form': form})
|
Step 11: Create gfg/urls.py in “gfg” folder and add the following code.
Python3
from . import views
from django.urls import path
urlpatterns = [
path('',views.gfgForm,name='form')
]
|
Step 12: Open geeks/urls.py to add the following.
Python3
from django.contrib import admin
from django.urls import path, include
urlpatterns = [
path('admin/', admin.site.urls),
path('', include('gfg.urls')),
]
|
Step 13: Open “admin.py” to add the following code which will register the model. This step will create a field in the admin dashboard of Django to view the data.
Python3
from django.contrib import admin
from .models import GeeksforGeeks
admin.site.register(GeeksforGeeks)
|
Step 14: Migrate all the data to an internal database to test our app.
python manage.py makemigrations
python migrate
Step 15: Ensure app deployment in the deployment server http://127.0.0.1:8000/.
python manage.py runserver
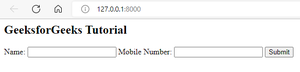
Ensure successful deployment.
Heroku Postgres and deployment
Step 16: Use the following command to install four packages for database connection and deployment.
pip install psycopg2 gunicorn django-heroku whitenoise
Step 17: Log in to your Heroku app and follow the below instructions to add Postgres to your Django application.
- Click “Create app”.
- Name your app and click save, i.e. “gfg-tutorial”
- Go to the “add-ons” section in elements or go to the new tab and search Heroku Add-ons.
- Now, you will have clickable “Heroku Postgres” which opens in a new tab. Click to install.
- Click on the Bento menu, and go to data or datastores.
- Click “view credentials” under the settings tab to fetch your connection details.
Step 18: Open “settings.py” to make the following changes.
Python3
import django_heroku
DATABASES = {
'default': {
'ENGINE': 'django.db.backends.postgresql_psycopg2',
'NAME': '<DATABASE>',
'USER': '<USER>',
'PASSWORD': '<PASSWORD>',
'HOST': '<HOST>',
'PORT': '5432',
}
}
STATIC_ROOT = os.path.join(BASE_DIR, 'staticfiles')
STATIC_URL = '/static/'
django_heroku.settings(locals())
|
Also, modify “ALLOWED_HOSTS” as mentioned below to allow the Heroku app which we created now to host the application.
Python3
ALLOWED_HOSTS = ['gfg-tutorial.herokuapp.com']
|
Step 19: Additional files
- Create “runtime.txt” and “Procfile” in the project folder “geeks”.
- Run the following command to get all the packages listed in “requirements.txt”
pip freeze > requirements.txt
Step 20: Open “runtime.txt” and add the following code.
python-3.10.7
Step 21: Open “Procfile” and add the following code.
release: python manage.py migrate
web: gunicorn geeks.wsgi
Push to GitHub
Step 22: Create a GIT repository and upload the project files.
Step 23: In Heroku, go to your app and navigate to the deploy tab. Select the project repo after connecting to your GitHub account in Heroku.
Step 24: Click “deploy branch”.
Step 25: Ensure the application is up and running.
Output:
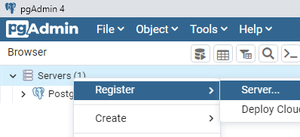
Connect Postgres to a remote server(pgAdmin4)
Step 1: Create a server. Right-click on “Server” -> Register -> Server.
Create server
Step 2: Add the following details.
General tab
Connection tab
- Hostname/Address : <HOST>
- Port: 5432
- Maintenance database : <DATABASE>
- Username : <USER>
- Password: <PASSWORD>
SSL tab
Choose “require” from the dropdown.
Advanced tab
db restriction : <DATABASE>
Once you add a database to DB restriction, hit enter to create a database and click on save.
View database tables
- GeeksforGeeks(server name) –> Databases –> <DATABASE> –> Schemas –> Public –> Tables
- Right-click on the table you want to view and select “View/Edit Data”.
Finally, we have deployed the Django application on Heroku with Postgres Backend. Let’s test it now!
Like Article
Suggest improvement
Share your thoughts in the comments
Please Login to comment...