Deploying Scrapy spider on ScrapingHub
Last Updated :
10 May, 2018
What is ScrapingHub ?
Scrapy is an open source framework for web-crawling. This framework is written in python and originally made for web scraping. Web scraping can also be used to extract data using API. ScrapingHub provides the whole service to crawl the data from web pages, even for complex web pages.
Why ScrapingHub ?
Let’s say a website which gives 1-input field and in return one get response based on the search query. The motive is to get all the data by entering input and getting response. Now this input field can have numbers from “0000” string to “9999” string, so in short, need to give 10000 inputs so that one can get all results from website. Now for each request let’s say for “0000”, it will take 4 – 5 minutes and in response you will get 1000+ fields of data. It can vary because at the end, the website will return all the data whose numbers ends with “0000” and for website it takes time to query and return it. So if we do some little maths, then, 10000 * 5 = 50000 minutes, which means 35-days approx.
So for starters, one can use mechanize module of Python 2.7 and query it but at the end, it needs 35 days to complete this by running the PC/laptop non-stop. The other solution is one can use Multi-threading and Multiprocessing to avoid such scenario but saving data in organized way and to overcome this complexity will take a lot of time. But using Scrapy will save a huge amount of time. Still, we need to run this script for at least 1-3 days because we are talking about scraping millions of data. So to overcome this problem, the best available option is to take help of ScrapingHub.
ScrapingHub provides features to deploy the Scrapy spider on cloud and execute it. In return, it will run our spider for 24 hours (free user) or 7 days (for paid) which is worth doing it. So that’s why one can use ScrapingHub to save time and cost of doing it.
How to do this :
Step 1: Creating Spider in local machine
In previous article, we created a simple spider to crawl the webpage and get all the URLs present on that website. Likewise, simply added one extra feature, which will avoid scraping duplicate url by maintaining set in the script and cross-checking before adding it.
import scrapy
class ExtractUrls(scrapy.Spider):
crawled = set()
name = "extract"
def start_requests(self):
for url in urls:
yield scrapy.Request(url = url,
callback = self.parse)
def parse(self, response):
title = response.css('title::text').extract_first()
links = response.css('a::attr(href)').extract()
for link in links:
yield
{
'title': title,
'links': link
}
if ('geeksforgeeks' in link and
link not in self.crawled):
self.crawled.update(link)
yield scrapy.Request(url = link,
callback = self.parse)
|
scrapy crawl extract -o links.json
After running this spider, it should be able to scrape successfully and save it inside links.json But we need to save time and want to run it for at least 24 hours. So we will deploy this spider on ScrapingHub.
Step 2: Creating account at ScrapingHub
Go to ScrapingHub login page and log in by using Google or Github. It will redirect to the dashboard.

Now click on Create project and mention name of the project. Click on Scrapy button, because our spider is built with Scrapy framework.
After clicking you will be redirected to the project dashboard and will see two options for deployment.
1. Deploying with CLI
2. Deploying with Github
Do it with CLIm because it is much preferred. So let’s switch back to our local project configure some settings.
Step 3: Configuring
At first install shub CLI, which helps to deploy the code.
pip install shub
Now after installing, you need to do login and mention the app key; so that ScrapingHub will know which project you are working on and where to deploy.
shub login
After login and writing the app key, user will be logged in. Now the next step is to simply deploy it by using :
shub deploy ID
Id will be mentioned in code and deploy section which is 6 digits long. After entering, user should get output something like this :
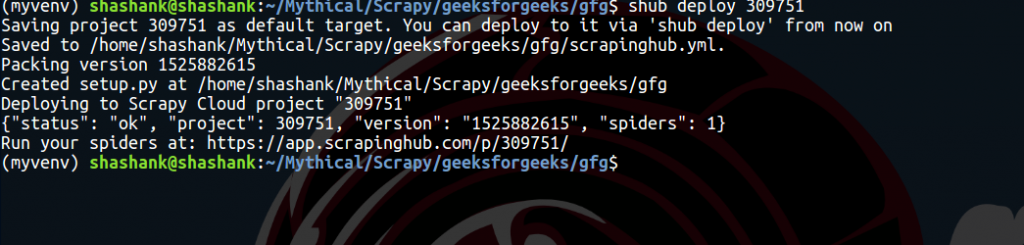
On Spiders dashboard section, user can see the ready spider. Just click on spider name and on Run button. Free users will get 1-unit free, which states that user can run one spider for maximum 24-hours. After that, it will automatically stop. User can buy the units to extend the time period.

By clicking on items under Running Job section, it will be redirected to another page which will show all the items getting scraped at that time. Job section will show graph; showing stats about the spider. This graph is a perfect visualization after running the spider for 5-6 hours.

To get the data in local machine, go to Items section back and there, at top right, click on Export button. It will show various format like – CSV, JSON, JSON lines, XML. It is worth noting that this feature is really helpful and it really saves a lot of time.

Using ScrapingHub, one can scrape about millions of data in just few days, by just deploying the spider and downloading it in preferred format.
Note : Scraping any web page is not a legal activity. Don’t perform any scraping operation without permission.
Like Article
Suggest improvement
Share your thoughts in the comments
Please Login to comment...