Detecting COVID-19 From Chest X-Ray Images using CNN
Last Updated :
15 Mar, 2024
A Django Based Web Application built for the purpose of detecting the presence of COVID-19 from Chest X-Ray images with multiple machine learning models trained on pre-built architectures. Three different machine learning models were used to build this project namely Xception, ResNet50, and VGG16. The Deep Learning model was trained on a publicly available dataset, the SARS-COV-2-Ct-Scan Dataset. The purpose of this project is to apply Convolutional Neural Network (CNN) Architectures in solving problems of the pandemic on a preliminary stage.
Tools and Technologies Used
Some important libraries and technologies used are listed below
- Programming Language: Python
- Web Framework: Django
- Machine Learning Framework: Tensorflow
- Frontend Dev: HTML, CSS (BootStrap)
- Essential Libraries: keras, sklearn, venv, seaborn, matplotlib
A detailed list of all the libraries can be found here.
Step by Step Implementation
Deep Learning Part
1) Convert Dataset into Dataframe
Convert the data into a pandas dataframe with the corresponding columns
- File [Image File]
- DiseaseID [Serial Number]
- DiseaseType [COVID, non-COVID]
Python3
train_dir = 'path/to/dataset'
train_data = []
for defects_id, sp in enumerate(disease_types):
for file in os.listdir(os.path.join(train_dir, sp)):
train_data.append(['{}/{}'.format(sp, file), defects_id, sp])
train = pd.DataFrame(train_data, columns=['File', 'DiseaseID', 'Disease Type'])
|
2) Read and Preprocess the Dataframe
- Read the Images
- Convert the Images into the standard size of (64 x 64)
- Create numpy arrays for input/output X_Train & Y_Train
- Normalize the RGB values by dividing with 255.
Python3
IMAGE_SIZE = 64
def read_image(filepath):
return cv2.imread(os.path.join(data_dir, filepath))
def resize_image(image, image_size):
return cv2.resize(image.copy(), image_size,
interpolation=cv2.INTER_AREA)
X_train = np.zeros((train.shape[0], IMAGE_SIZE, IMAGE_SIZE, 3))
for i, file in tqdm(enumerate(train['File'].values)):
image = read_image(file)
if image is not None:
X_train[i] = resize_image(image, (IMAGE_SIZE, IMAGE_SIZE))
X_Train = X_train / 255.
Y_train = train['DiseaseID'].values
Y_train = to_categorical(Y_train, num_classes=2)
|
3) Split the Dataset into Train/Validation
- Split into Train, Validation datasets
- Select split percentage & random state accordingly
Python3
X_train, X_val, Y_train, Y_val = train_test_split(
X_Train, Y_train, test_size=0.2, random_state = 42)
|
4) Define Model Architecture
- We are going to import three different architectures listed below :
- Structure of Model Architecture
- Conv2D of Input Shape (3,3)
- ResNet50/Xception/VGG16 Architecture
- Add a GlobalAveragePooling2D()
- Add a Dropout Layer
- Final DenseNet Layer with relu activation
- For Multiple Output add a Softmax layer
- Use an ‘adam’ optimizer, hyperparameters can be tuned accordingly
- The following code proposes a sample code for building a model
Python3
def build_model():
resnet50 = ResNet50(weights='imagenet', include_top=False)
xception = Xception(weights='imagenet', include_top=False)
vgg16 = VGG16(weights='imagenet', include_top=False)
input = Input(shape=(SIZE, SIZE, N_ch))
x = Conv2D(3, (3, 3), padding='same')(input)
x = resnet50(x)
x = xception(x)
x = vgg16(x)
x = GlobalAveragePooling2D()(x)
x = BatchNormalization()(x)
x = Dropout(0.5)(x)
x = Dense(256, activation='relu')(x)
x = BatchNormalization()(x)
x = Dropout(0.5)(x)
output = Dense(2, activation='softmax', name='root')(x)
model = Model(input, output)
optimizer = Adam(lr=0.003, beta_1=0.9, beta_2=0.999,
epsilon=0.1, decay=0.0)
model.compile(loss='categorical_crossentropy',
optimizer=optimizer, metrics=['accuracy'])
model.summary()
return model
|
5) Train the Model
- Call build_model() function
- Use an annealer, a callback that monitors a quantity and if no improvement is seen for a ‘patience’ number of epochs, the learning rate is reduced.
- Use an ImageDataGenerator to carry out real time image data augmentation
- Train the model on x_train, y_train
- Save the model weights in .hdf5 format and model graph in .json format
Python3
hdf5_save = 'ResNet50_Model.hdf5'
hdf5_save = 'Xception_Model.hdf5'
hdf5_save = 'VGG16_Model.hdf5'
model = build_model()
annealer = ReduceLROnPlateau(
monitor='val_accuracy', factor=0.70, patience=5,
verbose=1, min_lr=1e-4)
checkpoint = ModelCheckpoint(h5f5_save, verbose=1, save_best_only=True)
datagen = ImageDataGenerator(rotation_range=360,
width_shift_range=0.2,
height_shift_range=0.2,
zoom_range=0.2,
horizontal_flip=True,
vertical_flip=True)
datagen.fit(X_train)
model_graph = 'ResNet50.json'
model_graph = 'Xception.json'
model_graph = 'VGG16.json'
model_json = model.to_json()
with open(model_graph, "w") as json_file:
json_file.write(model_json)
|
Building the Web App
- Create a Django Project with an application initialized inside it which would be using the saved model weights to predict uploaded Chest X-Ray Images
- Create a basic Static Page with a form to send the image file to the backend
HTML
<form method="post" id="imageForm" enctype="multipart/form-data">
{% csrf_token %}
<label for="ImgFile">Upload Image</label>
<input type="file" name="ImgFile" class="form-control"/>
<input type="submit" id="submitButton" class="btn" name="submit" value="Solve"/>
</form>
|
- Inside the views.py folder, handle the uploaded image. Load the model files and send the response back to the front end.
- The response would contain the following details
- Model Prediction
- Confidence Score
- Prediction Duration (in s)
- Add styling to the frontend using CSS (Bootstrap) accordingly
Note: Loading multiple models and using model.predict() takes a lot of time and it’d be much more in the absence of GPU services in the Cloud instance. For scaling this application to a higher server load consider using TensorFlow Serving
Demo
A Demo Version of the project built and tested on localhost is demonstrated in the video below
COV-CNN Demo
Applications in Real Life & Future Work
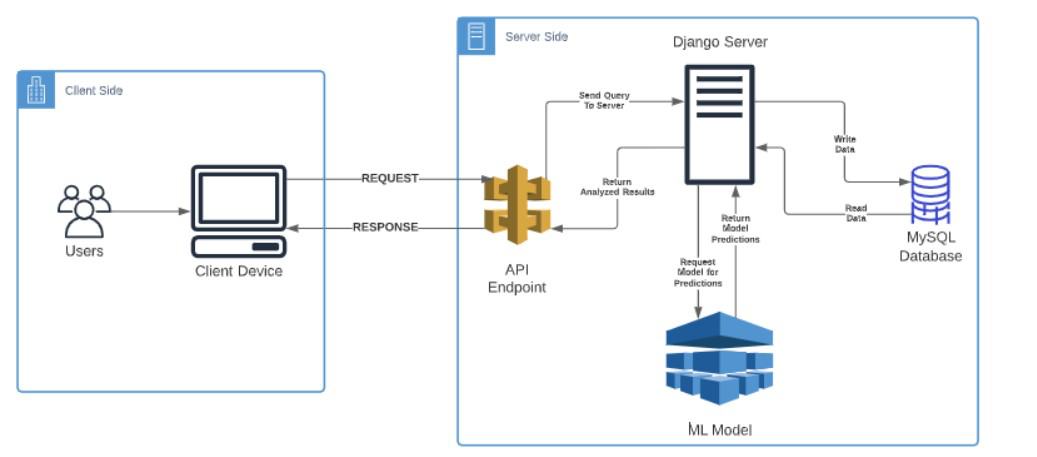
The project built in the previous lines cannot be directly applied, however, a lot of such applications can be built on a similar tangent for serving the purpose of preliminary medical diagnosis based on inputs of patients saving a lot of screening stage costs to the medical industry. The machine learning pipeline presented in the project can be taken up a notch by making it dynamic in nature. By adding more training data dynamically to the model and train it on them to improve its accuracy. The ML Model can be converted into a REST API making the application more robust in nature and scalable. A MySQL Database could be used for storing patient data with diagnosis details and other parameters. I’ve presented a use-sketch diagram for illustrating the architecture of the application which could be built in the near future to be applied in the medical industry.
Resources
Like Article
Suggest improvement
Share your thoughts in the comments
Please Login to comment...