This project deals with developing a Virtual website ‘E-commerce Website’. It provides the user with a list of the various products available for purchase in the store. For the convenience of online shopping, a shopping cart is provided to the user. After the selection of the goods, it is sent for the order confirmation process. The system is implemented using Python’s web framework Django. To build a Django e-commerce web application, it is necessary to study and understand many technologies.
Technologies and Required Skills Used in the Project
Django E-commerce Web Application
Scope: The scope of the project will be limited to some functions of the e-commerce website. It will display products, and customers can select catalogs and select products and can remove products from their cart specifying the quantity of each item. Selected items will be collected in a cart. At checkout, the item on the card will be presented as an order. Customers can pay for the items in the cart to complete an order. This project has a great future scope. The project also provides security with the use of login ID and passwords, so that no unauthorized users can access your account. The only authorized person who has the appropriate access authority can access the software.
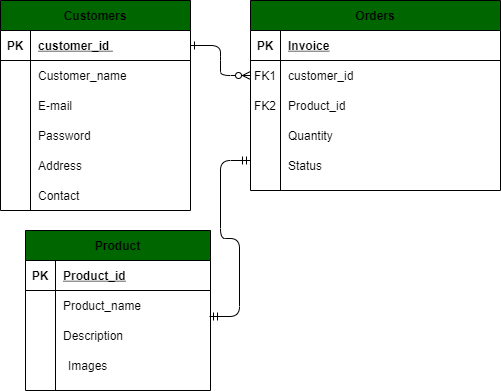
ER Diagram for E-commerce Website
Customer Interface
- Customer shops for a product
- Customer changes quantity
- The customer adds an item to the cart
- Customer views cart
- Customer checks out
- Customer sends order
ER-diagram for Customer

Use-Case diagram for Customer
Admin Interface
- Admin logs in
- Admin inserts item
- Admin removes item
- Admin modifies item

ER-diagram for Admin

Use-Case diagram for Admin
Step by Step Implementation
- Create Normal Project: Open the IDE and create a normal project by selecting File -> New Project.
- Install Django: Next, we will install the Django module from the terminal. We will use PyCharm integrated terminal to do this task. One can also use cmd on windows to install the module by running python -m pip install django command
- Check Installed Django version: To check the installed Django version, you can run the python -m django -version command as shown below.
- Create Django Project: When we execute django-admin startproject command, then it will create a Django project inside the normal project which we already have created here. django-admin startproject ProjectName.
- Check Python3 version: python3 –version
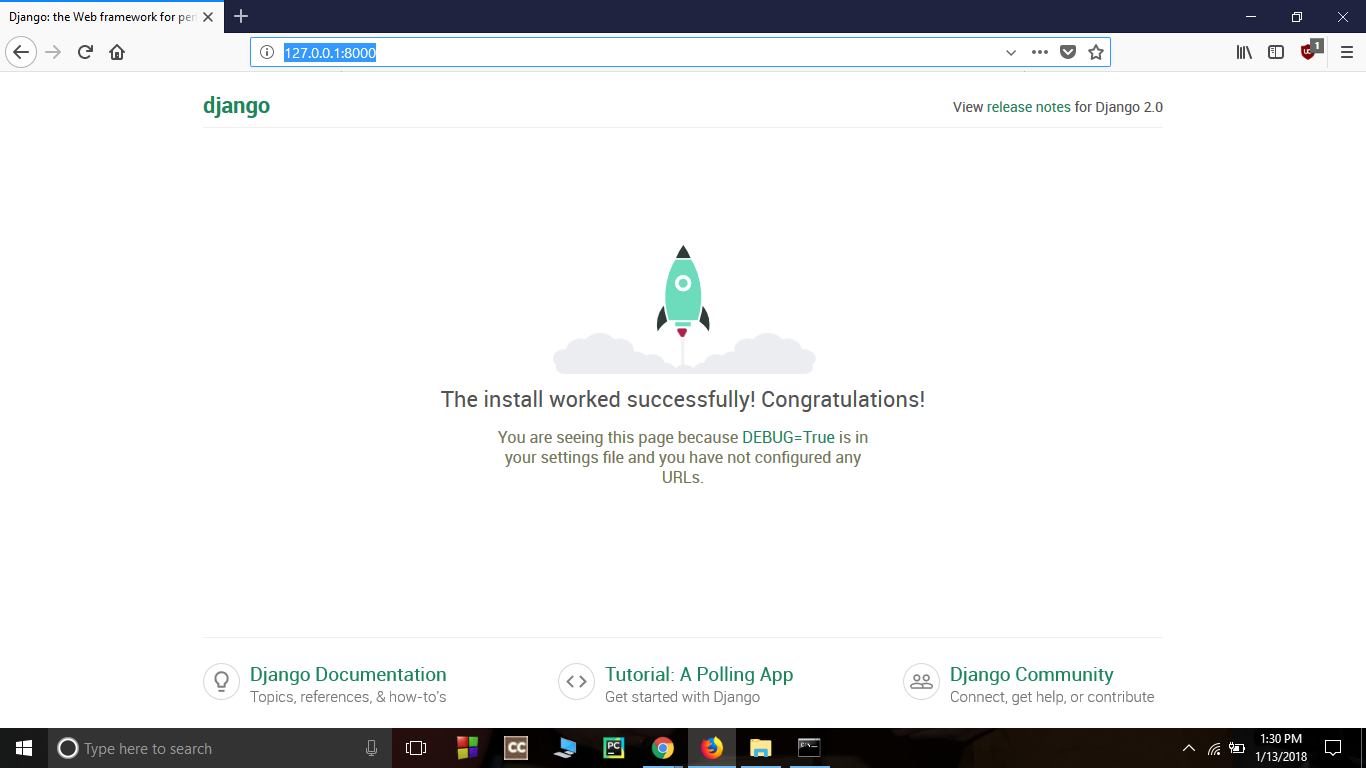
- Run Default Django webserver:- Django internally provides a default webserver where we can launch our applications. python manage.py runserver command in terminal. By default, the server runs on port 8000. Access the webserver at the highlighted URL.
Open the project folder using a text editor. The directory structure should look like this:

Project Structure
Now add store app in E-commerce website in settings.py.

urls.py: This file contains all the URL patterns used by the website
Python3
from django.contrib import admin
from django.urls import path, include
from django.conf.urls.static import static
from . import settings
urlpatterns = [
path('admin/', admin.site.urls),
path('', include('store.urls'))
] + static(settings.MEDIA_URL, document_root=settings.MEDIA_ROOT)
|
models.py: The below screenshot shows the required models that we will need to create. These models are tables that will be stored in the SQLite database.

Let’s see each model and the fields required by each model.
category.py: This is a Django model for a “Category” that includes a name field with a maximum length of 50 characters. It also has a static method get_all_categories() to retrieve all the categories from the database. The __str__ method is defined to return the name of the category when it’s converted to a string.
Python3
from django.db import models
class Category(models.Model):
name = models.CharField(max_length=50)
@staticmethod
def get_all_categories():
return Category.objects.all()
def __str__(self):
return self.name
|

customer.py: This is a Django model for a “Customer” with fields for name, phone, email, and password. It includes methods to register, retrieve customers by email, and check if a customer exists.
Python3
from django.db import models
class Customer(models.Model):
first_name = models.CharField(max_length=50)
last_name = models.CharField(max_length=50)
phone = models.CharField(max_length=10)
email = models.EmailField()
password = models.CharField(max_length=100)
def register(self):
self.save()
@staticmethod
def get_customer_by_email(email):
try:
return Customer.objects.get(email=email)
except:
return False
def isExists(self):
if Customer.objects.filter(email=self.email):
return True
return False
|

products.py : This is a Django model for “Products” with fields for name, price, category, description, and image. It also includes static methods to retrieve products by ID, retrieve all products, and retrieve products by category ID.
Python3
from django.db import models
from .category import Category
class Products(models.Model):
name = models.CharField(max_length=60)
price = models.IntegerField(default=0)
category = models.ForeignKey(Category, on_delete=models.CASCADE, default=1)
description = models.CharField(
max_length=250, default='', blank=True, null=True)
image = models.ImageField(upload_to='uploads/products/')
@staticmethod
def get_products_by_id(ids):
return Products.objects.filter(id__in=ids)
@staticmethod
def get_all_products():
return Products.objects.all()
@staticmethod
def get_all_products_by_categoryid(category_id):
if category_id:
return Products.objects.filter(category=category_id)
else:
return Products.get_all_products()
|

orders.py: This is a Django model for “Order” with fields for product, customer, quantity, price, address, phone, date, and status. It also includes methods to place an order and get orders by customer ID.
Python
from django.db import models
from .product import Products
from .customer import Customer
import datetime
class Order(models.Model):
product = models.ForeignKey(Products,
on_delete=models.CASCADE)
customer = models.ForeignKey(Customer,
on_delete=models.CASCADE)
quantity = models.IntegerField(default=1)
price = models.IntegerField()
address = models.CharField(max_length=50, default='', blank=True)
phone = models.CharField(max_length=50, default='', blank=True)
date = models.DateField(default=datetime.datetime.today)
status = models.BooleanField(default=False)
def placeOrder(self):
self.save()
@staticmethod
def get_orders_by_customer(customer_id):
return Order.objects.filter(customer=customer_id).order_by('-date')
|

views.py: In views, we create a view named home.py, login.py, signup.py, cart.py, checkout.py, orders.py which takes a request and renders an HTML as a response. Create an home.html, login.html, signup.html, cart.html, checkout.html, orders.html in the templates. And map the views to the store\urls.py folder.
Python3
from django.contrib import admin
from django.urls import path
from .views.home import Index, store
from .views.signup import Signup
from .views.login import Login, logout
from .views.cart import Cart
from .views.checkout import CheckOut
from .views.orders import OrderView
from .middlewares.auth import auth_middleware
urlpatterns = [
path('', Index.as_view(), name='homepage'),
path('store', store, name='store'),
path('signup', Signup.as_view(), name='signup'),
path('login', Login.as_view(), name='login'),
path('logout', logout, name='logout'),
path('cart', auth_middleware(Cart.as_view()), name='cart'),
path('check-out', CheckOut.as_view(), name='checkout'),
path('orders', auth_middleware(OrderView.as_view()), name='orders'),
]
|
The below files show the views for each functionality of the site.
home.py: This is a Django view for handling an online store. It includes methods for displaying the store’s index, adding or removing items from the cart, and rendering the store’s product listings. The view also uses Django sessions to manage the user’s shopping cart.
Python3
from django.shortcuts import render, redirect, HttpResponseRedirect
from store.models.product import Products
from store.models.category import Category
from django.views import View
class Index(View):
def post(self, request):
product = request.POST.get('product')
remove = request.POST.get('remove')
cart = request.session.get('cart')
if cart:
quantity = cart.get(product)
if quantity:
if remove:
if quantity <= 1:
cart.pop(product)
else:
cart[product] = quantity-1
else:
cart[product] = quantity+1
else:
cart[product] = 1
else:
cart = {}
cart[product] = 1
request.session['cart'] = cart
print('cart', request.session['cart'])
return redirect('homepage')
def get(self, request):
return HttpResponseRedirect(f'/store{request.get_full_path()[1:]}')
def store(request):
cart = request.session.get('cart')
if not cart:
request.session['cart'] = {}
products = None
categories = Category.get_all_categories()
categoryID = request.GET.get('category')
if categoryID:
products = Products.get_all_products_by_categoryid(categoryID)
else:
products = Products.get_all_products()
data = {}
data['products'] = products
data['categories'] = categories
print('you are : ', request.session.get('email'))
return render(request, 'index.html', data)
|
login.py: This Django view handles user authentication, including login and logout. It allows users to log in with their email and password, and upon successful login, it stores the customer’s ID in the session. The Login view also supports a return URL, which can be used to redirect users to a specific page after successful login.
Additionally, there is a logout function to clear the user’s session and log them out, redirecting them to the login page.
Python3
from django.shortcuts import render, redirect, HttpResponseRedirect
from django.contrib.auth.hashers import check_password
from store.models.customer import Customer
from django.views import View
class Login(View):
return_url = None
def get(self, request):
Login.return_url = request.GET.get('return_url')
return render(request, 'login.html')
def post(self, request):
email = request.POST.get('email')
password = request.POST.get('password')
customer = Customer.get_customer_by_email(email)
error_message = None
if customer:
flag = check_password(password, customer.password)
if flag:
request.session['customer'] = customer.id
if Login.return_url:
return HttpResponseRedirect(Login.return_url)
else:
Login.return_url = None
return redirect('homepage')
else:
error_message = 'Invalid !!'
else:
error_message = 'Invalid !!'
print(email, password)
return render(request, 'login.html', {'error': error_message})
def logout(request):
request.session.clear()
return redirect('login')
|
signup.py: This Django view handles user registration (sign-up). Users can input their first name, last name, phone, email, and password. It performs several validation checks to ensure that the entered data is correct. If validation is successful, the password is hashed for security, and the user is registered. If there are any errors, they are displayed on the sign-up page.
Python3
from django.shortcuts import render, redirect
from django.contrib.auth.hashers import make_password
from store.models.customer import Customer
from django.views import View
class Signup (View):
def get(self, request):
return render(request, 'signup.html')
def post(self, request):
postData = request.POST
first_name = postData.get('firstname')
last_name = postData.get('lastname')
phone = postData.get('phone')
email = postData.get('email')
password = postData.get('password')
value = {
'first_name': first_name,
'last_name': last_name,
'phone': phone,
'email': email
}
error_message = None
customer = Customer(first_name=first_name,
last_name=last_name,
phone=phone,
email=email,
password=password)
error_message = self.validateCustomer(customer)
if not error_message:
print(first_name, last_name, phone, email, password)
customer.password = make_password(customer.password)
customer.register()
return redirect('homepage')
else:
data = {
'error': error_message,
'values': value
}
return render(request, 'signup.html', data)
def validateCustomer(self, customer):
error_message = None
if (not customer.first_name):
error_message = "Please Enter your First Name !!"
elif len(customer.first_name) < 3:
error_message = 'First Name must be 3 char long or more'
elif not customer.last_name:
error_message = 'Please Enter your Last Name'
elif len(customer.last_name) < 3:
error_message = 'Last Name must be 3 char long or more'
elif not customer.phone:
error_message = 'Enter your Phone Number'
elif len(customer.phone) < 10:
error_message = 'Phone Number must be 10 char Long'
elif len(customer.password) < 5:
error_message = 'Password must be 5 char long'
elif len(customer.email) < 5:
error_message = 'Email must be 5 char long'
elif customer.isExists():
error_message = 'Email Address Already Registered..'
return error_message
|
cart.py: This Django model represents an “Order” in an e-commerce application. It has fields such as “product” and “customer” which are foreign keys to the “Products” and “Customer” models, respectively. The model stores information about the ordered product, including its quantity, price, delivery address, and contact phone number. The “date” field stores the order date, and the “status” field indicates whether the order is completed or not.
The class provides methods for placing an order and retrieving orders by a specific customer ID, ordered by date in descending order.
Python3
from django.db import models
from .product import Products
from .customer import Customer
import datetime
class Order(models.Model):
product = models.ForeignKey(Products,
on_delete=models.CASCADE)
customer = models.ForeignKey(Customer,
on_delete=models.CASCADE)
quantity = models.IntegerField(default=1)
price = models.IntegerField()
address = models.CharField(max_length=50, default='', blank=True)
phone = models.CharField(max_length=50, default='', blank=True)
date = models.DateField(default=datetime.datetime.today)
status = models.BooleanField(default=False)
def placeOrder(self):
self.save()
@staticmethod
def get_orders_by_customer(customer_id):
return Order.objects.filter(customer=customer_id).order_by('-date')
|
checkout.py: The “CheckOut” view in a Django e-commerce application handles the checkout process. It collects the customer’s delivery address and phone number via a POST request. It also retrieves the customer’s ID and their shopping cart from the session. The view creates order records for the selected products, including product details, customer information, prices, and quantities. After processing the order, it clears the shopping cart in the session and redirects the user to the “cart” page.
Python3
from django.shortcuts import render, redirect
from django.contrib.auth.hashers import check_password
from store.models.customer import Customer
from django.views import View
from store.models.product import Products
from store.models.orders import Order
class CheckOut(View):
def post(self, request):
address = request.POST.get('address')
phone = request.POST.get('phone')
customer = request.session.get('customer')
cart = request.session.get('cart')
products = Products.get_products_by_id(list(cart.keys()))
print(address, phone, customer, cart, products)
for product in products:
print(cart.get(str(product.id)))
order = Order(customer=Customer(id=customer),
product=product,
price=product.price,
address=address,
phone=phone,
quantity=cart.get(str(product.id)))
order.save()
request.session['cart'] = {}
return redirect('cart')
|
orders.py: The “OrderView” view in a Django e-commerce application handles displaying the orders for a logged-in customer. It retrieves the customer’s ID from the session and uses it to fetch the customer’s orders from the database. The view then renders an “orders.html” template, passing the list of orders to be displayed. This allows the customer to view their order history. The “auth_middleware” is used to ensure that only authenticated customers can access this view.
Python3
from django.shortcuts import render, redirect
from django.contrib.auth.hashers import check_password
from store.models.customer import Customer
from django.views import View
from store.models.product import Products
from store.models.orders import Order
from store.middlewares.auth import auth_middleware
class OrderView(View):
def get(self, request):
customer = request.session.get('customer')
orders = Order.get_orders_by_customer(customer)
print(orders)
return render(request, 'orders.html', {'orders': orders})
|
Output
The project already includes a lot of features. The main beneficiaries are both customers and administrators who take longer to behave online. In addition, additional features can be identified and incorporated in the future. It will take more time and effort to understand the need and adjust it to a computerized system to accommodate additional features.
Like Article
Suggest improvement
Share your thoughts in the comments
Please Login to comment...