Scrapy is a fast high-level web crawling and web scraping framework used to crawl websites and extract structured data from their pages. It can be used for a wide range of purposes, from data mining to monitoring and automated testing. In this tutorial, we will be exploring how to download files using a scrapy crawl spider.
For beginners, web crawling is the method of traversing through the World Wide Web to download information related to a particular topic. One thing to keep in mind is not all websites will permit you to crawl their pages and so it is always a good practice to refer to their robots.txt file before attempting to crawl the page.
Step 1: Installing packages:
Before we start coding, we need to install the Scrapy package
pip install scrapy
Step 2: Creating a project
# scrapyProject is the name we chose for
# the folder that will contain the project
mkdir scrapyProject
cd scrapyProject

# downFiles is the name of the project
scrapy startproject downFiles
The output after running the above code in your terminal will be as follows:

Output on starting a new scrapy project
Step 3: Choosing a spider template
Scrapy comes with 4 spider templates, namely:
- basic: general purpose
- crawl: for crawling, or following links (preferred for downloading files)
- csvfeeed: for parsing CSV files
- xmlfeed: for parsing XML files
In this tutorial, we will be using the crawl spider template and building upon it further.
To view the available spider templates in scrapy:
scrapy genspider -l

The 4 available spider templates in scrapy
Before we start building the basic structure of the spider, ensure that you are working inside the project directory (the directory containing the spider.cfg file) that you had created in step 2
To change your directory:
# the project name we had decided was
# downFiles in step2
cd downFiles
To create the basic structure of the crawl spider:
scrapy genspider -t crawl nirsoft www.nirsoft.net # nirsoft is the spider name, www.nirsoft.com is the website (domain) we will be crawling
A new python file with the name of your spider will be created with the following content:
This file will be located
…\scrapyProject\downFiles\downFiles\spiders\nirsoft.py
where
- scrapyProject is the directory name that contains the project
- downFiles is the project name
- nirsoft.py is the newly created “empty” spider
Code:
Python3
import scrapy
from scrapy.linkextractors import LinkExtractor
from scrapy.spiders import CrawlSpider, Rule
class NirsoftSpider(CrawlSpider):
name = 'nirsoft'
allowed_domains = ['www.nirsoft.net']
rules = (
Rule(LinkExtractor(allow=r'Items/'),
callback='parse_item', follow=True),
)
def parse_item(self, response):
item = {}
return item
|
This is an “empty” crawler. When executed it won’t yield any result. To extract the information we need to tell the spider which links it needs to crawl.
Note: This is what sets Scrapy apart from other popular web crawling packages like Selenium which, if not specified, crawl all the data (even if unnecessary). This feature makes Scrapy faster than Selenium.
Step 4: Defining the rules for link extraction
Python3
rules = (
Rule(LinkExtractor(allow = r'Items/'),
callback = 'parse_item',
follow = True),
)
|
The above segment of code is what handles which links the spider will be crawling. Several Commands can be used to make rules, but for this tutorial, we will be using only a common handful. We will be attempting to download some tools offered by nirsoft.net All the tools or rather the utilities are available under their utilities, and so all the relevant links follow the given pattern:
https://www.nirsoft.net/utils/...
Example:
https://www.nirsoft.net/utils/simple_program_debugger.html
https://www.nirsoft.net/utils/web_browser_password.html
https://www.nirsoft.net/utils/browsing_history_view.html
So the above code segment will be edited as follows:
Python3
rules = (
Rule(LinkExtractor(allow=r'utils/'),
callback='parse_item', follow = True),
)
|
Step 4: Parsing the crawled pages
Now that we have set which links are to be crawled, next we need to define what the spider should crawl exactly. For this, we will have to inspect the pages in question. Head to any of the above examples and open the inspect Element mode (ctrl+shift+c for Windows, cmd+shift+c for MacOS)
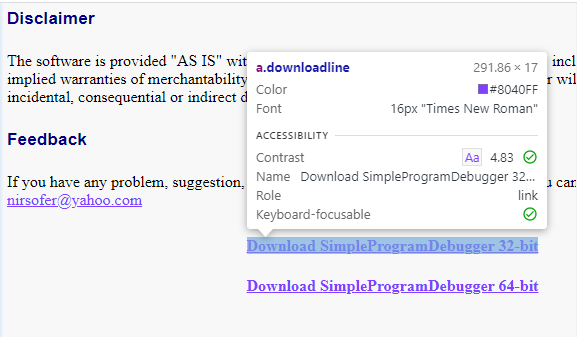
a.downloadline shows that all the download links are anchor tags under the class name “downloadline”
- As we can see the download links are all an anchor tag (a) with a class name “downloadline” (a.downloadline)
- So now we will use this in a CSS selector and extract the href attribute of the anchor tag
- For the crawler to work efficiently we also need to convert the relative links to absolute links. Luckily for us the latest versions of Scrapy enable us to do that with a simple method: urljoin()
So the parse_item() method will look as follows:
Python3
def parse_item(self, response):
file_url = response.css('.downloadline::attr(href)').get()
file_url = response.urljoin(file_url)
yield {'file_url': file_url}
|
If we run the crawler at this state, we will get the links to all the utilities available in nirsoft.
scrapy crawl nirsoft
For beginners: I would advise against running the above command at the moment because your command prompt will just be flooded with a ton of URLs that scroll past too quickly for your eyes to perceive anything.

In a matter of few seconds, our command line will be flooded with all the scraped URLs
Instead, let’s move on to the next step
Step 5: Downloading Files
Finally, the moment we all have been waiting for, downloading the files. However, before we get to that, we need to edit the item class that was created when we created the spider initially. The file can be found in the following location:
...\scrapyProject\downFiles\downFiles\items.py
where
- scrapyProject is the directory name that contains the project
- downFiles is the project name
- items.py is the item’s class in question
The items class has to be edited as follows:
Python3
class DownfilesItem(scrapy.Item):
file_urls = scrapy.Field()
files = scrapy.Field
|
Now we update the spider script to make use of the data fields we have defined
Python3
def parse_item(self, response):
file_url = response.css('.downloadline::attr(href)').get()
file_url = response.urljoin(file_url)
item = DownfilesItem()
item['file_urls'] = [file_url]
yield item
|
You will also have to import the item class you defined earlier into your spider script, and so the import section of the spider script will look like this,
Python3
import scrapy
from scrapy.linkextractors import LinkExtractor
from scrapy.spiders import CrawlSpider, Rule
from downFiles.items import DownfilesItem
|
Finally, to enable file download we need to make two small changes in the settings.py file in our project directory:
1. Enable file downloads:
ITEM_PIPELINES = {
  'scrapy.pipelines.files.FilesPipeline': 1,
}
2. Specify the destination folder for the downloads in settings.py:
FILES_STORE = r"D:\scrapyProject\nirsoft\downloads"
Note: The folder destination should be an actual destination
We use raw string to avoid any errors due to the backslash in Windows location string
Now if we run
scrapy crawl nirsoft
We will be able to find all the files downloaded to the specified destination folder, and hence we are done!
Limiting the types of files to be downloaded
Since we aimed to download the installation files for the utilities, it would be better to limit the crawler to downloading only the .zip and .exe files and leave the rest out. This will also reduce the crawl time thus making the script more efficient.
For this we need to edit our parse_items() functions as shown below:
Python3
def parse_item(self, response):
file_url = response.css('.downloadline::attr(href)').get()
file_url = response.urljoin(file_url)
file_extension = file_url.split('.')[-1]
if file_extension not in ('zip', 'exe', 'msi'):
return
item = DownfilesItem()
item['file_urls'] = [file_url]
item['original_file_name'] = file_url.split('/')[-1]
yield item
|
We also need to add the new data field “original_file_name” to our items class definition:
Python3
class DownfilesItem(scrapy.Item):
file_urls = scrapy.Field()
original_file_name = scrapy.Field()
files = scrapy.Field
|
Save all your changes and run,
scrapy crawl nirsoft
We will be able to find all the .zip and .exe files downloaded to the specified destination folder. However, we still have one issue:

SHA1 hash codes are not human readable, so it would be preferable if the files were saved with their original (human-readable) names, which leads us to the next section
Creating custom pipelines
Initially, we used Scrapy’s default pipeline to download the files, however, the issue was the files were being saved with their SHA1 hash codes instead of their human-readable file names. So we need to create a custom pipeline that will save the original filename and then use that name while downloading the files.
Just like our items class (items.py), we also have a pipeline class (pipelines.py) with a class for our project generated when we created the project, we will be using this class to create our custom pipeline
Python3
from scrapy.pipelines.files import FilesPipeline
class DownfilesPipeline(FilesPipeline):
def file_path(self, request, response=None, info=None):
file_name: str = request.url.split("/")[-1]
return file_name
|
We imported the default FilesPipeline provided by Scrapy and then overwrote the file_path function so that instead of using the hash code as file name, it would use the file name.
We commented out the process_item function so that it does not overwrite the default process_item function from FilesPipeline.
Next, we update our settings.py file to use our custom pipeline instead of the default one.
ITEM_PIPELINES = {
  'downFiles.pipelines.DownfilesPipeline': 1,
}
Finally, we run
scrapy crawl nirsoft
And we have our result:
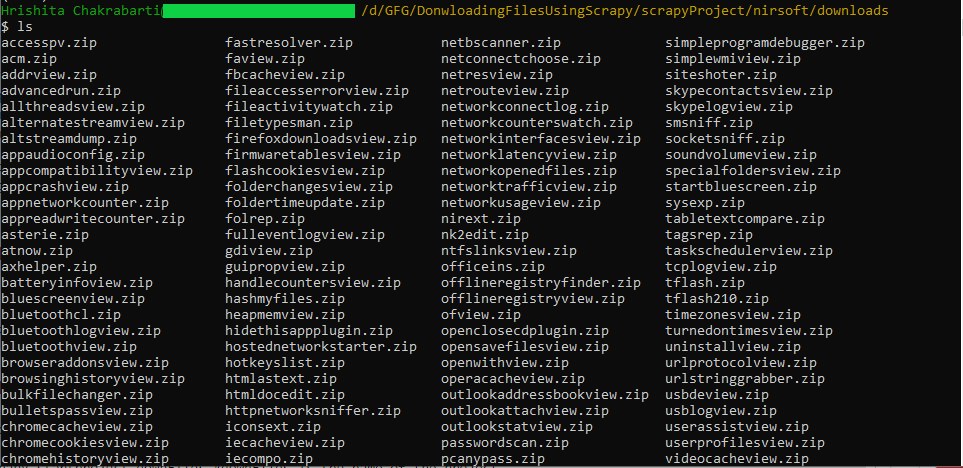
Thanks to the custom Pipeline, the downloaded files are much more readable
Like Article
Suggest improvement
Share your thoughts in the comments
Please Login to comment...