How to Make a Simple RestController in Spring Boot?
Last Updated :
19 Nov, 2021
Spring Boot is built on the top of the spring and contains all the features of spring. And is becoming a favorite of developers these days because of its rapid production-ready environment which enables the developers to directly focus on the logic instead of struggling with the configuration and setup. Spring Boot is a microservice-based framework and making a production-ready application in it takes very little time. In this article, we will discuss how to make a simple restcontroller in the Spring Boot.
restcontroller: restcontroller is used for making restful web services with the help of the @restcontroller annotation. This annotation is used at the class level and allows the class to handle the requests made by the client. Let’s understand @restcontroller annotation using an example.
Spring Initializr is a web-based tool using which we can easily generate the structure of the Spring Boot project. It also provides various different features for the projects expressed in a metadata model. This model allows us to configure the list of dependencies that are supported by JVM. Here, we will create the structure of an application using a spring initializer and then use an IDE to create a sample GET route. Therefore, to do this, the following steps are followed sequentially as follows:
Step 1: Go to Spring Initializr
Fill in the details as per the requirements. For this application:
Project: Maven
Language: Java
Spring Boot: 2.2.8
Packaging: JAR
Java: 8
Dependencies: Spring Web
Step 2: Click on Generate which will download the starter project
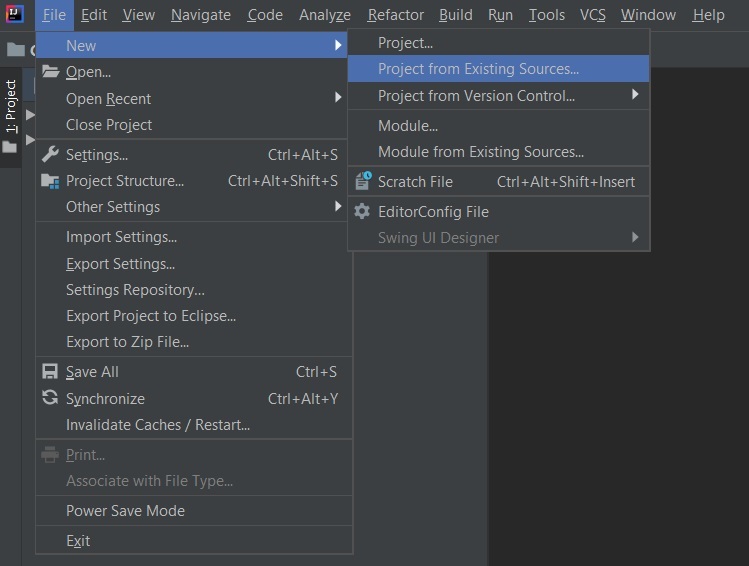
Step 3: Extract the zip file. Now open a suitable IDE and then go to File > New > Project from existing sources > Spring-boot-app and select pom.xml. Click on import changes on prompt and wait for the project to sync as pictorially depicted below as follows:

Note: In the Import Project for Maven window, make sure you choose the same version of JDK which you selected while creating the project.
Step 4: Go to src > main > java > com.gfg.Spring.boot.app, create a java class with the name Controller and add the annotation @RestController.
Controller.java file:
Java
@RestController
public class Controller {
@GetMapping("/hello/{name}/{age}")
public void insert(@PathVariable("name") String name, @PathVariable("age") int age) {
System.out.println(name);
System.out.println(age);
}
|
This application is now ready to run.
Step 5: Run the SpringBootAppApplication class and wait for the Tomcat server to start.

Note: The default port of the Tomcat server is 8080 and can be changed in the application.properties file.
This controller.java file is used for handling all incoming requests from the client-side.
Like Article
Suggest improvement
Share your thoughts in the comments
Please Login to comment...