How to Setup Burp Suite for Bug Bounty or Web Application Penetration Testing?
Last Updated :
30 Sep, 2022
BurpSuite is a set of tools for penetration testing the security of web-based applications. It comes as an all in one tool and it is very famous for its usability. Setting up Burp for penetration testing of web applications is very straight forward.
Starting the Proxy Server:
- Go to the Proxy Tab
- Go to Options Tab
- Input the IP address of your loopback interface(127.0.0.1) and a port number(like 8080).
- Do not use port numbers that may be used by other applications(like 443 or 80).
- Setup a proxy client in your browser.
Some browsers have their inbuilt proxy client, some rely on system proxy settings and some provide both the options. You should go with the browser that has an inbuilt proxy client so that you can continue doing your normal internetwork with some other browser without having to change settings. Once the proxy server and the client are running you will see that the intercept tab of the proxy tab will show you an HTTP request. Now you can monitor all the traffic going through your configured browser.
But, there is a problem. At this point, you can not intercept the HTTPS requests. Why? Because HTTPS is trying to set up a secure tunnel and can only send the requests to the trusted proxy server(s). To make your Burp Proxy server trusted, you need to set Burp’s Certificate Authority PortSwigger as a trusted CA in your browser. You can do this by:
1. Exporting Burp’s CA Certificate on Your Computer:
- Go to options tab of the proxy tab.
- Click on “Import/Export CA Certificate” button.

- Select “Certificate in DER Format” under “Export” section.

- Click on “Next” and click on “Select File” in the next window.

- Select the directory where you want to export your certificate, the trick here is to not go too deep in the structure and save it in some easily accessible folder.
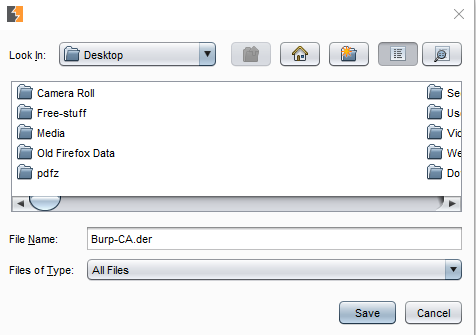
- The selected directory folder appears in the “Look In” section.
- Give a name for the certificate in “File Name” and put extension as .der
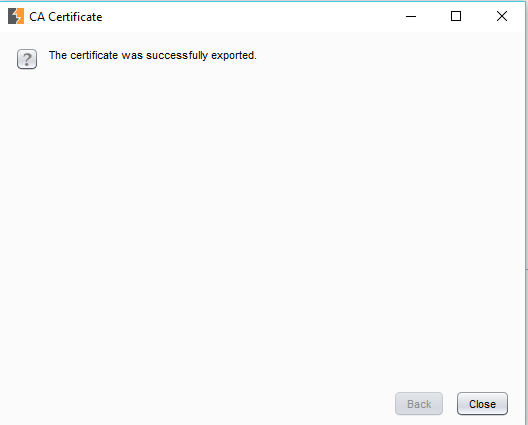
- Click on “Next” and a success message should be shown as follows.
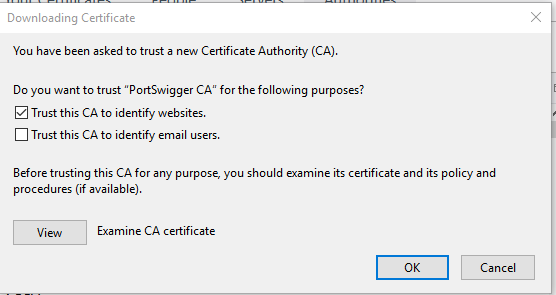
2. Adding the Root CA as Trusted CA in Your Browser:
A. For Mozilla FireFox:
- Go to Menu-> Options.
- Go to “Privacy and Security” window and scroll to the “Certificates” section

- Click on “Import” in the certificate manager pane.

- In the next window check “Trust this certificate to identify websites” and click on “OK”.
For reducing the overhead of changing proxy settings of the browser, I’d recommend that you install an extension to manage the same right from the home window. The extension I use is “FoxyProxy”.
B. For Chrome: Chrome does not have its own proxy settings so it uses the system’s proxy settings. It can be for our purpose by adjusting the system proxy settings but that will make a lot of things messy. For example, all of the requests/responses will go through your Burp proxy regardless of your target(requests/responses from your browser as well as other apps that use the internet). This is why it is recommended that you use a browser with a built-in proxy like Firefox.
This sets you up for getting started with web app pentest using BurpSuite. Now is the time to test that everything is working fine and the Burp Proxy is able to intercept all the request-response pairs. This can be easily checked by accessing a website in the browser and identifying that there are HTTP requests to those websites intercepted by the burp proxy.
Further Tweaking: There are some more things about Burp Proxy which you should know before getting started as it will save you a lot of time by reducing the unnecessary clutter in your HTTP history tab.
- You can specify which type of requests and responses will be intercepted by the proxy by using the extensions. This is available in the options window of the Burp Proxy.
- You can filter choose which requests and responses will be shown in the HTTP history tab by applying generic filters directly by clicking on the label “Filter:” on the top of the tab.
- You can also specify these filters while intercepting a single request or response by clicking on the “Action” button in the “Intercept” tab.
Like Article
Suggest improvement
Share your thoughts in the comments
Please Login to comment...