Quick Preview to Take Screenshot on Windows 10:-
- Use the CTRL + PRT SC Keys to take a quick screenshot.
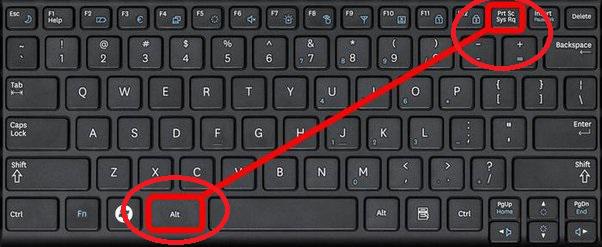
- Use ALT + PRT SC Keys to take a Screenshot of any application window.
- Use Windows + Shift + S Keys to access the Xbox Game Bar.
- Use Snip & Sketch Application as well to take screenshot
Taking Screenshots has become one of the necessary components of our daily life. Whatever device, we are using, we face the need to take screenshots there. Also no doubt, the Screenshots help to describe any action more clearly than any other means. Keep in mind that, Windows comes up with different Methods to Take Windows Screenshots.
In earlier times, there was only one way to Capture Screenshots on Windows. That is the using Windows Keyboard Shortcuts. But as the demand is increasing, there are more new ways introduced to Grab Screenshot on Windows 10. We can enlist 7 different methods to Get the Windows Screenshot.
This article is going to be a detailed guideline about the Ways to Take Screenshots in the Windows 10 operating system.

How to Take Screenshots in Windows 10? [7 Different Methods]
Methods to Take Screenshots on Windows 10
To Take Screenshots of the Windows Screen, the following methods can be used. In this guideline, we will start with the PRT SC Key execution.
Method 1: Take Screenshots on Windows using the Print Screen Button to Capture Full Screen
Step 1: When you have decided what you want to capture as a screenshot, tap on the PrtSc key on your keyboard immediately.
Step 2: The previous step will automatically get a screenshot of the screen and store it in the clipboard of your Windows PC. Since it will not save directly as an image, you can open another editor app, like Paint.
Step 3: On the clear white canvas of the Paint app, put the cursor on the page and press Ctrl + V keys. This will drop the image from the clipboard onto the page.
Step 4: Click on File > Save As. Name the screenshot and choose the location to save it in. Then, press the Save button.
Method 2: Take Screenshots on Windows of a Specific Window
Step 1: When you have many windows open on your device, press the Alt + Win + PrtSc keys together.
Step 2: The screenshot will be stored immediately in the folder named Videos > Captures once you press the Alt + Win + PrtSc keys.
Method 3: Take Screenshots on Windows Whole Screen
If you want to take a quick and accurate screenshot on your screen and avoid saving it into the clipboard, you can press the Windows and PrtScn keys together. This will bring up the thumbnail on the screen at the bottom-left side when the screenshot capture step is done.
You will find the screenshot in your device’s Pictures/Screenshots folder, accessible through the File Manager.
Method 4: Take Screenshots on Windows using the Snipping Tool
Step 1: When you need to screenshot something on the screen, tap on the Windows button (⊞ ) from the taskbar below.
Step 2: Type in the Snipping tool in the search field. Click on the first app option that comes in the result to open it.
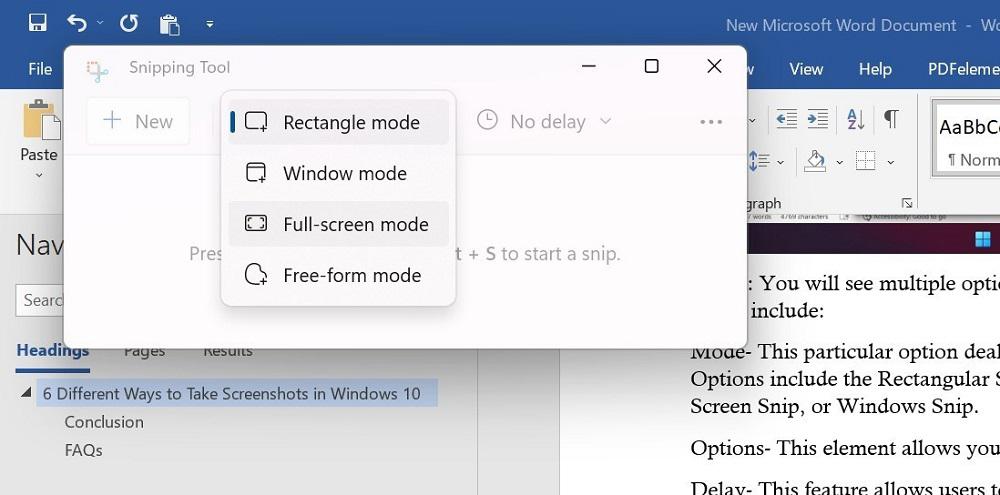
Step 3: You will see multiple options in the app when it opens on your Windows 10 PC. These include:
- Mode – This particular option deals with the style of screenshot you choose. Options include the Rectangular Snip, a default option, Free-Form Snip, Full-Screen Snip, or Windows Snip.
- Options – This element allows you to switch between the options for the Snipping Tool.
- Delay – This feature allows users to delay the screen capture for 1-5 seconds.

Step 4: After setting up the features for the Snipping Tool to take the screenshot, press the New Option. The screen will appear with a white overlay showcasing the uncaptured area.
Step 5: The screenshot will appear in the Spinning Tool after you capture one.
Step 6: Tap on the File tab and choose the “Save As” option to move the screenshot to your preferred location on the hard drive. The app does not automatically save the screenshots anywhere.
Method 5: Take Screenshots on Windows using the Snip & Sketch Tool
Step 1: Go to the window or page you will capture. Press Win + Shift + S keyboard shortcut or click the Start menu from the taskbar > type Snip & Sketch > tap the option.
Step 2: After the tool opens, you will see many options as icons, like:
- Freeform– For drawing a custom shape that you create to screenshot.
- Rectangle– Capture a screenshot of the screen within a rectangle shape you expand or decrease with your mouse.
- Full-screen Snip– The screenshot of the entire PC screen or the screens of multiple monitors (if you are using many of them).
- Window Snip– This mode captures only the screenshot of the window you are currently using.
If you want to change your choice, tap on X to close the tool.
Step 3: After capturing the screenshot, the image will be saved in the clipboard. Click on it from the notification that pops up on your screen. Tap on it for markup/file sharing.
Step 4: If the popup notification does not appear, go to the Notifications bar at the right part of the screen to access the Snip & Sketch tool.
Step 5: Save the file in the Paint app to cut the screen size. Then save the file.
Method 6: Take Screenshots on Windows using the Game Bar
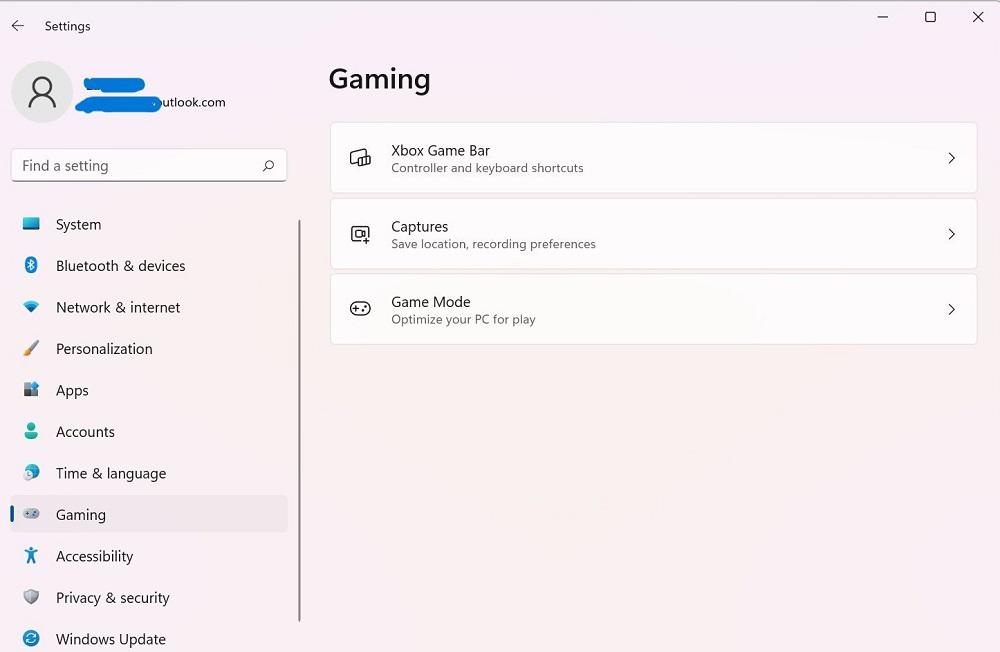
Step 1: For this app to work for screenshotting, you have to activate the Game Bar feature on your PC first. For that, go to Settings > Gaming. Then, activate the slider for the Game Bar operation in the next window.

Step 2: On your PC, tap the Win + G keys to access the Game Bar.
Step 3: Then tap on the Capture option. Or, press Win + Alt + PrtSc.
Step 4: The full-screen screenshot of the window you capture automatically saves into Videos > Captures. Click on it from File Manager to find and use it later.
Method 7: Take Screenshots on Windows using the Alt + Prt Sc
Step 1: Go to the desired screen of which you’re looking to take the screenshot and hit Alt + Prt Sc (Print screen) at the same time.
Step 2: You will be required to select the desired area in which you want to take the screenshot, click, the and save it as required.
Step 3: An image will be copied and can be pasted simply on the Paint app.

Taking a Screenshot on PC isn’t a tough task, even if you aren’t a tech-savvy person. All you need to do is follow this step-by-step Guide to Take Screenshots of anything on your PC. Use the simple PrtSc key for this process or different tools available on the device. Follow the steps correctly to avoid errors with this function on a Windows PC.
Also Read
Frequently Asked Questions to Take Screenshots on Windows 10
How to take screenshots on Windows 10?
To take the screenshot on Windows 10, press the CTRL + PRT SC Keys simultaneously. Then, the copied item will be pasted into a document or Photos application. You can save the file to get the screenshot.
How to take a screenshot on Windows 10 without the PrtScn key?
To take screenshots without using the PRT SC Key, you can use the Windows + Shift + S key. It will open the Snip & Sketch application where you can take screenshots of your Windows screen.
Can Windows automatically take screenshots?
No! On Windows, you have to perform screenshot operations manually. There are no options where Windows will take screenshots of certain pages without human interaction. You have to initiate the Screenshot operation manually on Windows.
Like Article
Suggest improvement
Share your thoughts in the comments
Please Login to comment...