Interacting With Ethereum Smart Contract Using Web3js
Last Updated :
01 May, 2023
Ethereum is a cryptocurrency platform in the market just like Bitcoin. It is an open-source & decentralized blockchain featuring working on smart contracts. It has its own cryptocurrency known as ether. The smart contracts in Ethereum are written in solidity.
TestRPC The Ethereum TestRPC is like a manual emulator for blockchain. It provides blockchain interaction without running on an actual Ethereum node. It also provides all the features required for testing of your blockchain. It is based on Node.js.
Web3.js Web3.js is an Ethereum-based JavaScript API that allows us to interact with a local or remote Ethereum node using different servers such as HTTP. It interacts with the Ethereum blockchain and can retrieve data from the blockchain as required by the developer.
This article describes how to interact with your Ethereum smart contract using Web3.js and TestRPC. It is recommended that you go through on How to Work on Remix-IDE before proceeding further.
Before we proceed to the steps, install TestRPC and Web3JS as follows:
1. TestRPC
Step 1: Open the console or command line and run the following commands to check if node and npm are installed.
$ node -v
$ npm -v
If the above command goes unrecognized then download them from Nodejs.org for windows or using the following commands (for macOS). The npm package is installed along with the node.
$ brew install node
To update these packages use the following commands-
$ brew upgrade node
Step 2: Now install ethereumjs-testrpc using the following command-
$ npm install -g etherumjs-testrpc
Step 3: Now you can start the server using the following command
$ testrpc

2. Web3.js
Step 1: Open console or command line and move to the folder which contains the JavaScript for your page as follows-
$ cd desktop/myproject
Step 2: Now, run the npm init command to create a package.json file, which will store project dependencies:
$ npm init
Step 3: After completing the above installation run the following command for the installation of web3.js-
$ npm install ethereum/web3.js0.20.0 –save
After the installation of TestRPC and Web3.js create a smart contract which you want to connect with Web3.js.
Step 1: Open Remix-IDE.
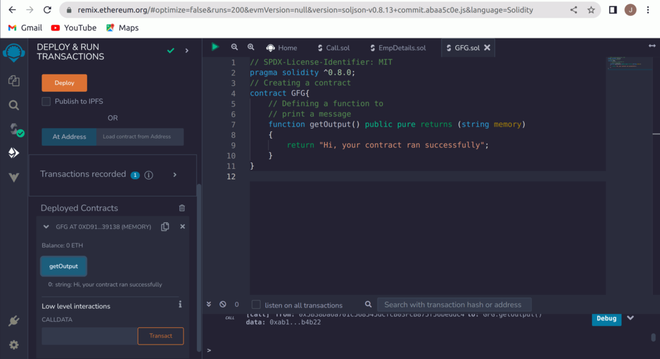
Step 2: Create a sample smart contract as shown below or create any other smart contract.
Solidity
pragma solidity ^0.8.0;
contract GFG{
function getOutput() public pure returns (string memory)
{
return "Hi, your contract ran successfully";
}
}
|
Step 3: Compile your code and move to the Deploy section.
Remix IDE Setup
Step 4: Select the environment as Web3 Provider and enter the TestRPC server http://localhost:8545, Make sure TestRPC is running on your system.

Step 5: Now using the following code, connect your webpage code to your smart contract.
Javascript
<script>
if (typeof web3 !== 'undefined'){
web3 = new Web3(web3.currentProvider);
}
else{
}
web3.eth.defaultAccount = web3.eth.accounts[0];
var yourContract = web3.eth.contract('PASTE ABI HERE!');
var contract_name = yourContract.at('PASTE CONTRACT ADDRESS HERE');
</script>
|
This code comes directly from the Web3.js Github page.
NOTE:

  1. Variable names can be changed according to requirements.
  2. You need to paste contract address and ABI as asked above in the code.
  3. You will get the contract address when you deploy your smart contract.
  4. You will get ABI when you compile your smart contract in compilation details.
  5. You can use all your contract functions from here onwards.
  6. The TestRPC command which we ran provides us 10 accounts, here we are using the first one.
  7. If you modify the code then you will have to redeploy it, and in that case you will have to give the recent deployed address and the current ABI.

Output: The output can be customized as you want to display it on your webpage but in the Remix-IDE the output will look like this after deploying the smart contract

Contract Output
This is how your smart contract is interacted with using web3.js. Keep exploring more about Ethereum Blockchain 🙂
Like Article
Suggest improvement
Share your thoughts in the comments
Please Login to comment...