ROS Subscribers using Python
Last Updated :
28 Feb, 2022
Writing a Subscriber for a bot in simulation might seem to bring with it a load of complexity, but it definitely is not so. Progressing through the tutorials for Robot Operating Systems (ROS) offers a great deal of knowledge, however, it might fare well to provide more insight. This article aims to provide an understanding of how Subscribers work and are better written in Python.
ROS Subscribers
Since robots primarily intend to automate what humans would otherwise do, we will draw parallels between simple human anatomy or man-made paraphernalia, and the robot’s construction to build perspective. Therefore, it is crucial that the reader understands what ROS nodes and ROS topics are.
Simply put, a node may be thought of as a mini-mailbox of the Robot! As a result, it exists in itself to provide us with some information and process that it receives from somewhere (we will qualify this soon). It is also important to note that a bot can have several such nodes (several mini-mailboxes) each of which has access to important information. But what kind of information is this? Nodes have access to different types of messages and nodes themselves!
Meanwhile, a ROS topic is best understood as an organ of the body (going by the human analogy). Each organ/topic makes certain ‘kinds’ of information accessible to the brain. From the diagram below, it may be inferred that in order for our robot to have some vision (use its eyes), it must access the correct organ (eyes) which in ROS is the /camera topic.
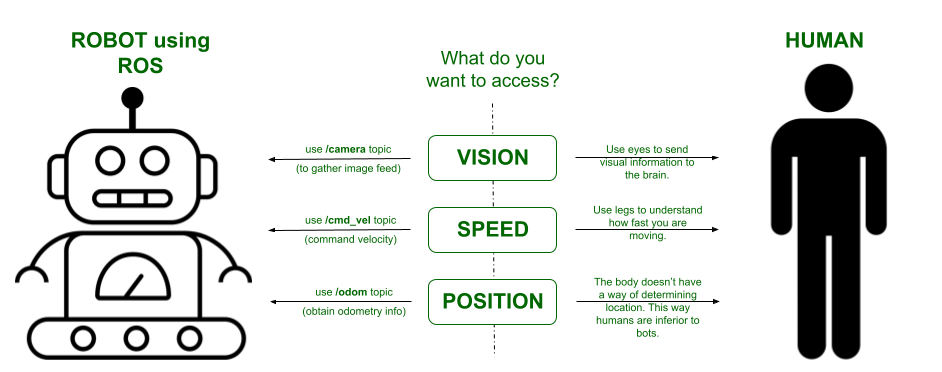
Here the ROS topics are channels on which information is broadcasted by the Robot. (Image created using Google Draw)
So where does the subscriber come into the picture? The subscriber is a node (mini-mailbox) that makes it possible for the robot’s brains to ‘subscribe to‘ the several topics which are constantly giving out information. Therefore, the primary goal of a Subscriber is to establish this type of communication between ROS topics and nodes. This makes subscribers the fundamental manner by which we may control our robot. For further clarity, the formal definition has been provided below:
A Subscriber in ROS is a ‘node’ which is essentially a process or executable program, written to ‘obtain from’ or ‘subscribe to’ the messages and information being published on a ROS Topic. A subscriber cannot publish or broadcast information on its own.
Prerequisites
In order to work along with the examples, it is necessary to have the following:
- ROS noetic installed on your native windows machine or on Ubuntu (preferable). Many users also run ROS on Ubuntu via a Virtual Machine.
- Turtlebot3 simulator. While it comes included in the ROS noetic install.
First things first, ensure that you have a spare package where you can store your python script file. Skim through this if you do not know how to create a package. This could be something like a practice_pkg or the package in which you wish to start working immediately.
Regardless of how you wish to store the .py file, go ahead and navigate into your workspace and the /src folder of your package. Create your subscriber file here. Let’s name it subscriber.py.
$ cd ~/catkin_ws/src/package_name/src
$ gedit subscriber.py
Let’s look at the template now.
Template
Python3
import rospy
from std_msgs.msg import String
def callback(data):
rospy.loginfo("Here's what was subscribed: %s", data.data)
print('Data from /topic_name received')
def main():
rospy.init_node('listener', anonymous=True)
rospy.Subscriber("/topic_name", String, callback)
rospy.spin()
if __name__ == '__main__':
try:
main()
except rospy.ROSInterruptException:
pass
|
Explanation
- Starting from the main function, notice how it’s always best to use an error handling block. Call and execute the main function from here.
- Start by initializing the node. You may call your node by any name. Here we have called it by the name ‘listener’. By setting anonymous = True, we let the compiler append numbers to the end of the node’s name so as to ensure anonymity. This is best visualized with rqt graphs.
- In the next line, we define the subscriber aspect of this node.
- Replace </topic_name> with the ROS topic you wish to subscribe to. One way of knowing which topics are currently accessible and published is by using the commands below.
- The second field indicates the data type of the message we are subscribing. Here we are subscribing to a String type. Important: always import this data type from it’s respective package. Here, String is an executable of the std_msgs.msg package.
- The third field is the most crucial field. It indicates the name of the function to which this obtained data will be sent. Every time any information is received from the specified ROS topic, it is sent to this callback function. DO NOT suffix the function name with ‘( )’.
$ roscore
# Press Ctrl+shift_T to open a new terminal
#now build your executables. This is good practice.
$ catkin_make
$ rostopic list
- The data received by our subscriber node from the ROS topic is now sent to callback( ).
- In the example above, we simply print this data information into a log file using the ros.loginfo( ) command. However, the real work lies in improving what we use this obtained data for. Therefore, real applications will always present lengthy codes following the callback( ).
Using Object-Oriented Architecture
It is always advisable to opt for creating instances of your nodes. This makes the robot-human analogy or robot-‘mini-mailbox’ analogy much more apparent and easier to understand, if not just the idea of debugging.
In this example, we will try to obtain the velocity at which our turtlebot moves. Save this file as subscriber.py – for the convenience alone.
Python3
import rospy
from geometry_msgs.msg import Twist
class basic_subscriber:
def __init__(self):
self.image_sub = rospy.Subscriber("/cmd_vel",
Twist, self.callback)
print("Initializing the instance!")
def callback(self, Twist):
rospy.loginfo(rospy.get_caller_id() + "The velocities are %s",
Twist)
print('Callback executed!')
def main():
sub = basic_subscriber()
print('Currently in the main function...')
rospy.init_node('listener', anonymous=True)
rospy.spin()
if __name__ == '__main__':
try:
main()
except rospy.ROSInterruptException:
pass
|
Explanation
- Code execution begins in the try-except block. The function main( ) is called here.
- In main( ):
- Create an object or instance of type basic_subscriber(). This initializes the class.
- Execution continues onto the next line where we create and initialize the node ‘listener’.
- rospy.spin( ) ensures that are code is executing in an infinite loop until a shutdown signal is received.
- In the basic_subscriber class, we use the constructor equivalent __init__(self) to define the attributes of the class.
- The subscriber entity is now defined.
- It subscribes to the ‘/cmd_vel’ topic.
- The type of message we have subscribed to here is of type Twist() – the one cluing us on the velocities.
- The final field calls the callback( ) function now.
- Here is where we print the subscribed information onto the terminal and also to a log file.
- In order to confirm that our callback( ) function was executed successfully, we print a simple message ‘Callback executed’.
Be sure to make this file an executable. In order to do so, navigate to your package’s directory and type the following:
$ chmod +x subscriber.py
Deploying ROS
First, run turtlebot3 from the Terminal.
$ roscore
# Press Ctrl+Shift+T to open a new terminal
$ caktin_make
# always source your base files in every new terminal that you open.
$ source devel/setup.bash
# now run the turtlebot3 simulator
$ roslaunch turtlebot3_gazebo turtlebot3_world.launch
You will notice that gazebo launches and the default Once again, in a new Terminal, type the following:
$ source devel/setup.bash
$ roslaunch turtlebot3_teleop turtlebot3_teleop_key.launch
You will now be able to control the turtlebot3 simulator which opens in a separate window using your keyboard. Now run your Subscriber script. In a new terminal, run the following:
$ rosrun <package_name> subscriber.py
Output:
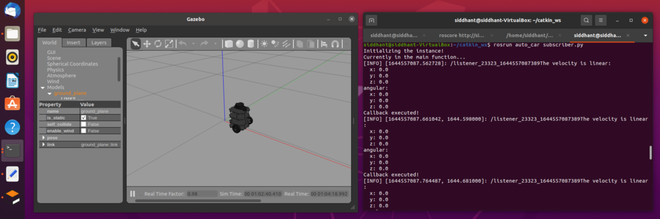
When the turtlebot3 is stationary.
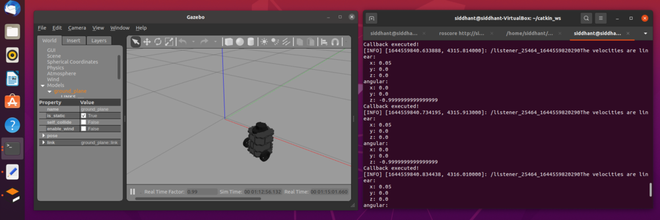
After moving the turtlebot3 using teleop_key.
Code demonstration
Like Article
Suggest improvement
Share your thoughts in the comments
Please Login to comment...