Spring – Static Factory Method
Last Updated :
14 Feb, 2023
Static factory methods are those that can return the same object type that implements them. Static factory methods are more flexible with the return types as they can also return subtypes and primitives too. Static factory methods are used to encapsulate the object creation process. In the Spring framework if we want to create a bean using the static factory method then we could use the factory method attributes.
Example
In this example, we will use the static factory method to create a bean and encapsulate the creation process of the bean. We will use a Student class and create different objects of this class based on the department of the students using the static factory method.
Step 1: Create a Maven Project
In this step, we will create a new maven project and make sure you will Create a simple project(skip archetype selection).
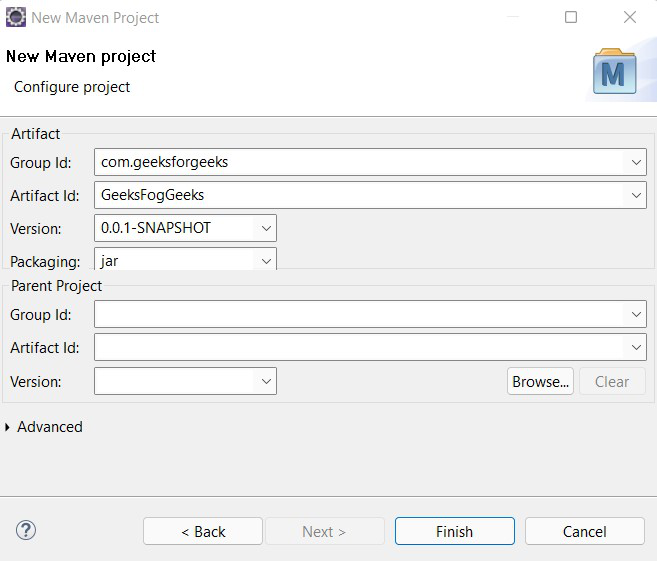
Fig 1 – Project descriptions
Step 2: Adding Dependencies
Now we will add the maven dependencies to our application. Add the following dependencies to your pom.xml
XML
<modelVersion>4.0.0</modelVersion>
<groupId>com.geeksforgeeks</groupId>
<artifactId>GeeksForGeeks</artifactId>
<version>0.0.1-SNAPSHOT</version>
<dependencies>
<dependency>
<groupId>org.springframework</groupId>
<artifactId>spring-beans</artifactId>
<version>5.0.8.RELEASE</version>
</dependency>
<dependency>
<groupId>org.springframework</groupId>
<artifactId>spring-context</artifactId>
<version>5.0.8.RELEASE</version>
</dependency>
</dependencies>
</project>
|
Step 3: Create A Model(Bean) Class
In this step, we will create a model class Student.java for our application. This class will have id, first_name, last_name, and department as the member variables. We will create its getter and setters method and will provide a toString() method definition.
Java
public class Student {
private int id;
private String first_name;
private String last_name;
private String department;
public int getId() {
return id;
}
public void setId(int id) {
this.id = id;
}
public String getFirst_name() {
return first_name;
}
public void setFirst_name(String first_name) {
this.first_name = first_name;
}
public String getLast_name() {
return last_name;
}
public void setLast_name(String last_name) {
this.last_name = last_name;
}
public String getDepartment() {
return department;
}
public void setDepartment(String department) {
this.department = department;
}
@Override
public String toString() {
return "Student [id=" + id + ", first_name=" + first_name + ",
last_name=" + last_name + ", department="
+ department + "]";
}
}
|
Step 4: Implementing Factory Class
In this step, we will create a StudentFactory class and in this class, we will create our factory method createStudentOfDepartmentType(String department), and provide its implementation. This class will create different Student instances depending on the department to which the student belongs.
Java
public class StudentFactory {
public static Student createStudentOfDepartmentType(String department) {
Student student = null;
if(department.equals("CSE")) {
student = new Student();
student.setId(1);
student.setFirst_name("geeks");
student.setLast_name("geeks");
student.setDepartment(department);
}
else if(department.equals("MECH")) {
student = new Student();
student.setId(2);
student.setFirst_name("dummy");
student.setLast_name("dummy");
student.setDepartment(department);
}
else {
throw new IllegalArgumentException("Unknown department");
}
return student;
}
}
|
Step 5: Bean Configuration
In this step, we will create the spring configuration file and name it application-context.xml. We will configure our beans and use the factory-method attribute for bean creation.
XML
<?xml version="1.0" encoding="UTF-8"?>
xsi:schemaLocation="
<bean id="CSE" class="com.gfg.factory.StudentFactory"
factory-method="createStudentOfDepartmentType">
<constructor-arg value="CSE" />
</bean>
<bean id="MECH" class="com.gfg.factory.StudentFactory"
factory-method="createStudentOfDepartmentType">
<constructor-arg value="MECH" />
</bean>
</beans>
|
Step 6: Creating Utilities Class
Now, we will create a Utility class for testing our spring static factory method. For this create a new class and name it TestSpringFactoryMethod.java and add the following code to it.
Java
import org.springframework.context.support.AbstractApplicationContext;
import org.springframework.context.support.ClassPathXmlApplicationContext;
import com.gfg.model.Student;
public class TestSpringFactoryMethod {
@SuppressWarnings("resource")
public static void main(String []args) throws Exception {
AbstractApplicationContext context = new ClassPathXmlApplicationContext("application-context.xml");
Student computer_student = (Student)context.getBean("CSE");
System.out.println(computer_student.toString());
Student mechanical_student = (Student)context.getBean("MECH");
System.out.println(mechanical_student.toString());
}
}
|
Output:
Run the application as Java Application.

Like Article
Suggest improvement
Share your thoughts in the comments
Please Login to comment...