Troubleshooting Google Chrome on Windows 10
Last Updated :
07 Oct, 2022
Google Chrome is one of the most widely used web browsers. Despite being successful it still troubles its user-base. In this article, we will look into various ways you can troubleshoot the Google Chrome crashing problem in a Windows 10 machine.
Let’s dive into it. This article lists the most popular ways of troubleshooting the crashing Google Chrome issue:
Fix #1: Check Chrome’s Latest Version
- Open your Google Chrome browser.
- Go to the Settings icon in the extreme right.
- Then click on the Help option followed by the About Google Chrome option.
- Make sure that you have the latest version of Google Chrome installed in your system.
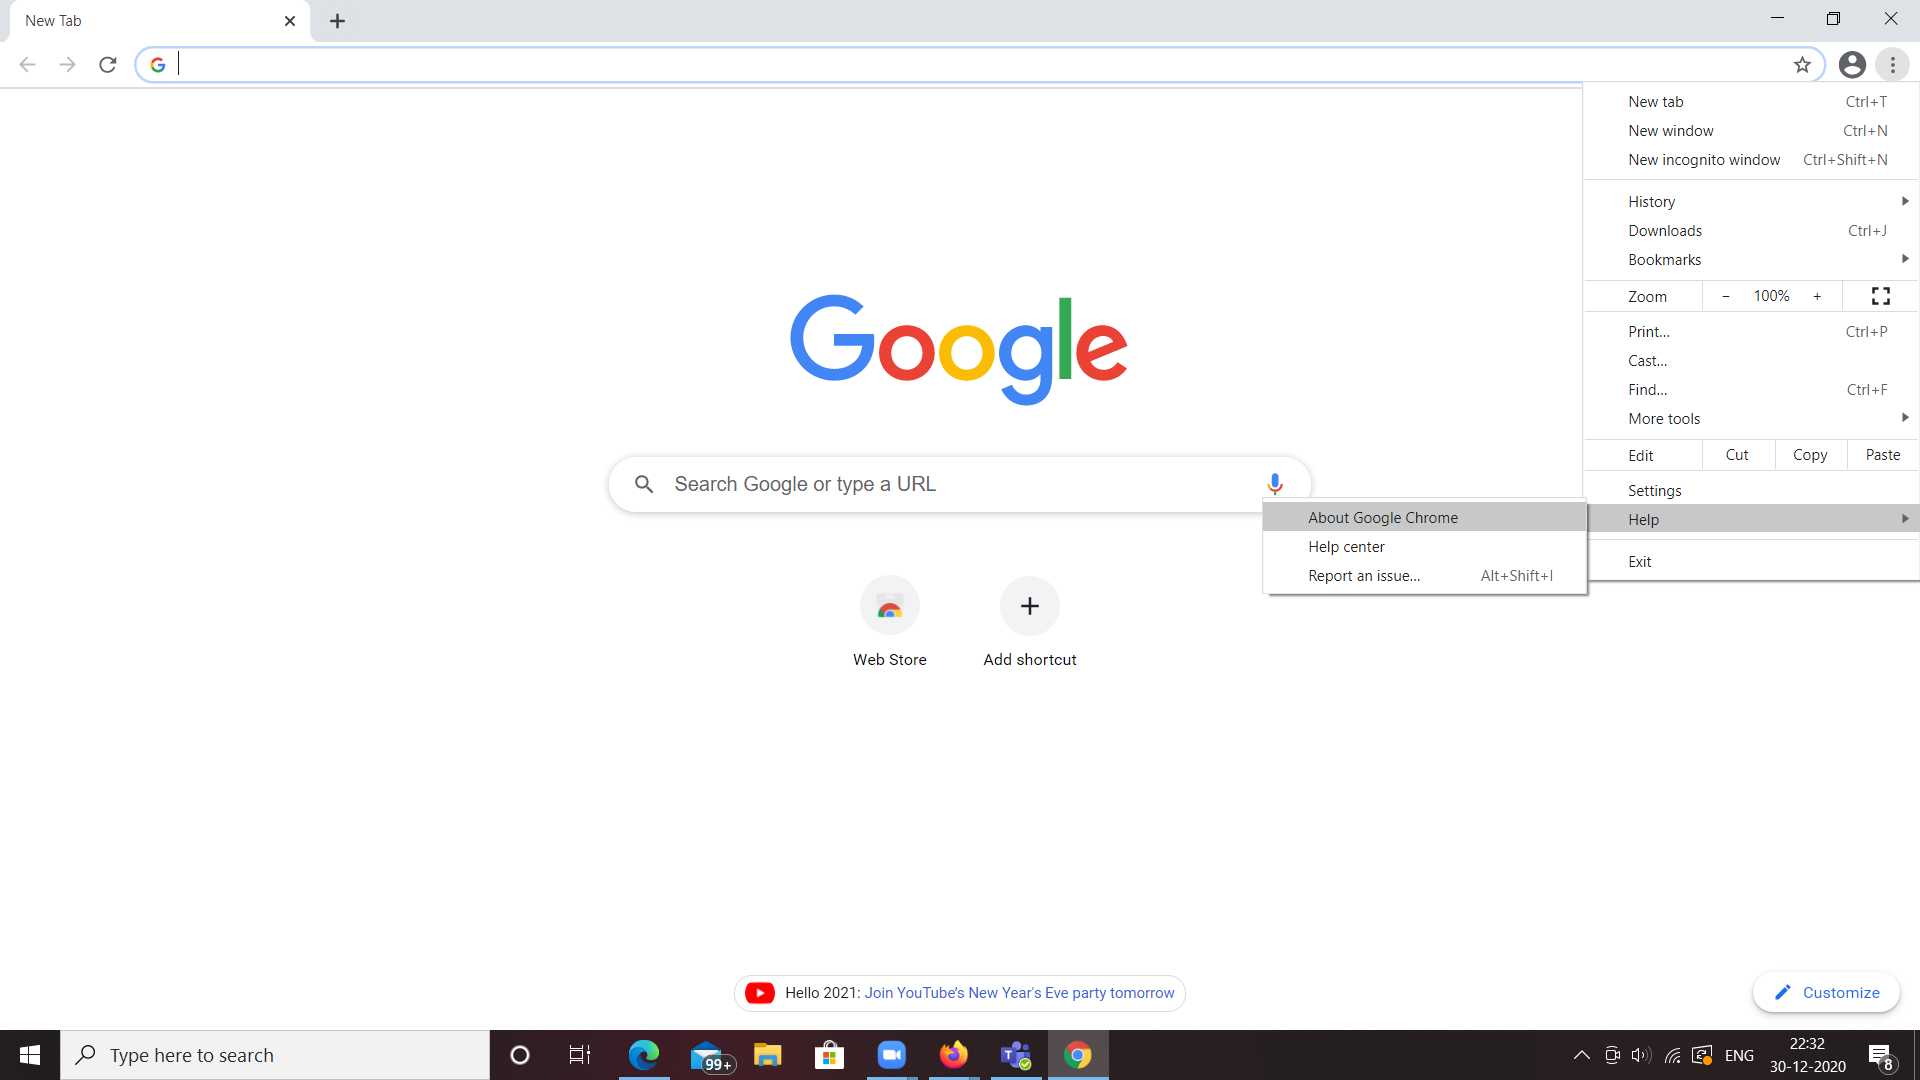
- Check whether Google Chrome is up to date or not as shown below. If not update it.

Fix #2: Clear History and Browser Cache
- Go to the Settings icon on the extreme right.
- Go to History followed by the History option.
- A new screen pops up as shown below.

- Click on the Clear Browsing data on the left side. Then a screen pops up as shown below.

- Click on the Advanced tab. Select the time range to all time. Select all the data and click on the clear data button.

- Relaunch the web browser and see if it works.
Fix #3: Disable all Chrome Extensions
- Go to the address bar and type chrome://extensions. Here you will be shown all the extensions installed in your web browser.
- Disable all the extensions and see if Google Chrome becomes more stable.
- Relaunch your web browser.

- Try browsing in Google Chrome and check if it fixes your problem. If yes, it means some extensions are actually causing a crash on your web browser.
- So try manually enabling all the extensions one by one and observe whether that particular extension is the one that is causing the issue.
Fix #4: Using the no-sandbox flag for Google Chrome
- Go to your desktop.
- Right-click on the Google Chrome shortcut.
- Click on the Properties option.
- Before proceeding any further make sure you have a shortcut icon on the Desktop. If not, simply drag the Google Chrome icon from your Start menu to the Desktop.
- Locate the Target line.
- Type -no-sandbox at the end of the input field
- Click on the Apply button
- Relaunch Google Chrome

Fix #5: Change Chrome Default Profile
- Close the web browser and ensure that all the instances of Google Chrome are closed by going to Task Manager’s Details tab.
- Once done go to the file explorer and type %appdata% in the address bar.

- Click on the AppData followed by the Local folder.
- Look for the Google folder followed by the Chrome folder. Open the User Data folder inside Chrome.
- Rename the Default folder to Default.old and see if this solves your problem.
Fix #6: Check for and remove incompatible programs
- Open your Google Chrome browser.
- Navigate to the settings page by typing chrome://settings in the address bar.
- Scroll to the bottom of the page.
- Click on the Advanced link.
- Locate the Reset and clean up section.
- Click on Clean up computer.
- A new page pops up with the option to Find harmful software.
- Click on the Find button.
- Choose to remove any incompatible applications on your device.
- Restart Google Chrome.

Fix #7: Switch to a new user profile
- Open your Google Chrome browser.
- Click on the Profile icon on the extreme right of the browser window.
- Click on Manage people in the context menu
- A new window pops up, click on the Add Person button.
- After typing your name and selecting a profile picture, click on the Add button.
- To switch to a new user profile visit the Profile icon in the extreme right of the browser.

Fix #8: Clear DNS Cache on System
- Close the Google chrome browser.
- Go to the start menu and open the command prompt.
- Type ipconfig /flushdns.
- Then type netsh winsock reset.

- It clears DNS Cache on your System.
- See if this works and solves your problem.
Fix #9: Run System File Checker (Checks corrupt system files)
- Stay on the command prompt and type sfc /scannow.
- It runs the system file checker and checks any of our files get corrupted in shutdown, reboot, or update.
- It will try to check the system files which are crucial that would probably be the cause of the crash.

Fix #10: Run DISM Tool to restore corrupted files
- After the System file checker is done. Go ahead and try typing the command as shown below.

- It checks and repairs the found corrupt files on your system by looking at the windows or rather the deployment image servicing and management tool image and trying and copying those corrupted files and replacing them with a fresh copy so once done hopefully that would fix your problem.
Fix #11: Reinstall the Google Chrome
- Close your Google Chrome.
- Go to the Start menu.
- Click on the Settings.
- Go to the apps option.
- You will be shown the list of all the apps that are currently installed on your system and go ahead and look for Google Chrome then make sure to uninstall it.
- After it is uninstalled go ahead and download a fresh copy of Google Chrome.

Fix #12: Change DNS Server
- Navigate to Control Panel.
- Click on Network and Internet.
- Click on Network and Sharing Center.
- At left hand side you can see Change Adapter Settings Click on it.
- You can see your connected network, right click on it and navigate to properties.
- In middle it shows connection items, click Internet Connection Version 4(TCP/IPv4) and click on properties.
- Click Use the following IP Address.
- Enter 8.8.8.8 in Preferred DNS server box and 8.8.4.4 in Alternate DNS Server box and hit OK.
- Wait for some minutes and Site Can’t be Reached problem solved.

Control Panel View
Like Article
Suggest improvement
Share your thoughts in the comments
Please Login to comment...