Google launched Android Jetpack at Google I/O 2018, which is a bundle of components, tools, and guidelines for creating excellent Android apps. It included LiveData, ViewModel, Room Database, Work Manager, and other components. ViewModel will be discussed in this blog. In the Activity lifecycle, ViewModel maintains UI-related data. It enables the App to withstand configuration changes (like Screen rotation).
ViewModels are mostly used for,
- Prepare data for the user interface layer.
- Handles app rotation configuration.
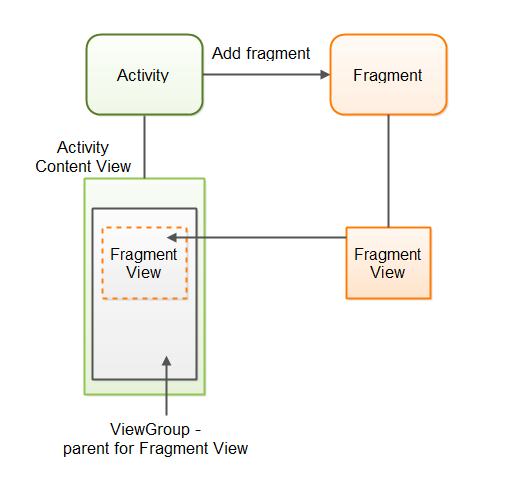
Image 1, View Model Lifecycle.
How to Add a ViewModel
Kotlin
class gfgViewModel : ViewModel() {
val courses = MutableLiveData<List<courses>>()
fun getCourses(): LiveData<List<courses>> {
return courses
}
private fun loadCourses() {
courses.value =
}
}
|
Then to import the data into View,
Kotlin
class GeeksActivity : AppCompatActivity() {
override fun onCreate(savedInstanceState: Bundle?) {
val gfgSampleModel = ViewModelProviders.of(this).get(MainViewModel::class.java)
gfgSampleModel.getCourses().observe(this, Observer<List<courses>>{ courses ->
})
}
}
|
We must initialize the ViewModel in the View (Activities/Fragments) by using,
Kotlin
val gfgSamplemodel = ViewModelProviders.of(this).get(GeeksModel::class.java)
|
Now we can see the data in the UI:
Kotlin
gfgModel.getCourses().observe(this, Observer<List<Courses>>{ courses ->
}
|
This is how ViewModel is used in our Views. More information about ViewModel may be found here. Now we can change, but it’s restricted. To manage that, we may use onSaveInstanceState() to return to the previous state.
Every Android application operates in its own Linux process, which is described as System Initiated Process Death. This process is started by the program when part of its code has to be executed, and it will continue to run until it is no longer required and the system needs to recover its memory for usage by other applications.
GeekTip: If your program is not in the forefront, the system can stop it at any time to free up system RAM for other processes to use.
- Both configuration and system-initiated process death may be handled by the onSaveInstanceState() bundle.
- However, it can only hold a limited amount of data and is highly dependent on speed and storage because serialization requires a large amount of memory to store the data.
- Serialization occurs on the main thread, thus when the configuration changes, the UI screen may be blocked, and the app may also freeze of produces (ANRs), i.e. App Not Responding.
- onSaveInstanceState() can only save a small amount of data.
Saved State of ViewModel
Because UI data is always referenced from ViewModel of Architecture Components and not the View (Activity/Fragment), Saved State of ViewModel may be regarded as a substitute for onSaveInstanceState(). So we’ll have to perform some code to utilize onSaveInstanceState().
So, as part of Jetpack, Google launched Saved State, which allows us to retain and recover data from the saved states after it has been killed by the System Initiated Process Death.
GeekTip #2: It should be noted that the state must be basic and lightweight. Local persistence should be used for complicated or big data sets.
Add the following code to your build to integrate the Saved State in Project.
implementation 'androidx.lifecycle:lifecycle-viewmodel-savedstate:1.0.0-alpha01'
How Do I make use of Saved State?
Replace the following code snippet in the onCreate() function of your View (Activity/Fragment).
val model = GeeksViewModel.of(this, savedVMState(this)).get(MainGfGViewModel::class.java)
instead of:
val gfgModel= GeeksViewModel.of(this).get(MainGfGViewModel::class.java)
Furthermore, in ViewModel:
class GeeksViewModel(private val state: SavedStateHandle) : ViewModel() { ... }
As you can see, we supplied SavedStateHandle to the ViewModel’s main function Object() { [native code] }. To obtain a SavedStateHandle, we use SavedStateVMFactory() as the Factory in our ViewModelProviders.of.
GeekTip #3: A Factory is an Interface that instructs the ViewModel on how to construct the ViewModel.
Do note that it is just a key-value pair. Even if the program dies due to System Initiated Process Death, the data will still be saved.
As you can see, we supplied SavedStateHandle to the ViewModel’s main function Object() { [native code] }. To obtain a SavedStateHandle, we use savedVMState() as the Factory in our GeeksViewModel.of.
A Factory is an Interface that instructs the ViewModel on how to construct the ViewModel.
- Even if the program dies due to System Initiated Process Death, the data will still be saved.
- SavedStateHandle is similar to SharedPreferences in Android in that it operates on a Key-Value pair.
- Let’s take a look at an example: we’ll be creating an app with three UI components (EditText, Button, and TextView).
- When the user enters their username in the EditText and clicks the Button, the username should be displayed in the TextView
The MainViewModel should now look like this,
Kotlin
class GeeksVM(private val savedStateHandle: SavedStateHandle) : ViewModel(), BaseViewModel {
override fun getCoursename(): LiveData<String> {
return savedStateHandle.getLiveData(Constants.COURSE)
}
override fun saveCourse(username: String) {
savedStateHandle.set(Constant.COURSE, course)
}
}
|
Here,
- The data is stored using savedStateHandle.set(“Key”,”Value”).
- The saved state handle.get live data(“key”) method is used to retrieve the LiveData of the String datatype.
The MainViewModel class implements the BaseViewModel, which looks like this.
Kotlin
interface gfgViewModel {
fun getCoursename(): LiveData<String>
fun saveCourse(username: String)
}
|
To Validate
Perform Step – #1 and you will not see your app’s package name in the console.
When you re-open the program, you should see the output persisted and shown in the TextView of the Screen.
Important Notes:
If you wish to preserve the data, use savedState.
savedStateHandle.set("key_name","value")
If you wish to retrieve data from a savedState, use the following syntax:
savedStateHandle.get("key_name")
Use if you wish to obtain LiveData as a return type.
savedStateHandle.getLiveData("key_name")
If you want to see if a certain key is present in savedState, use the following code.
savedState.contains("key_name")
If you want to locate all the keys in the savedState, use the following to get a list of them.
savedState.keys()
You may also remove any individual value by accessing it via its key. To carry out the following action:
savedState.remove("key_name")
Like Article
Suggest improvement
Share your thoughts in the comments
Please Login to comment...