Bottom Navigation Bar in Android Jetpack Compose
Last Updated :
08 Sep, 2021
We all have seen BottomNavigationBar in so many apps, such as Instagram, Quora. In this article, we will learn how to add bottom navigation in Jetpack Compose. Below is a sample of how it will look.

Why do we need a Bottom Navigation Bar?
- It allows the user to switch to different activities/fragments easily.
- It makes the user aware of the different screens available in the app.
- The user is able to check which screen are they on at the moment.
The following is an anatomy diagram for the Bottom Navigation Bar:

Prerequisites:
Step by Step Implementation
Step 1: Create a New Project (Or use it in the existing Compose project)
To create a new project in the Android Studio Canary version. Refer to this article: How to Create a New Project in Android Studio Canary Version with Jetpack Compose?
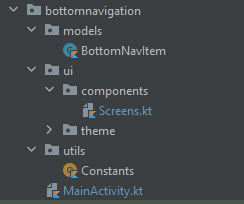
Project structure
Step 2: Adding Dependencies
Open build.gradle(app) and add the following dependency.
implementation “androidx.navigation:navigation-compose:2.4.0-alpha07”
Step 3: Creating Screens
Open Screens.kt and create three screens, Home, Search, Profile.
HomeScreen:
Kotlin
@Composable
fun HomeScreen() {
Column(
modifier = Modifier
.fillMaxSize()
.background(Color.White),
horizontalAlignment = Alignment.CenterHorizontally,
verticalArrangement = Arrangement.Center
) {
Icon(
imageVector = Icons.Default.Home,
contentDescription = "home",
tint = Color(0xFF0F9D58)
)
Text(text = "Home", color = Color.Black)
}
}
|
SearchScreen:
Kotlin
@Composable
fun SearchScreen() {
Column(
modifier = Modifier
.fillMaxSize()
.background(Color.White),
horizontalAlignment = Alignment.CenterHorizontally,
verticalArrangement = Arrangement.Center
) {
Icon(
imageVector = Icons.Default.Search,
contentDescription = "search",
tint = Color(0xFF0F9D58)
)
Text(text = "Search", color = Color.Black)
}
}
|
ProfileScreen:
Kotlin
@Composable
fun ProfileScreen() {
Column(
modifier = Modifier
.fillMaxSize()
.background(Color.White),
horizontalAlignment = Alignment.CenterHorizontally,
verticalArrangement = Arrangement.Center
) {
Icon(
imageVector = Icons.Default.Person,
contentDescription = "Profile",
tint = Color(0xFF0F9D58)
)
Text(text = "Profile", color = Color.Black)
}
}
|
Step 4: Create Bottom nav items
Let’s create a data class to hold data related to bottom nav items like label, icon, route. Open models/BottomNavItem.kt and add the following code.
Kotlin
import androidx.compose.ui.graphics.vector.ImageVector
data class BottomNavItem(
val label: String,
val icon: ImageVector,
val route:String,
)
|
And create some bottom nav items, open Utils/Constants.kt, and a list of three nav items.
Kotlin
object Constants {
val BottomNavItems = listOf(
BottomNavItem(
label = "Home",
icon = Icons.Filled.Home,
route = "home"
),
BottomNavItem(
label = "Search",
icon = Icons.Filled.Search,
route = "search"
),
BottomNavItem(
label = "Profile",
icon = Icons.Filled.Person,
route = "profile"
)
)
}
|
Step 5: Working with the MainActivity and Navigation Components
Create a function with the name NavHostContainer in MainActivity.kt which will contain NavHost and the Composable for navigation. Refer to the comments in the code for a better understanding
Kotlin
@Composable
fun NavHostContainer(
navController: NavHostController,
padding: PaddingValues
) {
NavHost(
navController = navController,
startDestination = "home",
modifier = Modifier.padding(paddingValues = padding),
builder = {
composable("home") {
HomeScreen()
}
composable("search") {
SearchScreen()
}
composable("profile") {
ProfileScreen()
}
})
}
|
Step 6: Adding Bottom Navigation
Refer to comments for better understanding.
Kotlin
@Composable
fun BottomNavigationBar(navController: NavHostController) {
BottomNavigation(
backgroundColor = Color(0xFF0F9D58)) {
val navBackStackEntry by navController.currentBackStackEntryAsState()
val currentRoute = navBackStackEntry?.destination?.route
Constants.BottomNavItems.forEach { navItem ->
BottomNavigationItem(
selected = currentRoute == navItem.route,
onClick = {
navController.navigate(navItem.route)
},
icon = {
Icon(imageVector = navItem.icon, contentDescription = navItem.label)
},
label = {
Text(text = navItem.label)
},
alwaysShowLabel = false
)
}
}
}
|
Step 7: Putting everything together in Scaffold
Now we need to put everything in the scaffold in setContent on MainActivity class
Kotlin
class MainActivity : ComponentActivity() {
override fun onCreate(savedInstanceState: Bundle?) {
super.onCreate(savedInstanceState)
setContent {
BottomNavigationTheme {
val navController = rememberNavController()
Surface(color = Color.White) {
Scaffold(
bottomBar = {
BottomNavigationBar(navController = navController)
}, content = { padding ->
NavHostContainer(navController = navController, padding = padding)
}
)
}
}
}
}
}
|
Output:
Project Link: Click Here
Share your thoughts in the comments
Please Login to comment...