How to Deploy Node.js Application in Kubernetes?
Last Updated :
17 Apr, 2024
Deploying the Node.js application on Kubernetes in a containerized manner makes it highly scalable, and fault-tolerant, and allows zero downtime. Kubernetes allows container orchestration that can be used in many ways during deployment. Load balancing is provided, which helps with automatic load transfer to multiple pods. So getting all these benefits from Kubernetes lets us understand how we can deploy Node.js applications to Kubernetes.
Primary Terminologies
- Kubernetes: It is a container orchestration tool that provides features such as scalability, zero downtime, fault tolerance, and manageability.
- Deployment: It refers to the deployed application in Kubernetes.
- Service: It exposes deployment to outside users instead of the cluster.
Deploying The Node.js Application in Kubernetes
Step 1: Create and push the Docker image of the Node.js application
FROM node:20-alpine
RUN mkdir -p /home/app
WORKDIR /home/app
COPY /package.json /package-lock.json .
RUN npm install
COPY / .
EXPOSE 3000
CMD ["npm","start"]
- Save the file with the name as Dockerfile. Now lets build the docker image using below command.
docker build -t node-hello-world .
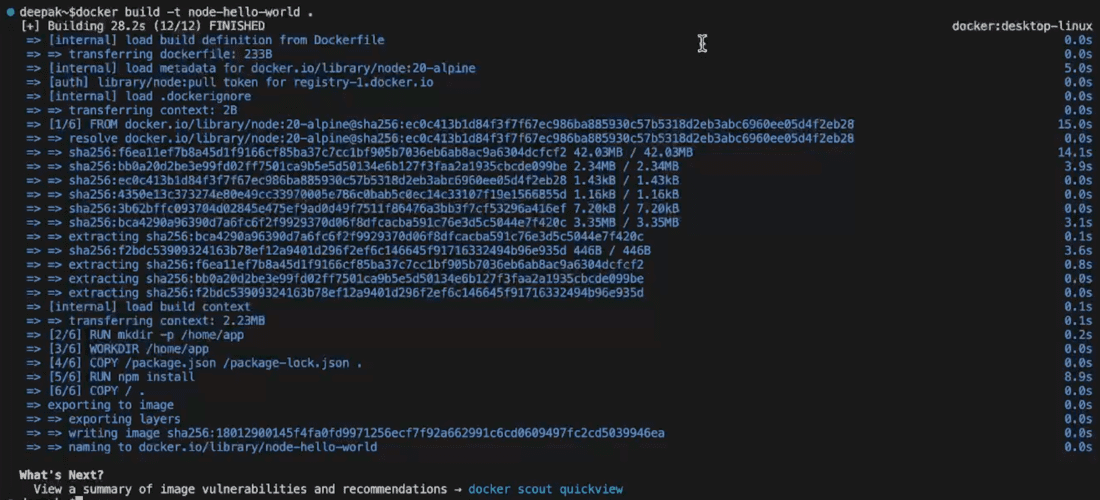
- Here -t option specifies tag of the image. Once the image is ready push it to the docker repository.
- First create a repository in dockerhub after login.

- Run the below command to change the tag of image according to your docker repository.
docker tag [OLD IMAGE NAME] [YOUR_USERNAME/REPOSITORY_NAME:TAG]

- After changing the tag push the image to repository using below command.
docker push IMAGE_NAME:TAG
.png)
Step 2: Create YAML Configuration File for Kubernetes Deployment
- Lets create configuration for kubernetes deployment. Create a YAML file in your project folder with the name as you want.
- First add apiVersion and metadata to the file. Specify the kind of deployment. Here It will be Deployment.
apiVersion: v1
kind: Service
metadata:
  name: nodehelloworld
- Now specify other specifications of the deployment. Selector will select all pods with matching app name. Template specifies labels for the deployment. Replicas determines number of replicas that will be created.
spec:
  replicas: 1
  selector:
    matchLabels:
      app: nodehelloworld
  template:
    metadata:
      labels:
        app: nodehelloworld
- Finally specify the configuration of the container. Specify image name that is pushed earlier and port number of Node.JS application.
spec:
      containers:
        - name: nodehelloworld
          image: deepcodr/node-hello-world:latest
          ports:
            - containerPort: 3000
          imagePullPolicy: Always
- The entire deployment configuration will look like below.
apiVersion: apps/v1
kind: Deployment
metadata:
  name: nodehelloworld
spec:
  replicas: 1
  selector:
    matchLabels:
      app: nodehelloworld
  template:
    metadata:
      labels:
        app: nodehelloworld
    spec:
      containers:
        - name: nodehelloworld
          image: deepcodr/node-hello-world:latest
          ports:
            - containerPort: 3000
          imagePullPolicy: Always
Step 3: Add Service Configuration to the File
- Now lets add Service configuration to the file. Above the deployment configuration add service configuration as below.
apiVersion: v1
kind: Service
metadata:
  name: nodehelloworld
spec:
  selector:
    app: nodehelloworld
  type: LoadBalancer
  ports:
    - port: 3000
      targetPort: 3000
---
- The specification provided makes the type of service as LoadBalancer. The port specify port on which service will listen on. Targetport specifies port to which traffic is forwarded.
- Other options are similar to that of deployment. Save the file and move to next.
Step 4: Apply the Deployment
- Open terminal where YAML file is present and apply the configuration using below command.
kubectl apply -f filename
- You should see similar response as below.

- Run below command to view the services and external IPS.
kubectl get services
- Copy the IP address and curl it with the application endpoint that you have created. You should get the desired response back.

Conclusion
Thus we have successfully deployed NodeJs application on Kubernetes. This has created pod and service for the application which can run with all features of kubernetes. We can use other kubernetes options to manage pods and update the application as required.
Deploy Node.js Application in Kubernetes – FAQs
What Kubernetes Resources Are Required To Deploy a Node.js Application?
The main Kubernetes resources needed to deploy a Node.js application include Deployment, Service, and optionally Ingress or LoadBalancer depending on your networking requirements.
How Do I Containerize My Node.js Application For Kubernetes?
Containerizing your Node.js application involves creating a Docker image that contains your application code, dependencies, and runtime environment. You then push this image to a container registry like Docker Hub or a private registry.
Can Kubernetes Auto-Scale My Node.js Application Based On Traffic?
Yes, Kubernetes supports horizontal autoscaling, which automatically adjusts the number of replicas (Pods) in a Deployment based on CPU utilization or custom metrics, allowing your Node.js application to scale up or down as needed.
How do I Expose My Node.js Application to External Traffic in Kubernetes?
You can expose your Node.js application to external traffic in Kubernetes using a Service of type LoadBalancer or Ingress. LoadBalancer provisions an external load balancer, while Ingress provides a more flexible way to manage external access and routing.
What Tools Can I Use to Manage Kubernetes Clusters and Deployments?
Tools like kubectl (Kubernetes command-line tool), Helm (package manager for Kubernetes), and Kubernetes dashboard (web-based UI) are commonly used to manage Kubernetes clusters and deployments.
Share your thoughts in the comments
Please Login to comment...