Explain difference between Route and Router in Ember.js
Last Updated :
07 Feb, 2023
Ember.js is a JavaScript framework for building web applications. It is designed to be simple and flexible, with a focus on providing a solid foundation for building complex and scalable applications. One of the key features of Ember.js is its support for the Model-View-ViewModel (MVVM) architecture, which separates the data model, the user interface, and the logic that binds them together. This makes it easier to develop and maintain large and complex applications.
To install and getting started with Ember.js
Route: In Ember.js, a Route is a specific location within an application, identified by a URL, that is associated with a template and a controller. It represents a state of the application and determines what content to display to the user based on the current URL. Routes are a crucial part of Ember.js applications, as they allow us to create and manage the URLs and templates of the application, and provide a way to navigate between different parts of the application.
Example: Ember.js application with a Route and a Controller that manages a list of objects, each representing a fruit with the properties name, isFruit, and color. The Route creates an array of these objects and sets it as the model for the Controller. The template displays the list of fruits in a table, and includes two buttons:
A “Print Attribute’s value” button that, when clicked, displays an alert showing the values of a specified attribute for all fruits in the list. A “Flip List” button that, when clicked, reverses the order of the fruits in the list.
Type the following command to generate the route for the above example:
ember generate route setupController1
app/routes/setupController1.js
Javascript
import Route from '@ember/routing/route';
import EmberObject from '@ember/object';
export default class FruitsRoute extends Route {
fruits = [
EmberObject.create({
name: 'Lady Finger',
isFruit: false,
color: 'green',
}),
EmberObject.create({
name: 'Brinjal',
isFruit: false,
color: 'purple',
}),
EmberObject.create({
name: 'Apple',
isFruit: true,
color: 'red',
}),
EmberObject.create({
name: 'Grapes',
isFruit: true,
color: 'green',
}),
EmberObject.create({
name: 'Mango',
isFruit: true,
color: 'yellow',
}),
EmberObject.create({
name: 'Watermelon',
isFruit: true,
color: 'red',
}),
EmberObject.create({
name: 'Orange',
isFruit: true,
color: 'orange',
}),
];
item2;
item3;
model() {
this.set('[]', this.fruits);
return this;
}
setupController(controller, model) {
super.setupController(controller, model);
controller.set('fruits', this.fruits);
}
}
|
app/controllers/setupController1.js
Javascript
import Ember from 'ember';
import { addObject, isAny, isEvery } from '@ember/array';
import EmberObject from '@ember/object';
export default Ember.Controller.extend({
actions: {
insertItem(data) {
let temp2 = '';
this.fruits.forEach(
(item) => (temp2 +=
item.getProperties(data)[data] + '\n')
);
alert(temp2);
},
flip() {
let data = this.fruits.reverseObjects();
this.fruits.forEach((item, idx) =>
item.setProperties(temp2.at(idx)));
},
},
});
|
app/templates/setupController1.hbs
Javascript
{{page-title "setupController"}}
<h3>Fruit's Lists :</h3>
<table>
<tr>
<th>name</th>
<th>isFruit</th>
<th>color</th>
</tr>
{{#each this.fruits as |detail|}}
<tr>
<td>{{detail.name}}</td>
<td>{{detail.isFruit}}</td>
<td>{{detail.color}}</td>
</tr>
{{/each}}
</table>
<br />
<div>
<label>Enter Attribute: </label>
{{input value=this.item3}}
</div><br />
<div>
<input
type="button"
id="print-item"
value="Print Attribute's value"
{{action "insertItem" this.item3}}
/>
</div>
<br />
<div>
<input type="button" id="flip-student"
value="Flip List" {{action "flip"}} />
</div>
{{outlet}}
|
Output:

Router: In Ember.js, a Router is a mechanism that maps URLs to routes in an application. It is responsible for handling the transition between routes and updating the URL to reflect the current route. The Router is defined in the application’s router.js file, and is responsible for defining the routes and their corresponding URLs in the application. The Router is an important component of Ember.js applications, as it allows developers to create and manage the URLs and templates of the application, and provides a way to navigate between different parts of the application.
Example: Ember.js application with three routers: home, about, and contact. The home route is the root route of the application and is accessible at the URL /. The about and contact routes are accessible at the URLs /about and /contact respectively. Now our task is to create templates and styles for each of these routes and ensure that the application displays the correct content and navigation when each route is accessed.
Step 1: To create a new application just put the below command in your terminal or command prompt:
ember new ember_routes_gfg
Step 2: Now, To create a new route home, enter the following command.
ember generate route home
We want the home page to be our root page for this example. So go to app\router.js and change the path to as follows inside the Router.map().
app\router.js
Javascript
import EmberRouter from '@ember/routing/router';
import config from 'ember-routes-gfg/config/environment';
export default class Router extends EmberRouter {
location = config.locationType;
rootURL = config.rootURL;
}
Router.map(function () {
this.route('home', { path: '/' });
});
|
Step 3: Now let us create two more web pages for about and contact.
ember generate route about
ember generate route contact
app\templates\application.hbs
HTML
<div class="container">
{{page-title "EmberRoutesGfg"}}
<h1 id="title">GeeksforGeeks Ember Router Tutorial</h1>
<nav class="navbar">
<LinkTo @route="home" class="nav">Home</LinkTo>
<LinkTo @route="about" class="nav">About</LinkTo>
<LinkTo @route="contact" class="nav">Contact</LinkTo>
</nav>
{{outlet}}
</div>
|
app\styles\app.css
CSS
.navbar {
display: inline;
}
.navbar .nav {
text-decoration: none;
font-size: 32px;
padding: 1rem;
font-weight: 600;
background-color: rgb(57, 248, 57);
transition-duration: 0.5s;
border-radius: 10px;
}
.navbar .nav:hover {
background-color: rgb(34, 158, 34);
}
.container {
margin: 1rem;
}
#title {
text-align: center;
}
|
Step 4: Now let us code the Home page, contact page and about page.
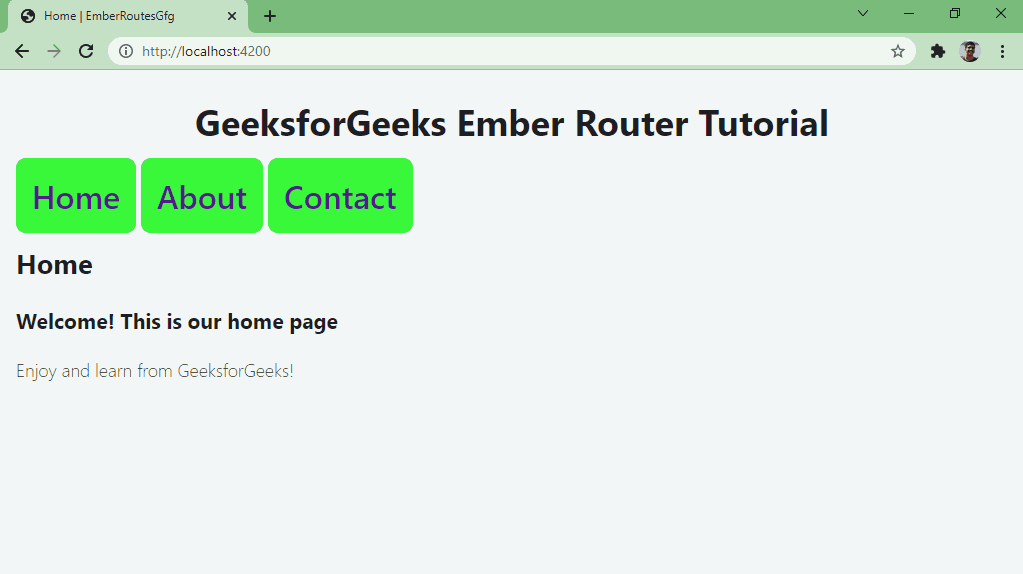
app\templates\home.hbs
HTML
{{page-title "Home"}}
<h2>Home</h2>
<h3>Welcome! This is our home page</h3>
<p>Enjoy and learn from GeeksforGeeks!</p>
|
app\templates\contact.hbs
HTML
{{page-title "Contact"}}
<h2>Contact</h2>
<h3>This is the contact page</h3>
|
app\templates\about.hbs
HTML
{{page-title "About"}}
<h2>About</h2>
<h3>Moto</h3>
<p>GeeksforGeeks is made for learning together
and share knowledge
</p>
<h3>What we provide?</h3>
<p>We provide lots of tutorials related to Data
structures and Algorithms,Web development and
App development, machine learning etc.
</p>
|
Output:
Difference between Route and Router:
|
Routes
|
Routers
|
| Definition |
A specific location within an application, identified by a URL |
A mechanism that maps URLs to routes in an application |
| Associated with |
A template and a controller |
not associated with any specific templates or controllers |
| Purpose |
Determine what content to display to the user based on the current URL |
Map URLs to routes and handle transitions between routes |
| Example |
this.route(‘blog-post’, { path: ‘/blog/:blog_post_id’ }); |
App.Router.map(function() { this.route(‘home’); … }); |
In summary, Routes are responsible for defining the state of the application and determining what content to display, while Routers are responsible for mapping URLs to routes and handling transitions between routes.
Share your thoughts in the comments
Please Login to comment...