Force Sensitive Resistor ( FSR ) with Arduino
Last Updated :
30 Apr, 2024
In this article, we will learn about Force sensors and the measurement of force sensors using Arduino.
Arduino is an open-source electronics platform. It consists ATmega328P 8-bit Microcontroller. It can be able to read inputs from different sensors & we can send instructions to the microcontroller in the Arduino. It provides Arduino IDE to write code & connect the hardware devices like Arduino boards & sensors.
Force Sensitive Resistor ( FSR):
Force Sensitive Resistor is a transducer that converts mechanical forces like weight, tension, pressure, and compression into an electrical signal. It is widely used in weight measurement. As the force applied to the sensor increases, the resistance of the sensor decreases.
Components Required:
- Arduino Uno R3
- Force sensor
- 5 x LEDs
- 10K resistor
- 100 Ohms resistor
- Jumper wire
Circuit diagram:
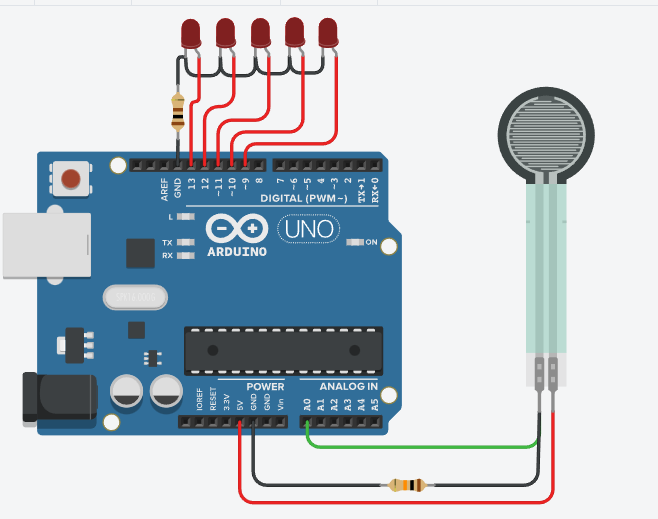
Force Sensor with Arduino circuit
Setup:
- Connect 5V of Arduino to one terminal of the FSR sensor.
- Connect another terminal of the FSR sensor to the Arduino Analog pin directly GND pin with a 10K resistor.
- Connect Level 1 LED to Digital Pin 13.
- Connect Level 2 LED to Digital Pin 12.
- Connect Level 3 LED to Digital Pin 11.
- Connect Level 4 LED to Digital Pin 10.
- Connect Level 5 LED to Digital Pin 9.
- Connect the negative terminal of all the LEDs to the GND pin with a Resistance of 100 Ohm.
- Upload the code to Arduino Uno Board using Arduino IDE.
- Set the Serial monitor to a 9600 baud rate.
Analog to Digital conversion:
Analog Read output = (Input Voltage / 5 ) * 1024
Level indication:
| Level | Analog value range |
| 1 | 0 to 200 |
| 2 | 200 to 400 |
| 3 | 400 to 600 |
| 4 | 600 to 800 |
| 5 | 800 to 1023 |
Arduino code:
C++
void setup() {
  // Set the serial monitor baudrate to 9600
  Serial.begin(9600);

  // Output LED Level 1
  pinMode(13,OUTPUT);
  // Output LED Level 2
  pinMode(12,OUTPUT);
  // Output LED Level 3
  pinMode(11,OUTPUT);
  // Output LED Level 4
  pinMode(10,OUTPUT);
  // Output LED Level 5
  pinMode(9,OUTPUT);

}

void loop() {

  // Variable to store ADC value ( 0 to 1023 )
  int level;
  // analogRead function returns the integer 10 bit integer (0 to 1023)
  level = analogRead(0);

  // Print "Analog value:" in serial monitor
  Serial.println("Analog value:");
  // Print output voltage in serial monitor
  Serial.println(level);

  // Turn off all the led initially
  digitalWrite(13,LOW);
  digitalWrite(12,LOW);
  digitalWrite(11,LOW);
  digitalWrite(10,LOW);
  digitalWrite(9,LOW);


    // Splitting 1023 into 5 level => 200, 400, 600, 800, 1023
    // Based on the ADC output, LED indicates the level (1 to 5)

  if (level<200)
  {
    // LEVEL 1 LED
    digitalWrite(13,HIGH);
  }
  else if(level<400)
  {
    // LEVEL 2 LED
    digitalWrite(12,HIGH);
  }
  else if(level<600)
  {
    // LEVEL 3 LED
    digitalWrite(11,HIGH);
  }
  else if(level<800)
  {
    // LEVEL 4 LED
    digitalWrite(10,HIGH);
  }
  else if(level<1023)
  {
    // LEVEL 5 LED
    digitalWrite(9,HIGH);
  }

}
Output:
Applications:
- Weight measurement
- Pressure measurement
Share your thoughts in the comments
Please Login to comment...