Designing a website for a UX designer or developer is not an easy task if they don’t get a clear idea of the entire layout and functionality of the system. While building software, clients can make requests regularly to change things here and there on web pages and this can be frustrating for any developer or a designer.
How these issues are resolved in big companies?
The answer is Wireframing

In big companies, most of the developers and designers follow the concept of wireframing. Wireframing gives you an idea of the overall structure of the web pages and how navigation will flow in these pages for a user to perform a specific task. Where does a certain component or element need to be positioned? Where the images, videos, navigation bar, buttons, and other elements need to be placed. You can also call it a skeleton of the website.
In big companies, firstly developers create a wireframe before they move to the actual coding part. Wireframing not just saves a lot of time and money but also clears out all the designing-related confusion between the UX designers and stakeholders. The main goal of wireframing is how you plan the workflow of your website to be.
Wireframing works like a living piece of documentation for UX designers/developers and stakeholders. If the concept of Wireframing is new for you then read the blog Wireframe in UX Design: Benefits, Types, and Methods to Create it to understand the basic concepts.
In this blog, we will take an example of a website, and we will learn to create a wireframe for this website. Before that read the blog 5 Simple Steps to Create Wireframe in Software Design to understand some basic steps of creating a wireframe.
Getting bored with the theoretical concepts???
Let’s dive into some practical details and understand the step-by-step process to create a wireframe.
You don’t have to be a graphics designer to create a wireframe. You can easily create it using a pen and paper or using some online tools.
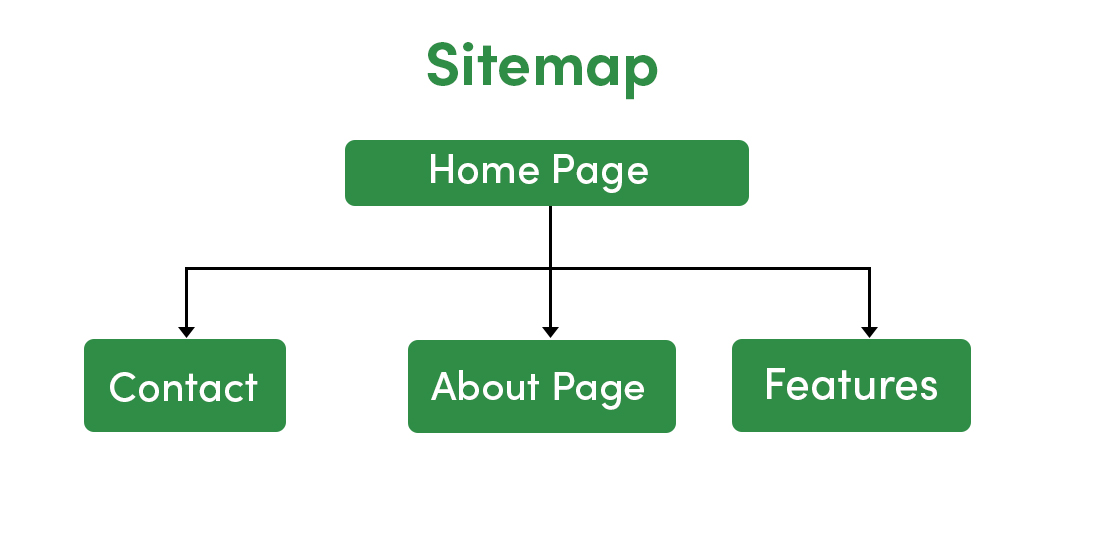
Step 1: Planning For Sitemap
Start creating your wireframe with sitemap planning. A sitemap gives the direction to your entire website so that you know which pages you’re going to build and how they will be connected. Start with the home page which is the most common page for every sitemap or website. Every other page flows out of the home page so you should always start creating a wireframe from here.
Apart from the home page a sitemap contains some other pages such as About Us, Features, Contact Us, etc. These pages are the core of your website and it is represented as the main screen of your website that you want to route to. These pages have sub-pages under them as well. A sitemap gives you the basic layout of the website. Where the main items need to exist, and how these items need to be linked with each other.
Small sites don’t need a sitemap because they usually have a single landing page. But when you start building a small site then later it can become larger and a complex one, once you start implementing the other pages or features in it.
Let’s say on our website there are three pages Home Page, Features Page, and Contact Us page. Now to showcase this in a sitemap. Just add a few boxes and name them to show the pages, lines underneath to show sub-pages, and you’re done with the first step. You don’t need to spend too much time on it.
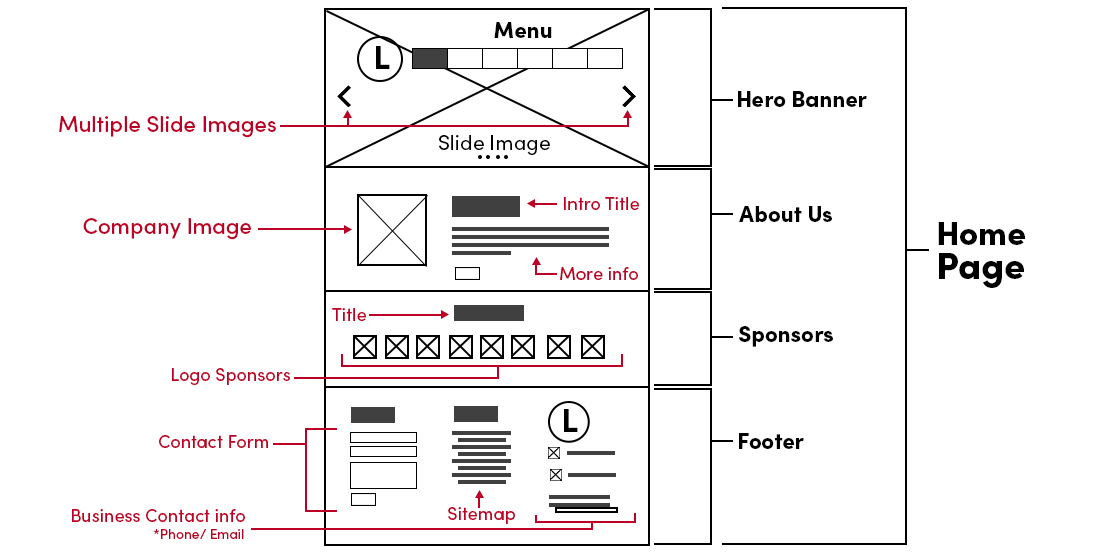
Step 2: Create Homepage Wireframe
Once you’re done with creating a sitemap, move to the very first page i.e. homepage. There will be two most important parts of the home page. One is the header with its navigation and menu and the other one is the footer. Both of the things will exist on most of the other pages.
Create a layout for the homepage. If you want to choose bootstrap (or some other framework) in designing then you need to divide the 12 columns into sections to create a layout and to place the item in it.
You can also choose your own layout. On the home page, we will represent the slider image, logo, and the main menu. Represent each item with some specific shape or simple graphics.
- Create a circle with the text ‘L’ in it to represent the logo.
- For the menu, draw several boxes in a big rectangle box with some shade in it to represent the current page (This will be different for other section like about us, contact us, or features. For now, the home page section will be shaded)
- Represent the hero image with one big rectangle box and two cross diagonal lines in it. The hero image runs behind the front of the website as well as near the header. Draw a left and right arrow at the left and right corner of the box to represent the sliding of an image.
- To represent a call to action you can draw a rectangle with a cross through it.
- To represent some information or the paragraph you can use multiple horizontal lines one below each other.
- If you want to represent the images in the other section of the home page then again create a box with two diagonal lines in it, crossing each other.
- You can add some more sections on the home page such as testimonials or sponsors (It totally depends on you, what information you want to represent on the home page). You can draw several boxes to represent them. Again you can divide these boxes using the bootstrap grid layout.
- Finish up the home page with the footer section. Include common elements such as logo, contact form, contact info, social media links, and the other pages that you want to represent.
- Label each section in your wireframe to represent what it is.
Note: We will copy and paste the layout of a few sections such as header, footer, logo, and menu to include in other pages such as features, contact us, etc. This way you can create the other pages easily and quickly. If you’re doing it digitally using some online tools such as Figma or Adobe XD then create the asset components and reuse them throughout your design. These tools can also help you with updating the parts dynamically, in case, you make the changes in the root component. If you’re using pen and paper then you can do it manually.
Step 3: Use Markup in Your Wireframe (This is applicable for all pages)
Once you’re done with creating a layout of the page, move to the next step and markup each item in the sections of your page to represent what it is. Your wireframe will be viewed by many designers, developers, and clients. They won’t understand anything if you won’t markup the elements in it, especially your client if he/she is not aware of the technical things.
You can do this at the end when you’re done with creating the layout of the pages. Select a color such as red and start marking up the content on your page such as contact forms, titles, contact info, images, features, logo sponsors, copyright, etc.
You don’t have to explain in detail that what each section is doing or what the item will eventually be. Just represent what it is. So instead of using the label “Example of contact form” use the label “contact form”.
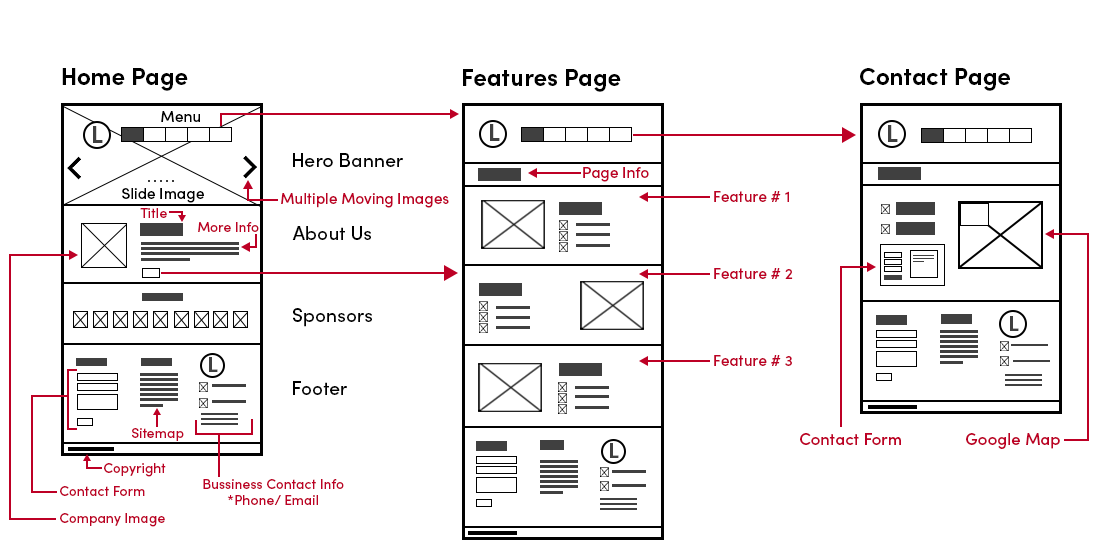
Step 4: Create Features and Contact Page
Features and contact page will have a slightly different layout than the home page. Features page will promote your product or the services of your website. On this page, we will include a call to action, photos, and texts to represent different products/features. This will help in engaging the customers. On the contact page, we will represent phone number, email address, address, and a contact form.
Features Page
- Copy the header section from the homepage but don’t include the large image slider.
- Create a rectangle box and overshadow it to represent the page title.
- Below the page title, create three to four sections to represent the product and service.
- In each section, create a large box with two cross diagonal lines in it to represent the image of the product. Just next to the box, add some horizontal lines and a small box to give a title and description of the product.
- In other sections do the same thing we have mentioned in point number 4 but to make it more interesting, place the product image and its description on the opposite side.
- Copy the footer section from the home page and add this to the bottom of the page.
- Markup each feature and page title with red text on this page.
Contact Page
- Copy the header section from the homepage but don’t include the large image slider.
- Create a rectangle box and overshadow it to represent the page title.
- Below the page, the title creates a section, and on the right-hand side of it, create a large box with two cross diagonal lines. This will represent the Google map (for address).
- Create a small icon and a small rectangle box to represent the phone number and email address.
- For the contact form create a box next to the Google map (left side) and include some small boxes in it with different shapes and sizes.
- Copy the footer section from the home page and add this to the bottom of the page.
- Markup each element with red text on this page.
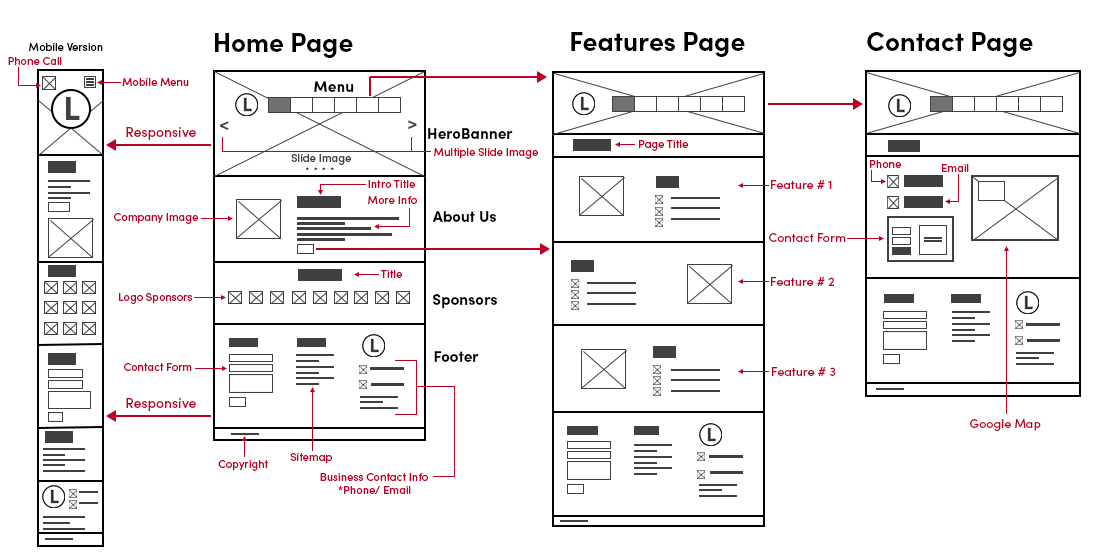
Step 5: Create A Responsive Wireframe
Today a lot of websites are viewed on mobile devices. So it’s good to create a wireframe for the mobile or tablet version. You need to understand how the designs adapt when you develop the application for smaller screen sizes.
We will have slightly different elements in the responsive wireframe. The desktop version will have more width but in the mobile version we will reduce the width, and we will increase the height. Let’s take the example of a home page section by section to create the responsive wireframe for it.
- Most of the rows and columns will be collapsed. The size of the images, texts, and blocks will be reduced.
- Create a section on the top and include the logo in the middle of the screen. Create a little square in the background to represent the slider image.
- Below the logo, create various sections for about us, sponsors, and footer. Rearrange the elements in each section. All the elements will be represented in smaller sizes.
- Markup each element with red text on this page.
Note: Some sections will have the same amount of height as their respective desktop versions. But if a section will have lots of images then it will have much more scroll height.
Conclusion
If you’re a developer or a designer then we highly recommend you to create a wireframe for your application before you jump into the coding part. You will get better ideas and visualization for your application. This will help you in solving a lot of queries and issues of your client at the earlier stage of the development.
Share your thoughts in the comments
Please Login to comment...