How to Optimize Jupyter Notebook Performance ?
Last Updated :
25 Sep, 2023
Introduction
Jupiter Notebook is one of the best (if not the best) online applications/environments which is used heavily to do tasks related to Data Analysis, Data Science, Machine Learning, Deep Learning, etc. in Python. Jupyter Notebook doesn’t need to be installed locally, it can be run entirely in online mode. The sections in which the code is written and executed are known as “Notebooks”, Jupyter is a client-server application that uses those notebooks and its interpreter to interpret the codes.
It also supports other text elements like Paragraphs, Headings, Equations, etc. Several ways can be used to optimize the performance of the Jupyter Notebook, we will put light on them one by one.
Although Jupyter Notebook is very helpful for anyone who doesn’t want to install any third-party application on their device, it sometimes suffers from an optimization problem. It becomes unresponsive, laggy, or sometimes the kernel doesn’t work properly, etc. To decrease this kind of problems and make the Jupyter run smoothly, in this article, we will see some basic optimization tricks to optimize our Jupyter notebook and reduce the problems.
Why does the Jupyter Notebook slow down suddenly?
There are several reasons why Jupyter Notebooks usually slows down suddenly –
- Excessive Computational Load – This situation arises when the user is working with a very large dataset or accidentally starts an infinite loop, it will put a lot of computational load on the internal memory and CPU of the Jupyter notebook, which eventually makes it slow.
- Huge Output – Sometimes, by mistake or to display some particular portion of a huge dataset, users mistakenly print the entire dataset, if the dataset is huge then it will take a lot of time to get printed and also require a lot of power which can cause the Jupyter Notebook to slow down.
- Kernel Problems – As Jupyter Notebook uses a separate kernel to execute the code, so if that Kernel has any issue or faces any issue then the execution will stop and the Notebook will become unresponsive.
Jupyter notebook extensions
There are some Jupyter Notebook extensions which can be also used optimize the Notebook, some of them are explained below –
- Spell Checker – Spell Checker is an extension which is handy for the users because it alerts the users’ about any typo or spelling mistake and their code or any text written in the cell. The kernel may face some issue if there is an unrecognized thing written there, that eventually leads to Kernel failure and unresponsive Notebook.
- Debugger – Debugger is one of the must have Jupyter Notebook extension which is helpful to debug the written code, if it throws any unnecessary error.
- NBextensions – NBextensions is a plethora of packages group together under a same umbrella, user can install only the NBextensions package and after that enable those subextensions the user want, some of the useful NBextensions are mentioned below –
- Hinterland – It provides an auto-complete feature for the codes written in the cell of Jupyter Notebook.
- Snippets – This menu-like extension generates random demo codes for libraries like Matplotlib, Pandas, SciPY etc. demonstrating some of their main features like a sample code to print a line plot, histogram etc.
- Table of Contents – This one is very useful. this extension generates a Table of Contents, from the Markdown cells defined by the user. So that it becomes easy to find something based on their heading/markdown.
Optimizing Environment
Updating Jupyter and Dependencies
Sometimes, the root of the problem relies on the Jupyter notebook or the installed dependencies itself, not on the Kernel or any other hardware or software.
So it is recommended to keep updating the dependencies and also the Jupyter Environment (if someone is using third-party applications like Anaconda to access Jupyter Notebook). Based on how the dependencies were installed (either via conda or pip), they can be updated using the same commands. Updated dependencies helps in reducing the problems which might have occurred in past in it’s previous versions, sometimes it also happens that the newest version of a certain dependency is more optimized than it’s predecessor.
Jupyter Notebook Short Cuts –
Shortcuts are one of the best ways to speed up the execution process of the code, Also it is useful to create new notebooks, new tabs, and new blocks faster. Jupyter Notebook comes with 2 modes – Edit and Some shortcuts work in edit mode, some shortcuts that work in command mode, and some work in both.
Common Shortcuts that work in both Edit and Command mode –
Following are the common shortcuts that are available or works in both the mode –
- CTRL+ENTER – This shortcut is used to execute all the selecteblocks/cellsls of the Jupyter Notebook. Remember, if no block is selected then it will not run, user has to manually select the blocks they want to execute simultaneously or use the shortcut to select the desired cells.
- CTRL+S – This is a very common shortcut, this is used to save the notebook.
- SHIFT+ENTER – This is used to execute the current selected cell / block and then move into the next block, but it doesn’t execute the next one
Shortcuts used in Edit Mode –
By default, any Jupyter Note book is in Edit mode, but if someone is working in Command mode and they want to switch to Edit mode they need to simply press ENTER once to come back into edit mode. The shortcuts available in edit mode are as follows. Note : None of these work in the Command mode.
- Tab – Tab is used to show the code completion suggestions, but it only works when we try it after completing a certain line of code or in anywhere in the code except the start. If we use tab in a blank area or in front of the code then it will act as normal Tab i.e shift the code by four blank spaces.
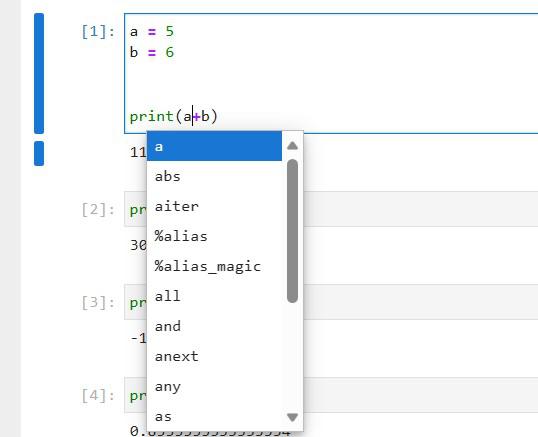
In the above image we can see that it is showing suggestions after pressing tab after the variable ‘a’, it will show the suggestions if we have done it after the closing braces, but if we press tab before “p” then it will shift the code by 4 blank spaces.

- CTRL+] – This is used to Indent the code. This is the alternate of Tab, because as Tab shows suggestions if pressed in between the code or at the end of the code, this one works everywhere, whether is it in middle of the code, end of the code or at front of the code, this will indent the line or entire code (if selected).
- CTRL+[ – This is the reverse of the previous one, it is used to De-Indent the code.
- CTRL+Z – It is a very common shortcut, it is use to undo the last action.
- CTRL+Y – It is used to redo the last action.
- CTRL+A – This is also a very common shortcut , this is used to select everything, if any singular block is selected then it will select all the code present in it, if not then it selects the entire notebook i.e all the cells.
- CTRL+HOME – This is used to move the cursor to the start of the cell.
- CTRL+END – This is used to move the cursor to the end of the cell.
- CTRL+LEFT – This is used to move one variable by variable or operator by operator to the left. But if it is a function then it will entirely go infront of the function to it’s left.
- CTRL+RIGHT – This is used to move one variable by variable or operator by operator on the right. But if it is a function then it will entirely go to end of the function.
Shortcuts used in Command Mode –
If someone is Edit Mode and then wants to shift to the Command mode, they need to press ESC key. And then after entering command mode, the followings are the shortcuts available, there is no need to keep holding ESC key with any of the followings and DO NOT PRESS ENTER, it will change the mode from Command to Edit Mode.
- SHIFT+UP/DOWN ARROW KEYS – It is used to select multiple blocks / cells at once present in that Notebook. SHIFT+UP Arrow to select the cells present above the selected cell and SHIFT+DOWN Arrow to select the cells present below the selected cell.
- X – This signifies Cross , means it is used to remove cells.
- A – This is used to insert a new cell above the current selected cell.
- B – It is used to insert a new cell below the current selected cell.
- Z – This is used to undo the last deletion of the cell.
- Y – If any of the cell was in any other mode like Markdown or Raw, this shortcut is used to change it to Code.
- M – This is used to convert any cell which is in Code or Raw mode into Markdown mode.
Other ways to optimize Jupyter Notebook performance
Apart from the above approaches, there are some more approaches which is helpful to optimize the performance of Jupyter Notebook. They are mentioned below –
- Increase Memory Allocation – By default, Jupyter Notebook has a default memory limit assigned, which might not be enough for some of the tasks user might do, like handling a very large dataset, doing lot’s of calculations or plotting graphs etc. due to that limited memory limit, there can be a delay in execution, the notebook become unresponsive etc. To avoid this, manually user can increase the memory allocation limit from the jupyter_notebook_configuration_dir and then find a file called jupyter_notebook_config.py . Open the file and change the value of max_buffer_size to a certain value which will fulfill the needs of the user.
- Optimize Code – Optimizing the code by using relevant data structures is also another way to optimize the notebook performance. Using efficient Algorithms and relevant Data Structure reduces the computational time and takes less memory to execute, so there are less chance of the Notebook becomes unresponsive and high chance of it becoming optimized. If someone is using large datasets, they should use the libraries like NumPy or Pandas to manipulate the data, using the data structured provided by them, because those were made to handle data so they will work far better than of a normal list or array.
- Use Parallel Computing – There are certain libraries like multiprocessing , concurrent.futures, ipyparallel etc. to distribute the computation process into multiple CPU cores, so that all the cores become useful and the execution completes in a much faster way. As jobs get distributed, they could run concurrently, so the program could take the benefit of parallel computing and the notebook executes much faster.
- Update Libraries – As mentioned earlier, it is always recommended to keep the libraries updated to the latest version because most of the times the update comes with a performance improvement, bug fix, more optimized etc. so if the user continue to use the old versions of the libraries, chances are there that they might face some performance issue. Users can also use different third-party environments like Conda to manipulate and manage those libraries
- Use Compatible Browser – Although Jupyter Notebook supports most probably all the renowned web browsers like Google Chrome, Microsoft Edge, Firefox etc. it is still recommended to use the browsers which are well-optimized themselves and doesn’t use a large amount of memory to run, if the browser is not optimized then the Jupyter will also not work smoothly. Also make sure to keep the browser up to date.
Share your thoughts in the comments
Please Login to comment...