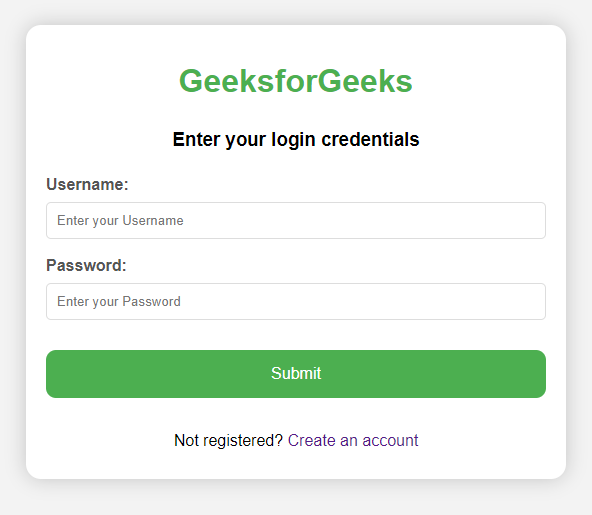
HTML Login Form
Last Updated :
07 May, 2024
HTML Login Form is a foundational element in web development. It is used to authenticate users and grant access to secure sections of a website or application. It typically includes input fields for username/email and password, along with a submit button for logging in. Additionally, there is often an option for new users to create an account or sign up.
Upon clicking the submit button, the form sends the user’s entered credentials to the server for verification. If the provided credentials are valid, the user is successfully logged in and granted access to the site’s protected content. However, if the credentials are incorrect, an error message is displayed, prompting the user to retry entering the correct information.
Overall, the HTML Login Form plays a crucial role in ensuring the security and accessibility of web applications by managing user authentication processes effectively.
This article demonstrates how to build a Responsive Login Form using HTML and CSS.
How to Create a Login Form
The following steps are required to create the login form in HTML:
1. Set up the HTML Document
Start with a basic HTML document structure:
2. Create the Form Element
- Within the <body> tag, add a <form> element.
- Set the action attribute to the URL where the form data will be sent (usually to a server-side script).
- Set the method attribute to “POST” to send the data securely.
3. Add Input Fields
- Inside the <form> element, create input fields for username and password:
- Use the <input> tag with the type attribute set to “text” for username.
- Use the <input> tag with the type attribute set to “password” for password.
- Add clear labels for each input field using the <label> tag.
4. Include a Submit Button:
- Add a submit button using the <button> tag with the type attribute set to “submit“.
- Give the button a clear label describing its action, like “Login” or “Submit“.
5. Optional: Add Additional Features:
- Include a “Remember Me” checkbox using the <input> tag with the type attribute set to “checkbox“.
- Add a link to “Forgot Password” page using the <a> tag.
- Add styling using CSS for a more appealing look.
6. Close the Form and Document:
- Close the <form> tag.
- Add the closing </body> and </html> tags to complete the document.
Example of Login Form in HTML
Implementation of a Login Form with Multiple Input Tags.
HTML
<!DOCTYPE html>
<html>

<head>
    <title>HTML Login Form</title>
    <link rel="stylesheet"
          href="style.css">
</head>

<body>
    <div class="main">
        <h1>GeeksforGeeks</h1>
        <h3>Enter your login credentials</h3>
        <form action="">
            <label for="first">
                  Username:
              </label>
            <input type="text"
                   id="first"
                   name="first"
                   placeholder="Enter your Username" required>

            <label for="password">
                  Password:
              </label>
            <input type="password"
                   id="password"
                   name="password"
                   placeholder="Enter your Password" required>

            <div class="wrap">
                <button type="submit"
                        onclick="solve()">
                    Submit
                </button>
            </div>
        </form>
        <p>Not registered?
              <a href="#"
               style="text-decoration: none;">
                Create an account
            </a>
        </p>
    </div>
</body>

</html>
/*style.css*/
body {
    display: flex;
    align-items: center;
    justify-content: center;
    font-family: sans-serif;
    line-height: 1.5;
    min-height: 100vh;
    background: #f3f3f3;
    flex-direction: column;
    margin: 0;
}

.main {
    background-color: #fff;
    border-radius: 15px;
    box-shadow: 0 0 20px rgba(0, 0, 0, 0.2);
    padding: 10px 20px;
    transition: transform 0.2s;
    width: 500px;
    text-align: center;
}

h1 {
    color: #4CAF50;
}

label {
    display: block;
    width: 100%;
    margin-top: 10px;
    margin-bottom: 5px;
    text-align: left;
    color: #555;
    font-weight: bold;
}


input {
    display: block;
    width: 100%;
    margin-bottom: 15px;
    padding: 10px;
    box-sizing: border-box;
    border: 1px solid #ddd;
    border-radius: 5px;
}

button {
    padding: 15px;
    border-radius: 10px;
    margin-top: 15px;
    margin-bottom: 15px;
    border: none;
    color: white;
    cursor: pointer;
    background-color: #4CAF50;
    width: 100%;
    font-size: 16px;
}

.wrap {
    display: flex;
    justify-content: center;
    align-items: center;
}
Output:

Share your thoughts in the comments
Please Login to comment...